Tag Archives: Le fidèLe

Celebrate the True Meaning of Christmas with Free Printable Nativity Cards & Easy Craft Tutorial for Hope & Joy Napkin Rings for Christmas Dinner

949leigh

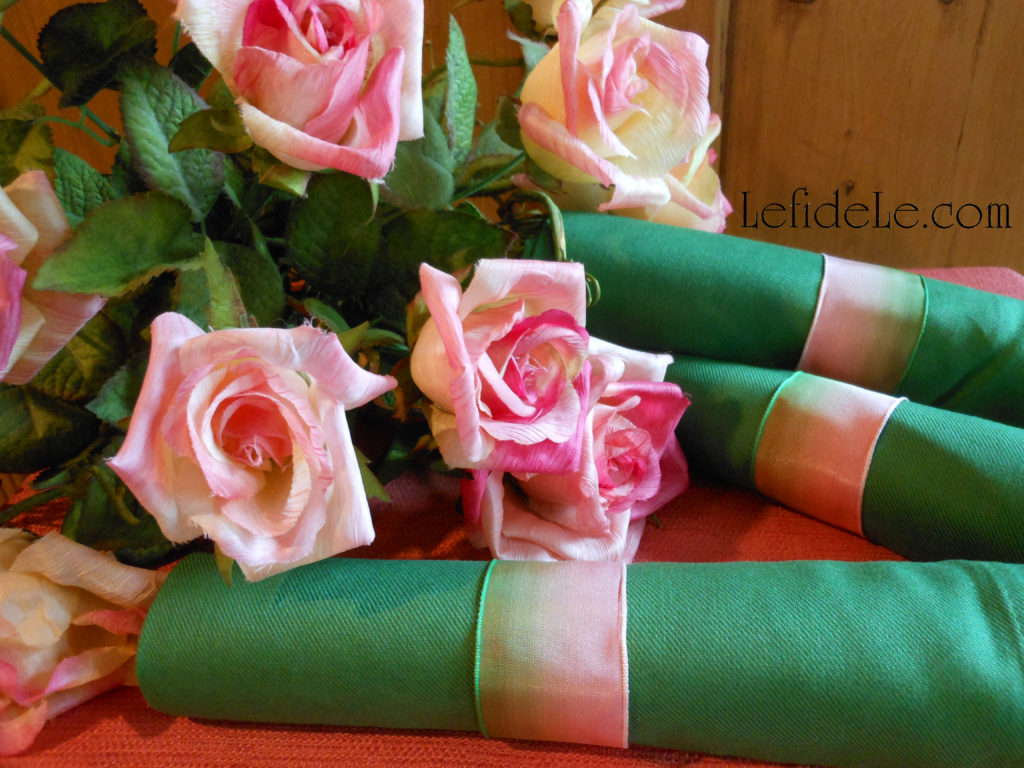
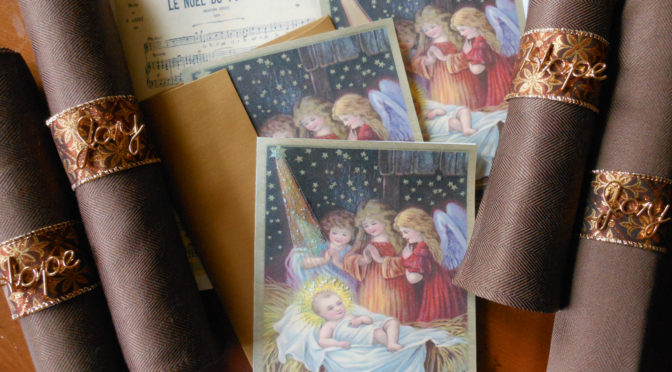
Easily craft beautiful hope and joy napkin rings for Christmas dinner with this quick tutorial, and then send free printable nativity cards that celebrate the true meaning of Christmas. In this way you may offer the message of abounding hope and joy for the Christmas season.

606leigh

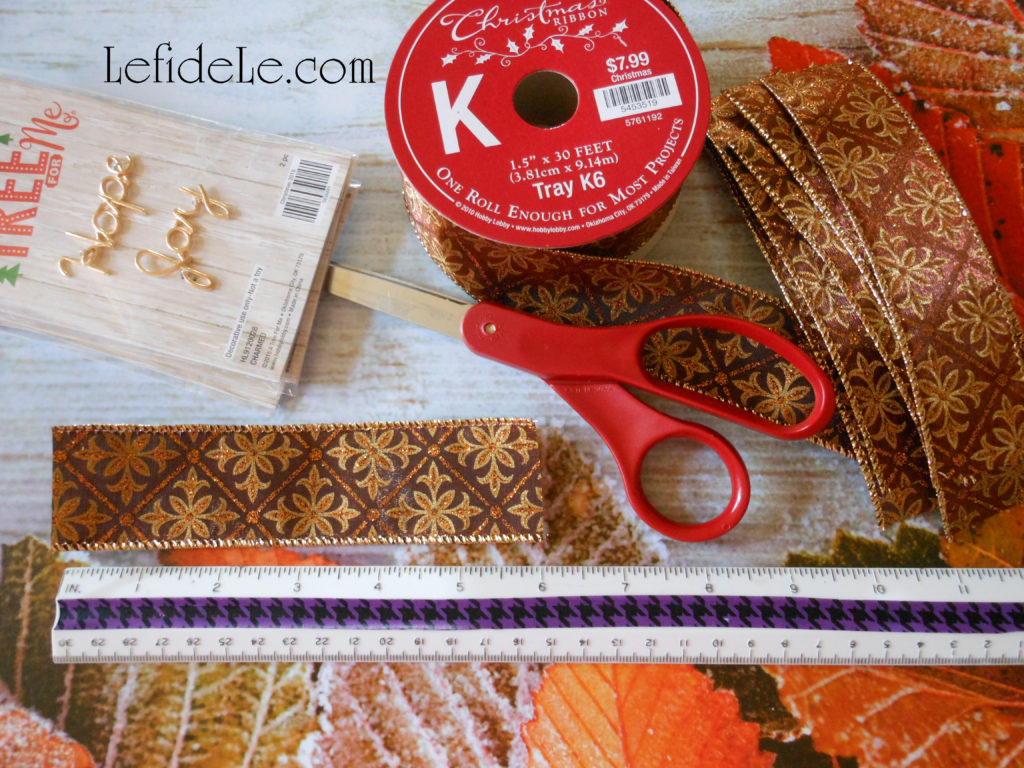
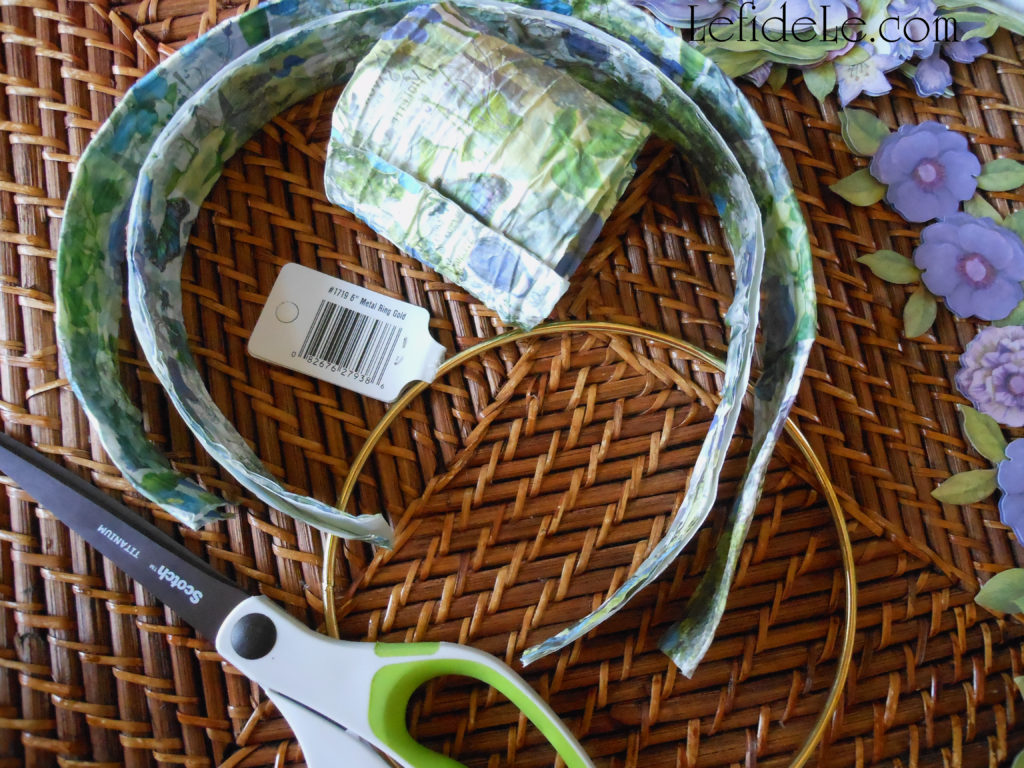
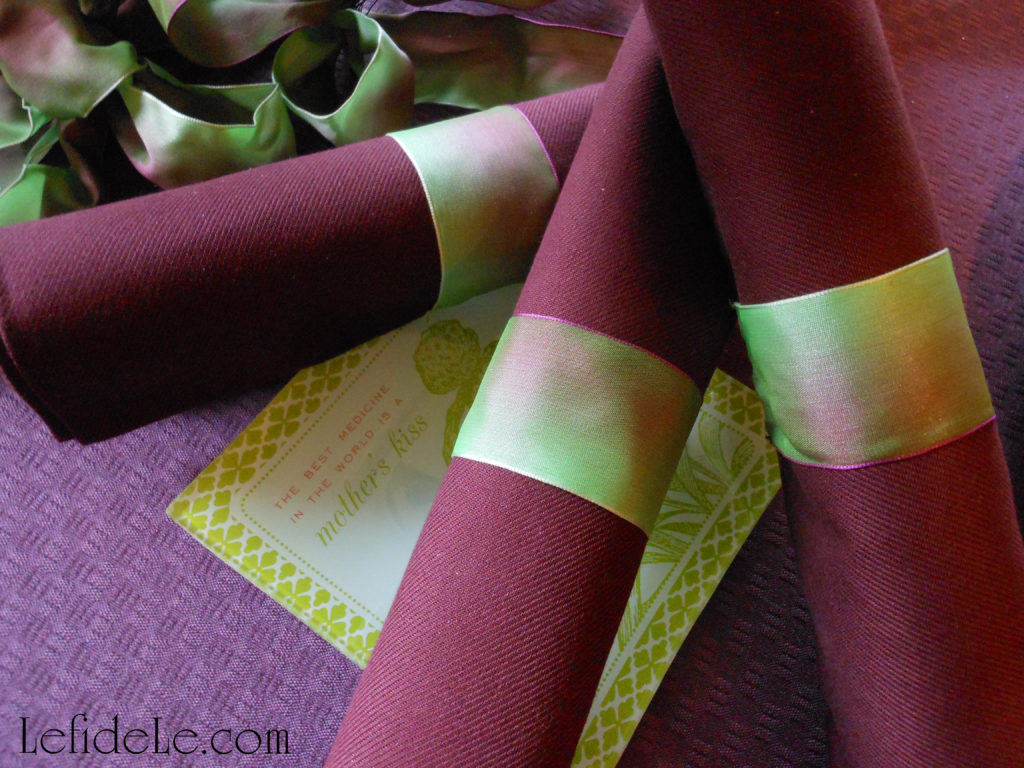
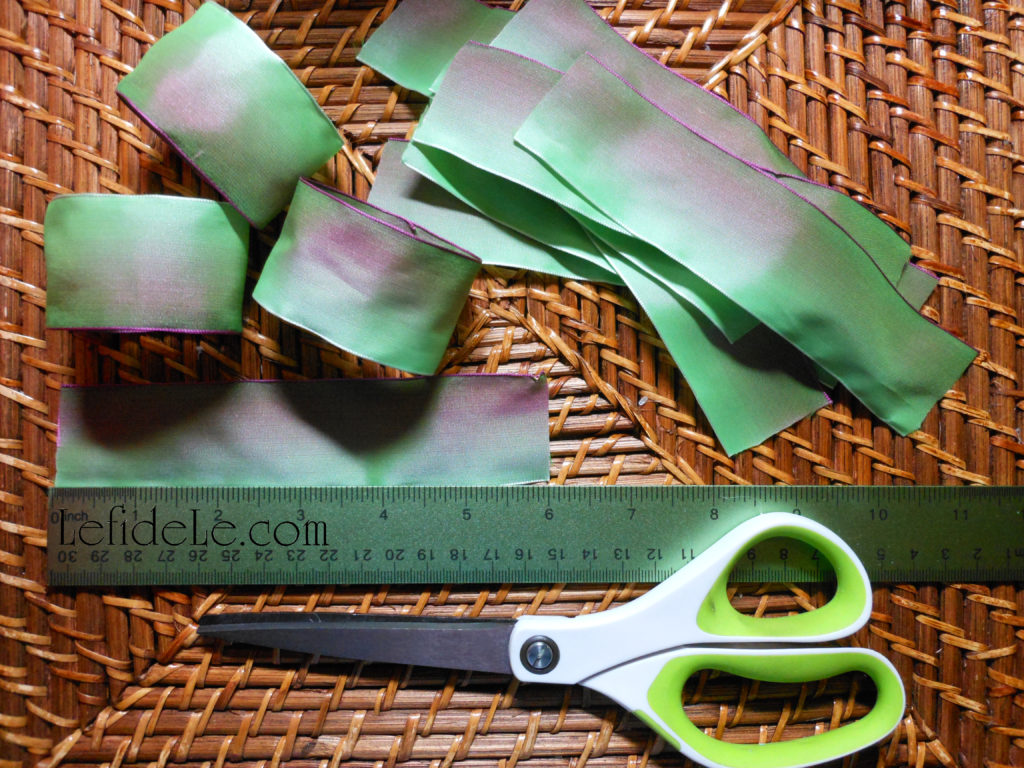
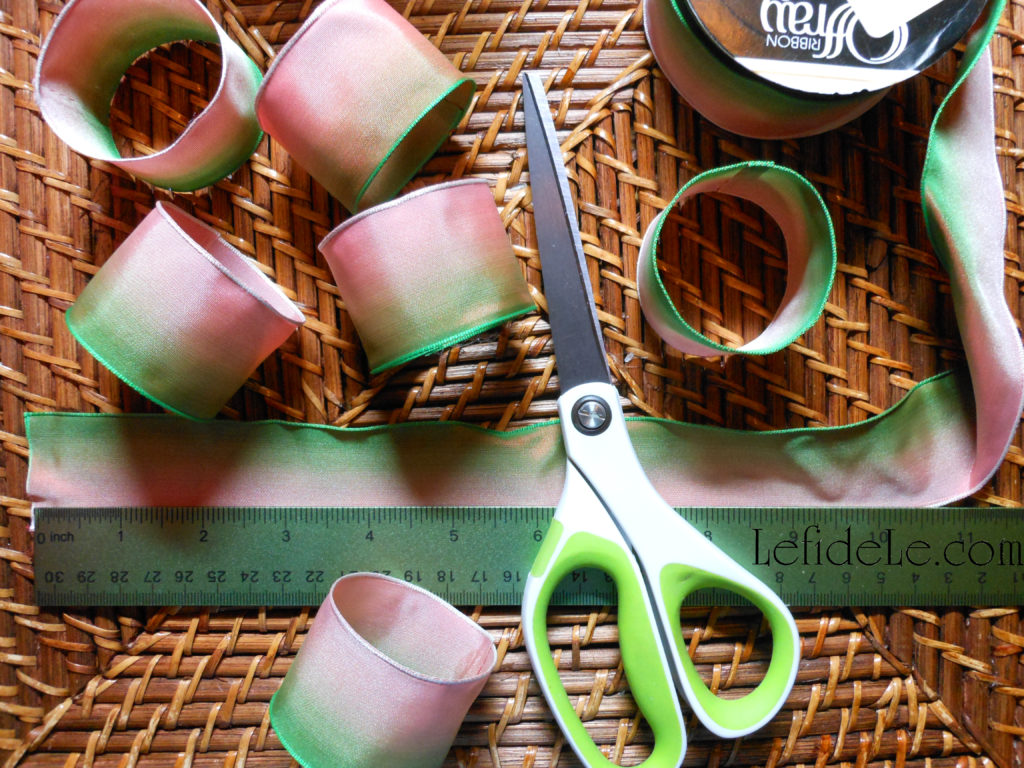
In order to make the napkin rings, you will need a wired ribbon of 1.5 inch width. Choose any pattern of colors to coordinate with the table linens you plan on using. You will need to cut a 6 inch strip for each ring you plan to make, and then you can use the leftover ribbon for coordinating wreaths or packages. You’ll also need miniature word ornaments or scrapbooking embellishments. (This ribbon was 40% off at Hobby Lobby, as were the adornments which were available in various metals and words.) You can also go a step further by bending wire to form a cursive word… but on this day I was going for a quick and easy 5 minute project!

617leigh

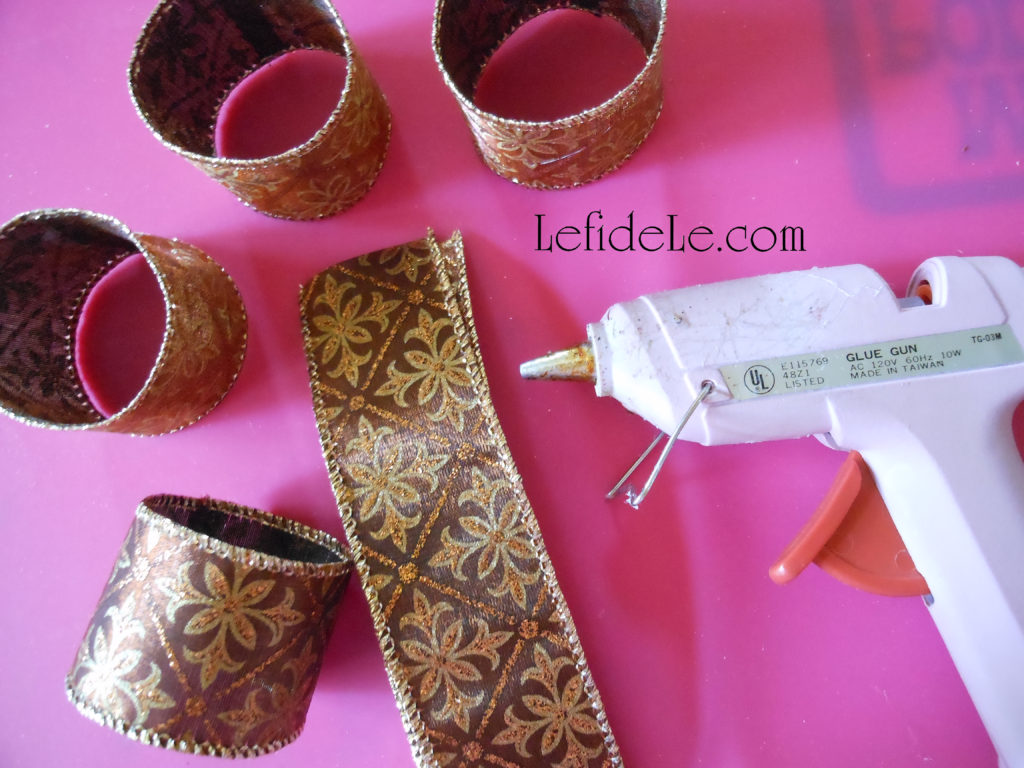
Place a line of glue along the decorative side of the short end of the ribbon. Slightly overlap that edge over the other, and press firmly for lasting adherence. (Use a silicone finger guard to protect yourself from the heat while pressing.)

929leigh

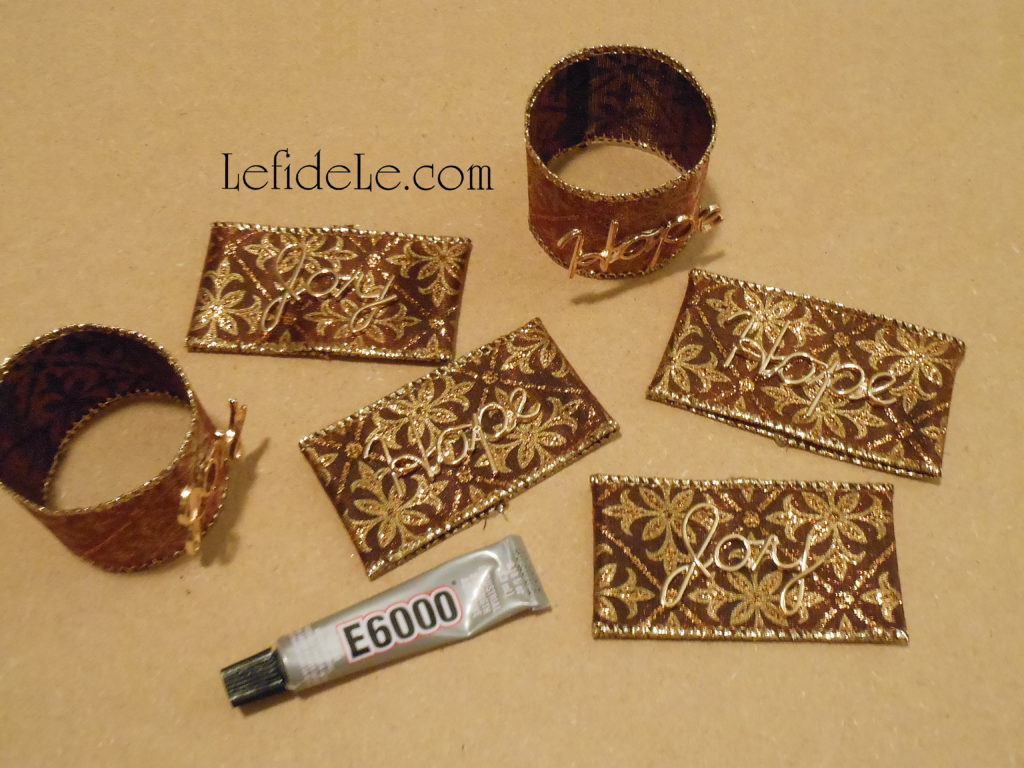
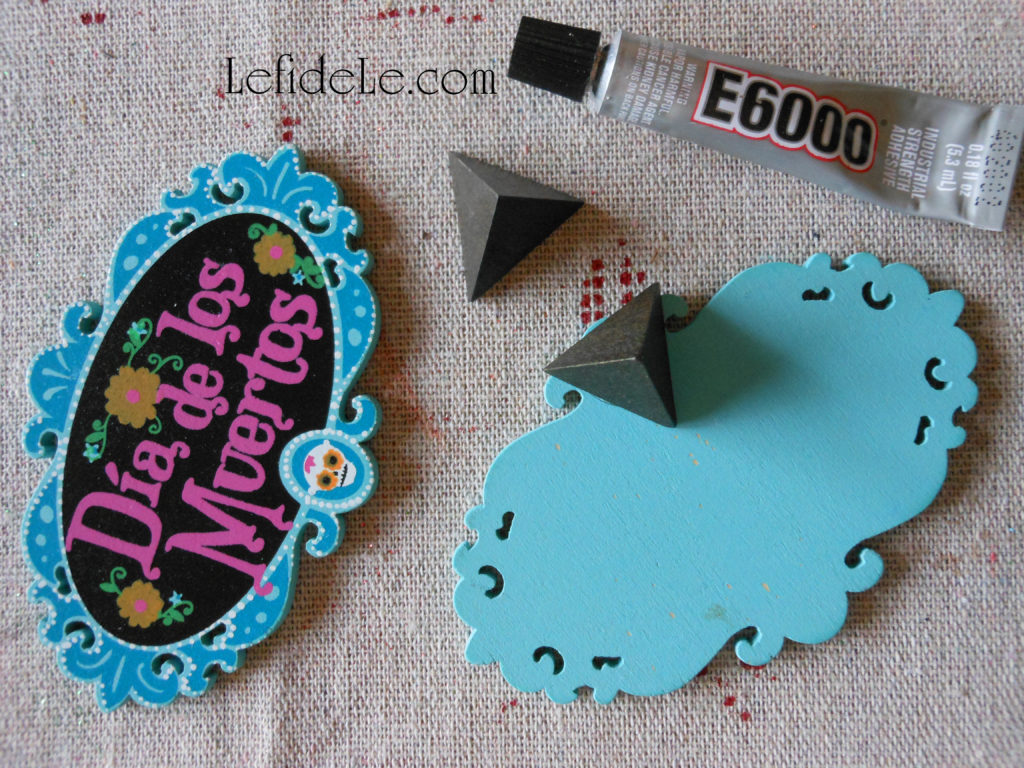
Flatten the rings with the seam centered on the underside. Use a glue like E6000 to adhere the metal to the glittered ribbon, as it grips unlike surfaces well. Just use a dot of glue at the center of the word. Let them dry overnight.

printable-noel-card-by-leigh

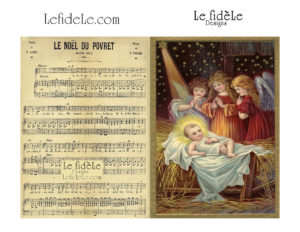
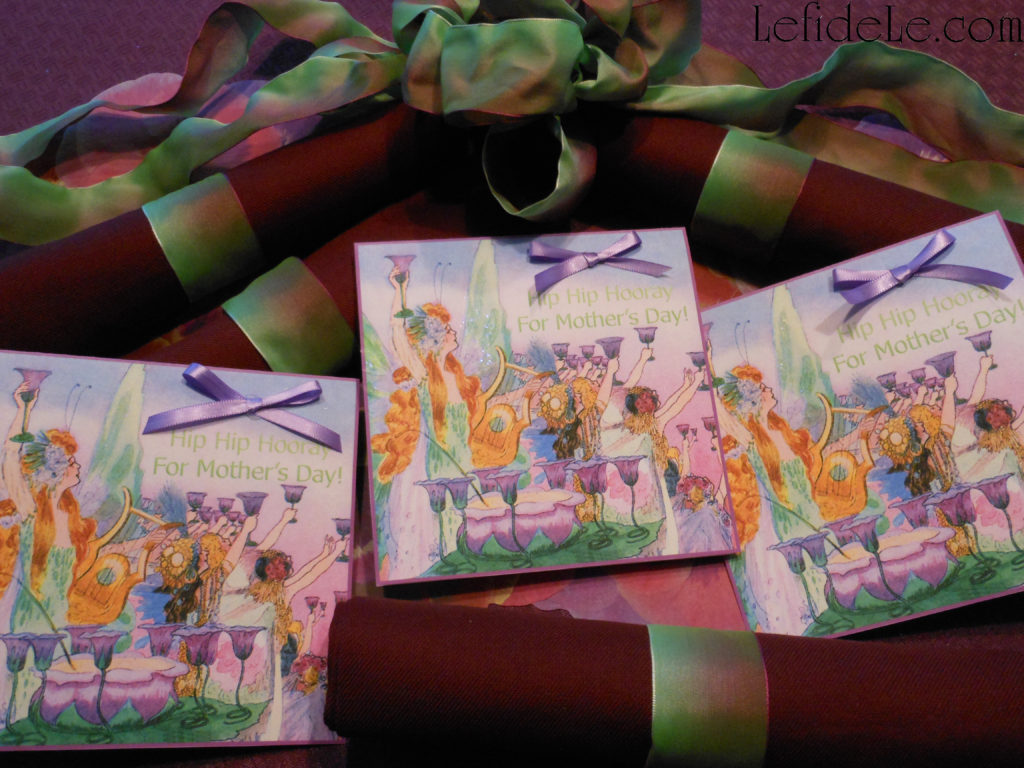
My free printable card is a great way to send Christmas blessings celebrating the true meaning of the holiday to everyone on your list. Print out the exact number you need, when you need them, without having to go back to the store for extra boxed sets. It’s much simpler and far less expensive to buy bulk boxes of envelopes for year round use. (Check my arts & crafts webpage or index webpage for my ever-growing selection of free printables… free for noncommercial personal use only!) To print the cards, simply right click on the image above and select print. One page equals one 5×7 card… so choose the number you want to make, and select color and photo quality settings.

100leigh

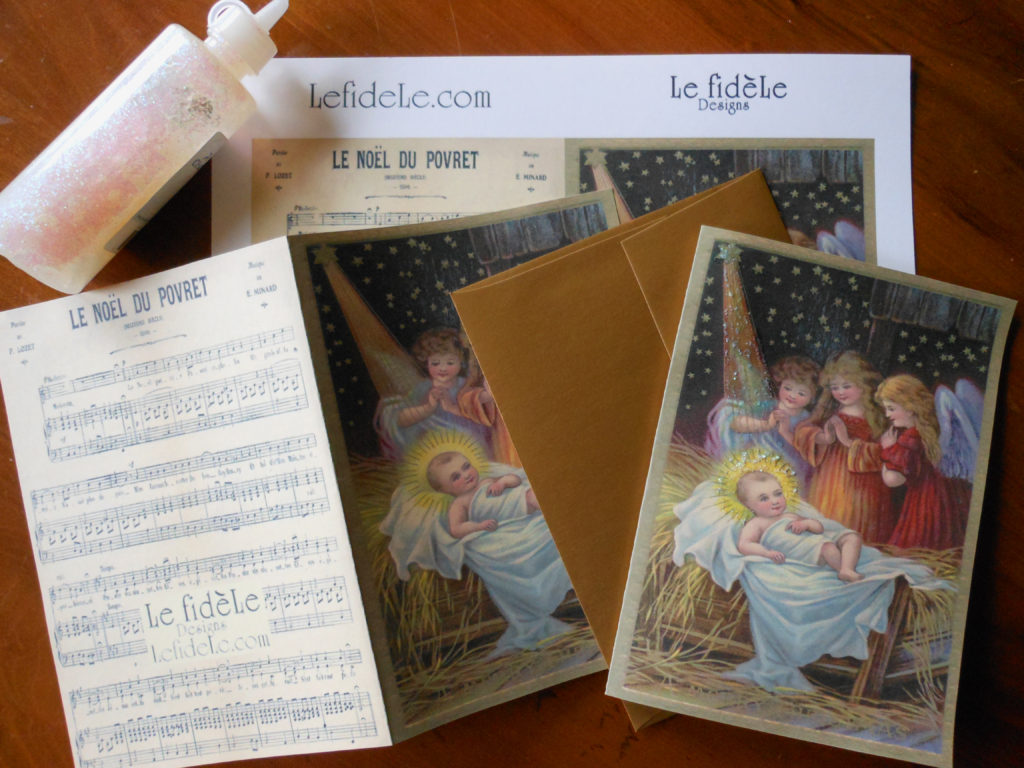
Cut along the colorized edge of the rectangle and fold in half. If you really want to make the card shine, spread opalescent glitter glue over the halos and stargazes, and then let them dry overnight before sending. (In person, the dramatic difference is worth the 10 seconds per card.) You can handwrite a line of scripture (like the one below), or use a dollar bin stamp as an easy way to add a special Christmas message of your choice to the inside of each card. (Le fidèLe Designs affiliate store Michaels offers these often.) This is a great project to involve the whole family with an assembly line of printing, cutting, folding, stamping, glittering, and then group signing. You spend less money, and the hand crafted card is appreciated more by the recipient (at least from what I’ve experienced.)

970leigh

“Now the God of hope fill you with all joy and peace in believing, that ye may abound in hope, through the power of the Holy Ghost.” Romans 15:13 KJV

Faithfully Yours,

Leigh

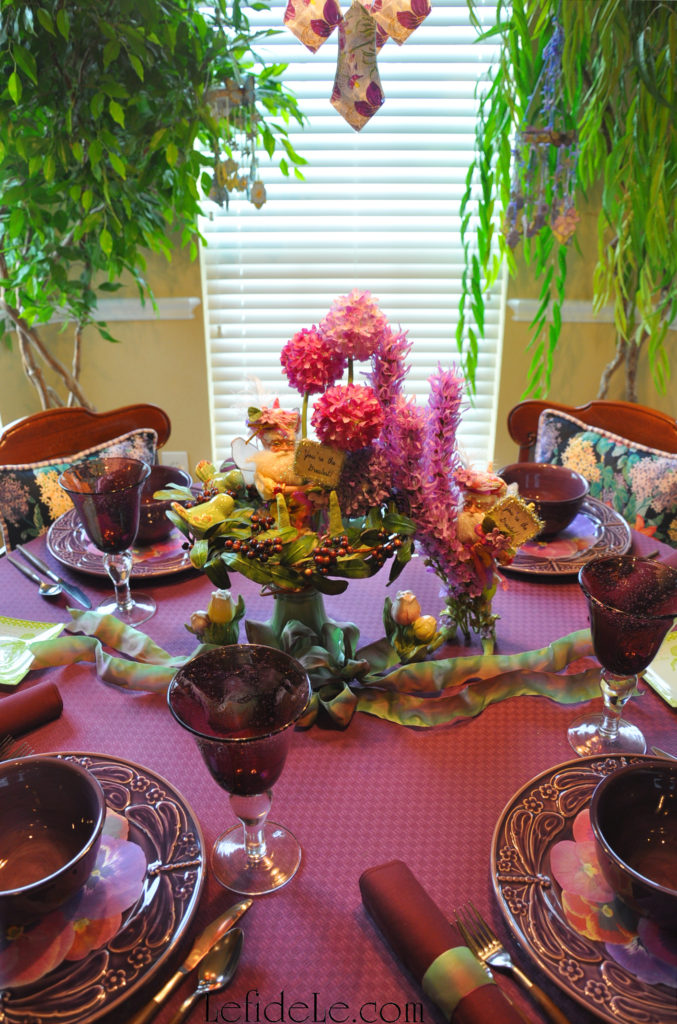
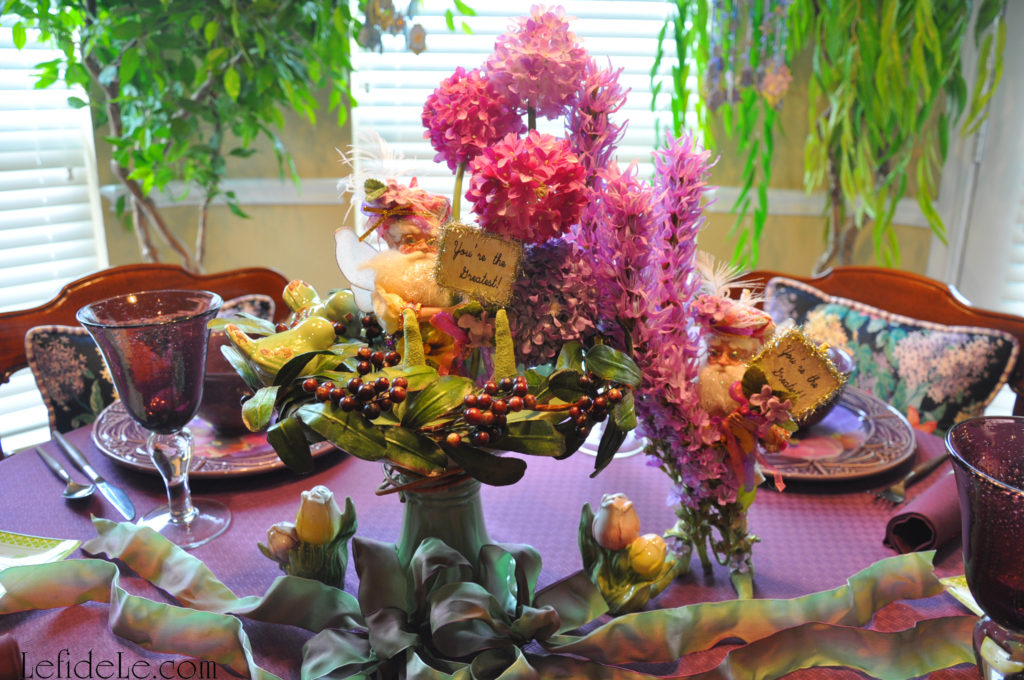
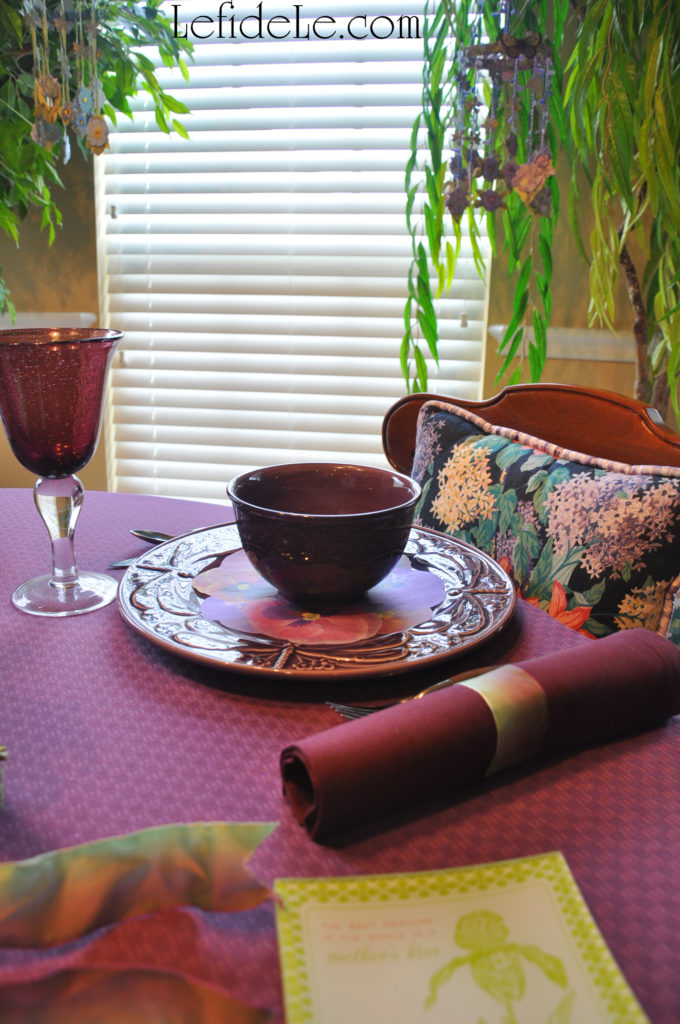
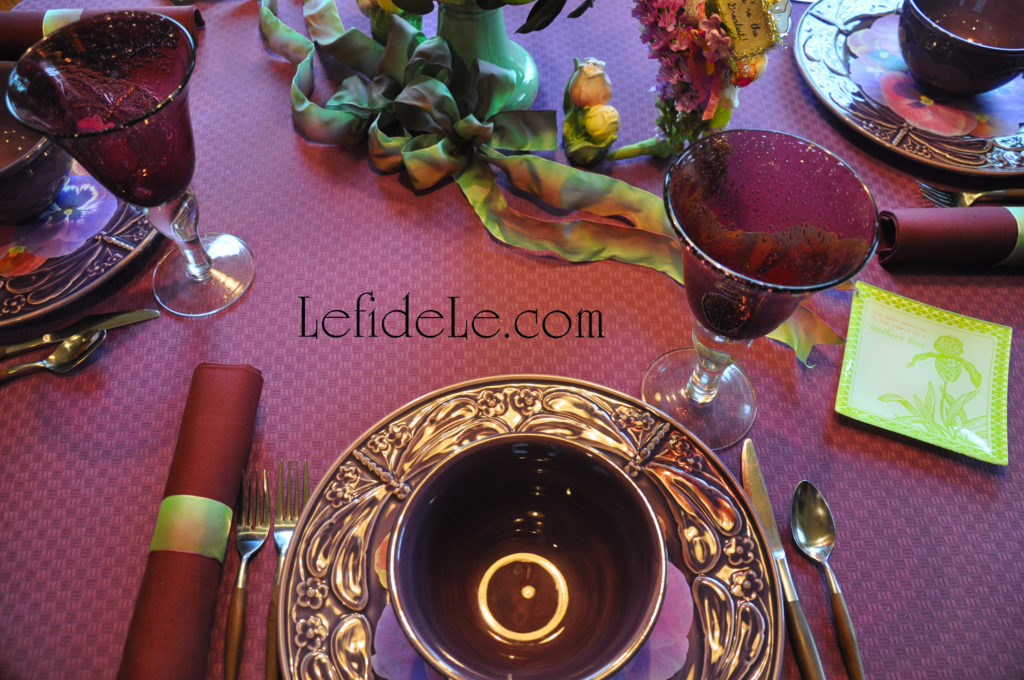
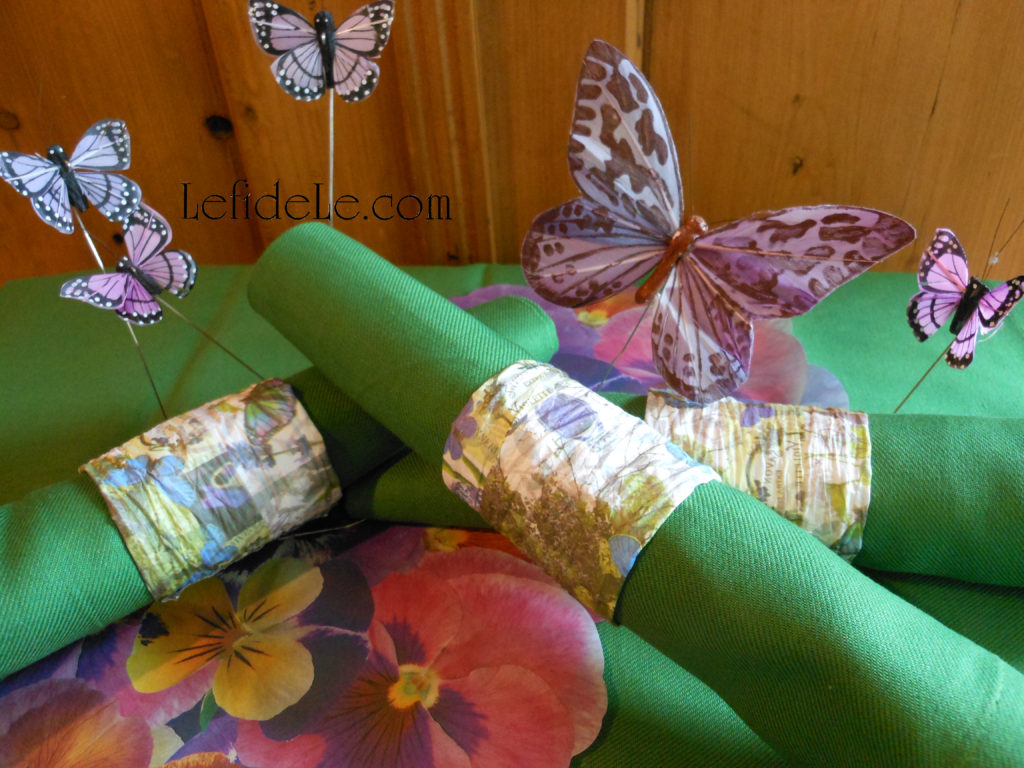
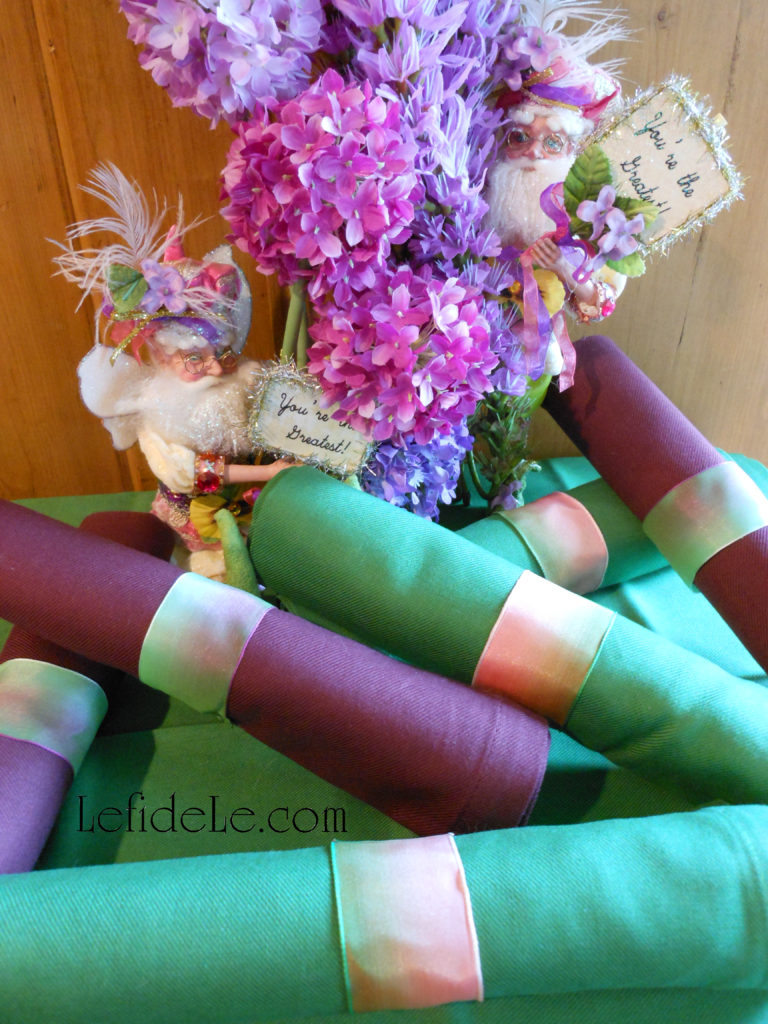
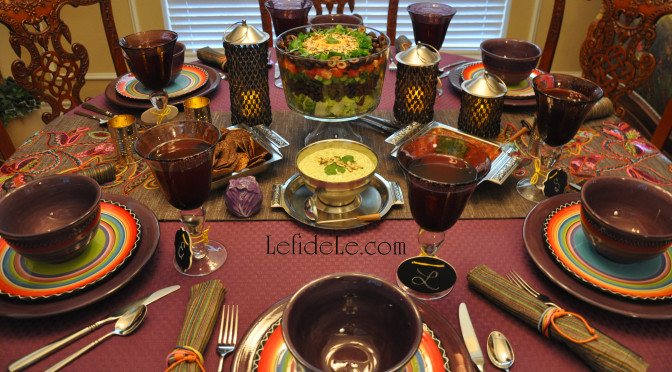
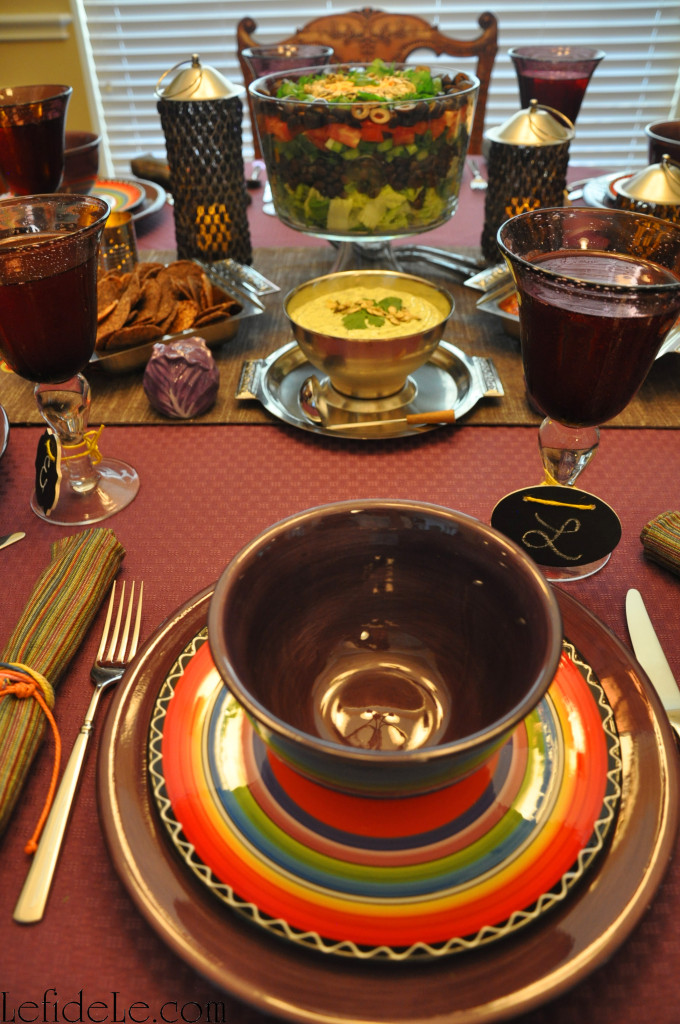
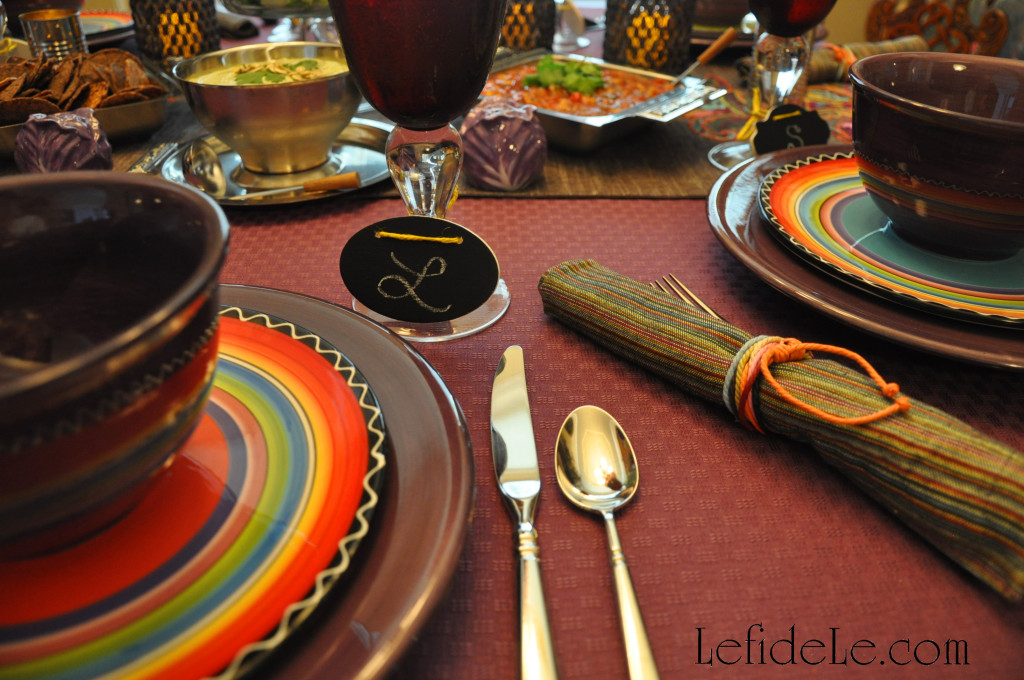
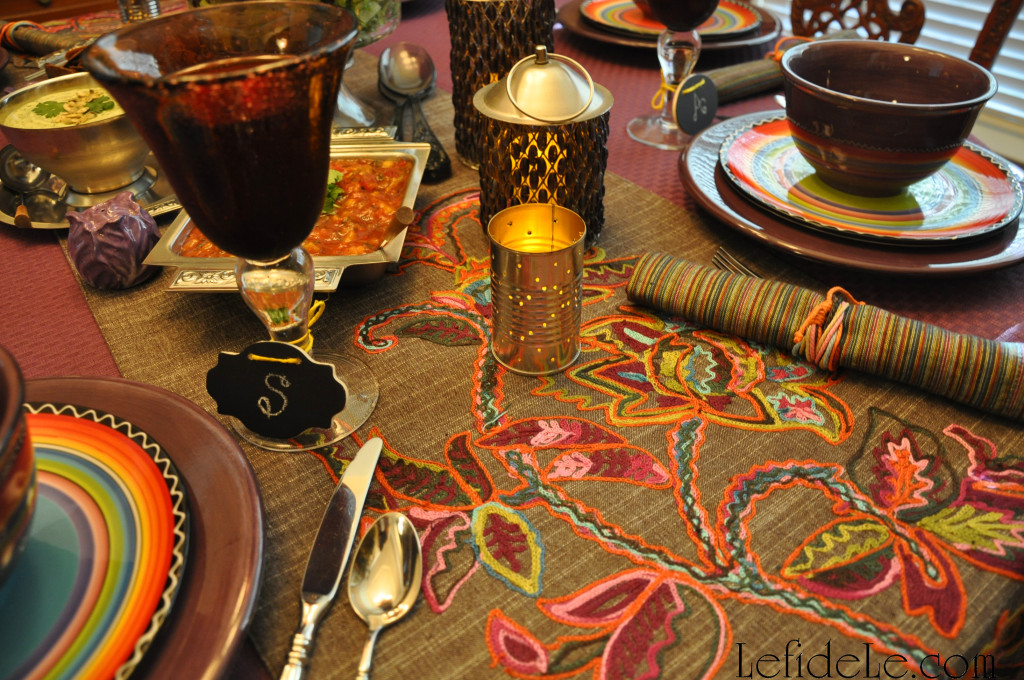
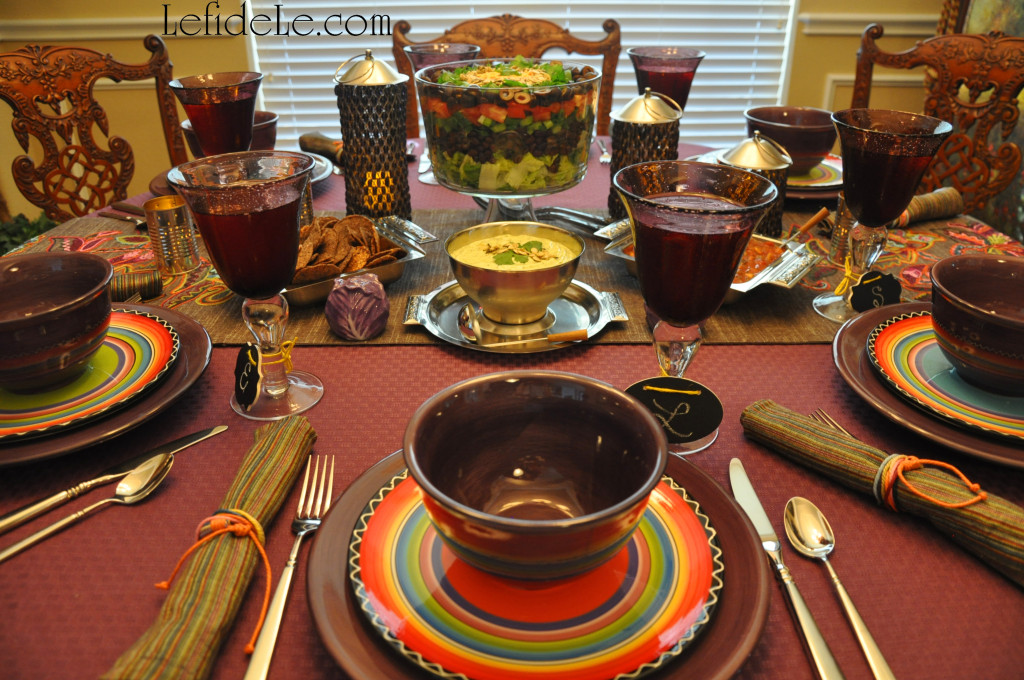
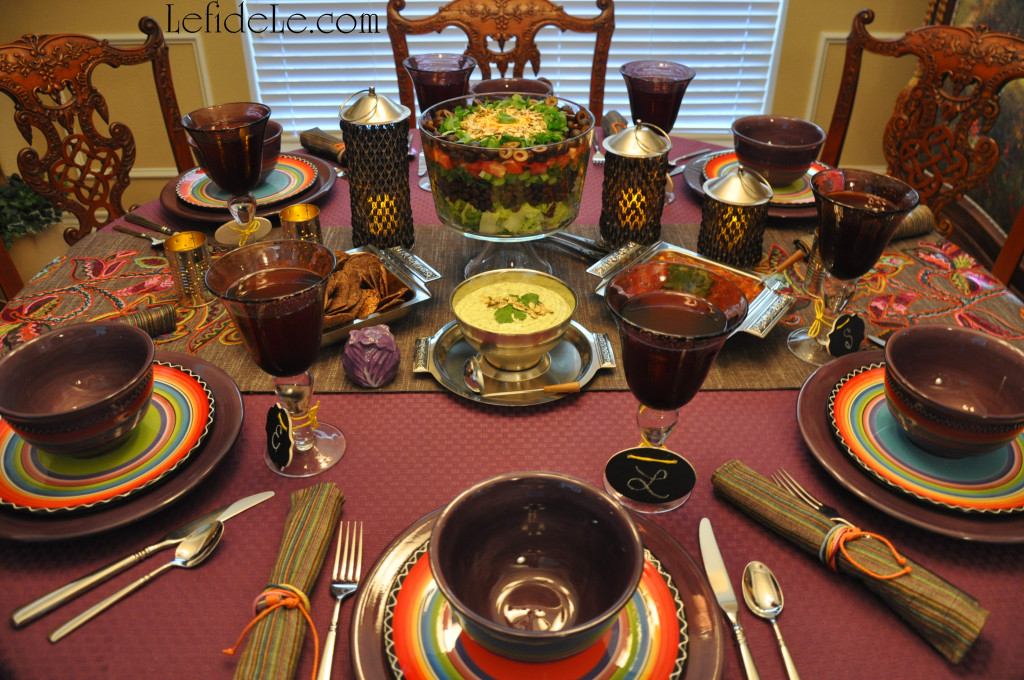
P.S. See the napkin rings within a Christmas dinner setting in my article here: Celebrate the True Meaning of Christmas with Tablescape Décor Ideas Evoking Love’s Pure Light

Celebrate Halloween with Colorful Day of the Dead (Dia de los Muertos) Party Décor Inspired by Traditional Ofrenda Symbolism (+ DIY Craft Tutorials & Candy Recipe)

65leigh

Celebrate Halloween with colorful Dia de los Muertos (Day of the Dead) party décor inspired by traditional ofrenda symbolism. It is an edifying means of incorporating both traditions into an event that seeks to cultivate an atmosphere of cultural understanding. By recognizing the universal conditions of love, life, and death through festivity, we can be united as one people comprised of a beautiful mosaic of ethnic tradition. In this way, revelry becomes a means of dispelling the negative cultural bias that plagues the nation, so that we may move forward together in celebration.

133leigh

Dia de los Muertos (Day of the Dead) coincides with All Saints Day and All Souls Day in both tradition and calendar. In this regard, a traditional ofrenda (offering) has a higher central tier honoring a deceased loved one. Taking the place of a photograph is another traditional element, that of a religious symbol. It takes the form of a chalkboard cross that has been inscribed with flowers and the Spanish words, “Te Amo” (“I love You”). A vase upcycled with crystal appliques holds a floral offering in keeping with gravesite ritual. See how easy this is to make in my tutorial here: DIY Calaveras de Azucar (Sugar Skulls) Napkin Rings, Wine Glass Charms, & Vase Craft Tutorial for Dia de los Muertos (Day of the Dead) Themed Halloween Dinner Party Décor.

104leigh

Lit candles are said to illuminate the path for the visiting spirits of loved ones. Representing fire, these may be in the form of Catholic religious candles depicting santos (saints), luminarias (lanterns) made of pierced paper bags or cans, or plain wax candles. Perritos (little dog figurines) are presented in symbolic gesture regarding the idea that dogs guided ancestral spirits to the afterlife. (Because surely “all dogs go to Heaven”!) Mariposas monarcha (monarch butterflies), that migrate to Mexico through Texas in the fall, represent visiting ancestors. Wild yellow and orange Mexican marigolds (cempasúchil) are known as the flor de muerto (flower of the dead). They may be linked into garlands, shaped into crosses, or placed decoratively. A fun way to incorporate these elements is make your own luminarias and flowers. The traditional crafts are easy to make using my tutorial here: Easy DIY Upcycled Can Tea-light Luminarias (+ Free Printable Template) & Tissue Paper Flowers Crafts (for Cinco de Mayo Fiesta Décor). Another essential item is a papel picado (cut paper) banner which signifies the fragility of life.

109leigh

Representing water is a Mexican bubble glass pitcher bearing a traditional mask of la calavera catrina (iconic image of a wealthy 1800’s era Euro-Mexican lady). When worn as a parade mask, half of the face is covered with a skull representation symbolizing life as inextricably linked with death. Make your own with the help of my tutorial here: DIY La Calavera Catrina Costume Mask & Calaveras de Azucar (Sugar Skulls) Banner for a Dia de los Muertos (Day of the Dead) Themed Halloween. Other decorative elements are multi-colored doilies beneath figures of X’s & O’s(kisses & hugs), and little signs naming the holiday. Small sugar skull tins replace toys, and framed sugar skull images replace ancestors’ photos in this lighthearted nod to tradition.

79leigh

Calaveritas de azucar (little sugar skulls) are necessary offerings as its sweetness (representing life) is said to balance the bitterness of muerte (death). Easily make these with my recipe here: Calaveras de Azucar (Sugar Skulls) Edible Folk Art & Egg-Free Vegan Candy Recipe for Dia de los Muertos (Day of the Dead) or Halloween. Seeds (with an obvious connection to life) originally decorated skulls in place of sugar. They are still offered as a traditional component, with food representing the element earth. Here they are contained in floral dishes nested into decorative tin pails. Sprouted pepitas or semillas de Calabaza (pumpkin seeds), pipas (sunflower seeds), and fried green peas as well as roasted chick peas (garbanzo beans) are adorned here with glittered skull cupcake picks. A trio of palanqueta de ajonjoli disks (sesame seed candy) are another sweet form of seed offering. (Nut brittle is a form of this kind of candy.) Sugared marshmallow pops are propped into stacks of customary naranjas (oranges). (The pops were purchased at Fiesta Mart, but they may also be found at Le fidèLe affiliates Michaels & World Market whose coupon links are in the left side bar or below on a smart phone.) Pan de muerto (bread of the dead) sits front and center of the ofrenda as it denotes human life in its round skull-like form with an X of raised dough like cross-bones. It is a pan dulce (sweet bread) flavored with anise and orange peel. Candies, Mexican chocolate, and chicle (chewing gum) are also customary offerings.

93leigh

White glittered skull shapes may be decorated and strung as another craft honoring the holiday. Read how to make the banner here: DIY La Calavera Catrina Costume Mask & Calaveras de Azucar (Sugar Skulls) Banner for a Dia de los Muertos (Day of the Dead) Themed Halloween.

602leigh

Make your own stand-up signs with dollar wooden shapes from the craft store. These prepainted shapes came from Le fidèLe Design’s affiliate Michaels (see the coupon link in the left side bar or scroll down on a smart phone), but any blank shape may be decorated easily with paint pens. Simply glue a wooden bead or shape (like these pyramids) to the base of the back.

492leigh

The background fabric for the ofrenda was once used as a tablecloth for a dinner party. (It can be purchased at Le fidèLe affiliate Joann whose coupon link is in the left sidebar, or below on a smart phone.) See it in this capacity in my previously posted article using this theme for a grown-up Halloween tablescape here: Dia de los Muertos (Day of the Dead) Themed Halloween Dinner Party Décor + DIY Décor & Recipe Links. Learn how to make your own wine glass charms and napkin rings for the dinner party here: DIY Calaveras de Azucar (Sugar Skulls) Napkin Rings, Wine Glass Charms, & Vase Craft Tutorial for Dia de los Muertos (Day of the Dead) Themed Halloween Dinner Party Décor.

76leigh

Feliz Dia de los Muertos!

Faithfully Yours,

Leigh

Decadent Macadamia Nut Cake (Gluten-Free Vegan Cheesecake & Pound Cake Fusion) + DIY Cake Decorating Stencil Tutorial

077Leigh

This decadent macadamia nut cake is a unique fusion of rich cheesecake and dense pound cake, yet it’s gluten-free and vegan! I invented it on a random whim of culinary creativity with no idea of how delicious it would turn out. I found out that it tastes even better on the second-day… which makes it a fantastic make-ahead dessert for you next gathering of gal pals. Easily decorate it with a DIY stencil and confectioner’s sugar, and serve it with a variety of fruit preserves. Then all you need to do is wait for the compliments to roll in before shocking everyone with the news that it’s gluten-free and vegan. Who knew guilt-free could taste this indulgent?!


Ingredients:

2 cups raw macadamia nuts (or raw cashews… soaked overnight)

2 tablespoons coconut oil (or butter, shortening, etc.)

2 teaspoons pure vanilla extract (or other extract)

4 teaspoons lemon juice (or other citrus juice)

½ cup fresh water (or juice)

2 cups Arrowhead Mills gluten-free baking mix (or another baking mix… not just flour)

2 egg replacers (3 teaspoons dry replacer + 4 tablespoons warm water… or 2 whole eggs, or 2 chia or flax “eggs”)

1 ¼ cups confectioner’s sugar (or powdered sugar)

1 teaspoons guar gum (or xanthan gum)

1 teaspoon baking soda

1 dash sea salt (= ⅛ teaspoon)

Optional toppings: fruit preserves


Instructions:

014Leigh

Remember to soak the macadamia nuts at room temperature the night before you want to bake the cake.

019Leigh

Drain off the soaking liquid, and blend the nuts at high speed with a fresh ½ cup of water plus the lemon juice, vanilla extract, coconut oil, and prepared egg replacer. (Mix the dry egg replacer well with warm water until it’s a frothy white liquid.) Now add the dry ingredients to the wet concoction, mixing it very well. (For those of you with corn allergies… note that confectioner’s sugar and guar gum are the corn-free alternatives to powdered sugar and xanthan gum.)

025Leigh

Pour the batter into round metal cake tins. (Metal conducts heat better for gluten-free baked goods.) Bake for approximately 1 hour, or until golden brown, in a 350ᵒ oven. (My oven has been running low and slow… so vary the time according to your oven’s temperament.)

035Leigh

While letting the cakes cool completely, find a piece of clean copy paper to make a stencil / template with. Fold it in half, and draw one side of a heart (with the center of it running into the folded edge). Cut this out, and unfold it to reveal a perfect heart.

055Leigh

Lay down the open heart and sprinkle additional confectioner’s sugar over the opening.

063Leigh

Remove the stencil and sprinkle more around the edges of the cake.

043Leigh

Another option is to lay down the solid heart template and sprinkle confectioner’s sugar around it.

092Leigh


This is a great way to easily decorate this kind of cake for a gathering. Then you can top individual servings with everyone’s favorite flavor of fruit preserves.

079Leigh

Make your cake peachy keen by topping it with scrumptious peach preserves straight from Fredericksburg, Texas… the town is known for its perfect peaches! (You can buy these delicious preserves, along with other amazing products from the Hill Country, at the affiliate link in the sidebar for Fredericksburg Farms.)

Faithfully Yours,

Leigh

P.S. A little birdie told me that a smidgen is ¹̷32 teaspoon, a pinch is ¹̷16 teaspoon, and a dash is ⅛ teaspoon… who knew a pinch of salt could be so technical!

DIY Scrapbooking Paper Flower Mobile Craft Tutorial for Decorations & Gifts (Birthdays, Baby Showers, Mother’s Day, & Get Well Wishes)

2280Leigh

Craft your own DIY mobile from scrapbooking paper flowers with this tutorial for making decorations and gifts for birthdays, baby showers, Mother’s Day, and get well wishes. They’re great to hang up as party decorations, and then let your guests take them home as gifts. They also inexpensively make sweet craft room décor, and because they’re so lightweight they can be placed nearly everywhere… even suspended over a small workspace in a tiny craft closet to bring the magic of a lush fairy garden inside.

2113Leigh

The most important elements of the mobile are the paper flowers that hang from it. Try walking through the scrapbooking aisle at your local craft store, and choose the collection that really catches your eye. (Here, I’m using K & Company layered accents that were on sale.) Be sure to buy 2 matching sets, so that you can glue them back to back later.

2061Leigh

It looks much prettier to add a wash of color to the backs of the floral elements, so that when they’re glued they appear as additional petals. (The easiest way to do this is with a sheer colored marker like these Prismacolor markers in limepeel and lilac.) You can also easily modify the front of the designs by adding a wash of color to them. (In this way, I made blue flowers violet and white flowers lavender… who needs “Bibbidy Bobbidy Boo” when you have markers?!)

2103Leigh

Also, find a package of smaller floral elements to further embellish your piece with. (Here, I’m using a package of flower confetti that I found on the clearance aisle last year.) Remember that it’s so easy to alter the colors of these elements by simply coloring over them with a marker. (This lilac Prismacolor marker added a translucent layer turning my baby blue confetti into lavender… Flora, Fauna, & Merriweather can eat their hearts out!)

2066Leigh

You have several options for the ring the elements will hang from. You can use a 6 inch metal ring (like this golden one from Joann) and wrap it with ribbon… or simply use it as is. You can also opt to use a coordinating wired paper ribbon (as the one I’m using here, which came from my gift wrapping supplies). To do this simply cut a length of ribbon long enough to form approximately half a foot diameter (exact measurements aren’t necessary), and then cut that in half lengthwise.

2072Leigh

Next, you’ll need to cut 1 strand of yarn/ribbon for each floral element. Try cutting them in various lengths from 6 to 10 inches. (I used clearance yarns that matched my paper flowers.)

2075Leigh

Hot glue the yarn/ribbon pieces (staggered in lengths) to the inside curve of the wired ribbon piece.

2079Leigh

Now glue the ends together to form a complete circle, and then glue the top flap (of the wired ribbon) down over the glued strands.

2284Leigh

Next, you need to add 3 additional pieces of yarn/ribbon to make a hanging “tripod”. You can either glue them as you did with the strands earlier, or you can simply tie some on. Then, gather the loose ends at the top, and form a knotted loop to hang them by. (If you like, tie more pieces of yarn onto the loop to decorate it a bit.)

2100Leigh

Now it’s time to glue on the big flowers. (It’s easiest to do this by hanging the mobile up, so that you can see how you’re arranging the elements.) Hot glue them back to back with the yarn/ribbon sandwiched in between them. (Even though they have foam stickers, it’s best to use a little glue so that the yarn/ribbon stays put… because every fairy godmother knows it mortifying when your creation falls apart.)

2110Leigh

Hot glue the smaller floral pieces (confetti) in a staggered formation along the yarn/ribbon strands. (I also used torn off petals from the green floral confetti as leaves.) To the ring, add a few of the smaller flowers and a couple of larger elements (like these butterflies that were the K & Co. package… which I also tinkered with by adding color).

2111Leigh

I wanted the dominantly purple mobile to have more of a purple toned ring, so I used a lilac Prismacolor to color in the white portions of the paper ribbon. (I did the same using a blue marker on the dominantly blue mobile… the blue fairy herself couldn’t do this any easier.) It’s the little touches like that which really make mobile a visually cohesive structure… in other words, it’s prettier that way.

2277Leigh

If you feel like it needs more sparkle, attach crystals as flower centers and sprinkle glitter… then tell Tinkerbell to eat your pixie dust!

Faithfully Yours,

Leigh

P.S. Check out these mobiles HERE in my Fairyland Tablescape hanging from the trees in the background.

Then get my free printable fairy cards HERE to gift with the mobiles you just created.

037Leigh

Whimsical Fairyland Tablescape Décor Ideas for a Birthday Party or Mother’s Day Celebration

Welcome to a whimsical fairyland with tablescape décor ideas perfect for a birthday party or Mother’s Day celebration. This is a venue where fantastical flower bearing fairies evoke Irish proverbs that will fill your mind with conviviality as joy fills your soul.

133Leigh

“Your feet will bring you where your heart is.”

Take a seat next to a dear loved one whose smile is lit by the glistening light reflected by the chandelier’s découpaged crystals.

140Leigh

“What fills the eye fills the heart.”

Feast your eyes upon a table festooned with watercolor ribbon bows and a berry clustered birdbath centerpiece framed by ceramic tulip salt and pepper shakers.

150Leigh

“A word is more enduring than worldly wealth.”

Meadow fairies present you with purple flowers and signs declaring, “You’re the Greatest!”

182Leigh

“People live in each other’s shelter.”

Rest upon floral cushions as you bask in the serenity of good company sheltering beneath trees adorned with handcrafted paper flower mobiles.

184Leigh

“Time is a good storyteller.”

Raise a toast with violet bubble goblets in celebration of time shared as you dine upon ceramic dishware of purple dragonflies twirling around parchment paper pansies.

136Leigh

“A light heart lives long.”

A lavender tablecloth of basket-weave patterning glides across a lighthearted tablescape with wood handled flatware and eggplant napkins rolled into handmade watercolor ribbon napkin rings.

215Leigh

Remember that “Mothers hold their children’s hands for just a little while… and their hearts forever.”

And as the small serving plates say, “The best medicine in the world is a mother’s kiss,”… remembered and cherished. Love you Mom!

Faithfully Yours,

Leigh

P.S. The flower laden fellows are Mark Roberts Fairies, and the lovely quotes are old Irish proverbs!

P.P.S. Learn how to make your own paper flower mobiles by clicking HERE.

And read how to easily make the ribbon napkin rings HERE.

Get my free printable Birthday & Mother’s Day cards HERE.

Get the perfect Macadamia Nut Cake Recipe (Gluten-free Vegan) to serve at your gathering HERE.

Free Printable Fairyland Mother’s Day & Birthday Cards + Super Easy DIY Ribbon Napkin Rings Craft Tutorials

022Leigh

Craft a fantastic fairyland tablescape with this tutorial for super easy DIY ribbon napkin rings, and make fairyland cards for birthdays and Mother’s Day with my free printables. With four examples of napkin rings, using watercolor ribbon and paper gift wrapping ribbon… you’re sure to get all the inspiration you need to easily and inexpensively create the same magic for your own party. There you can raise a toast, as the fairies do in the cards, saying “Hip Hip Hooray” on celebration day!

2347Leigh

Make the napkin rings using absolutely any kind of ribbon you like to coordinate with your linens and decorations. (Here, I’ve used different varieties of Offray brand watercolor ribbon to resemble the petals in my fairyland tablescape.)

1921Leigh

Simply cut 6 inch lengths of it, and hot glue the edges (overlapping the short ends).

1924Leigh

Here is another example of the watercolor ribbon turned into rings.

2427Leigh

I made these pink and green rings to coordinate with my grandmother’s vintage ribbon rosettes.

2309Leigh

Here, the same super easy technique is used with simple gift wrapping paper ribbon.

2465Leigh

These would be equally lovely when paired with either fabric or paper napkins.

2449Leigh

This is the same wired paper ribbon that I used to make the rings for my scrapbooking paper flower mobiles (click here for the craft tutorial).

012Leigh

Make these Mother’s Day or Birthday cards using my free printables (for personal use only). They only need to be printed, cut out, and folded over. (Find square envelopes in many colors to send these in at Paper Source, whose affiliate link is in the sidebar.)

FairyToastingMothersDayCardLeighFairyToastingBirthdayCardLeigh

Right click on one of the small images above and select print. (The left is Mother’s Day & the right is Birthday.) Print these on heavy cardstock paper using the photo setting.

005Leigh

To further embellish the cards as I’ve done here, you can brush on opalescent glitter glue over the fairy wings. A small ribbon bow hot glued above the words really adds dimension to the cards.

037Leigh

The flower fairies seen here are from the Mark Roberts collection. They really add a whimsical touch to the centerpiece in my fairyland tablescape (see it all put together by clicking here).

2435Leigh

Hip Hip Hooray… we’re crafting today!

Faithfully Yours,

Leigh

Healthy Purple Baked Potato Chips & Creamy Vegan Tasty Tuber Topping Dip Recipes

063Leigh

These healthy recipes for purple baked potato chips and creamy vegan tasty tuber topping dip will transform your snack time into a guilt-free indulgence. They’re a great enticement for those store-bought fried chip lovers to take better care of their health, and for the picky eaters in your life… because who can resist purple food!? The tasty tuber dip is also the perfect topping for baked potatoes and can be prepared well in advance for ease of week night dinner preparation. All in all, this is a winning combination worth trying… if I do say so myself!


Purple Baked Potato Chip Ingredients:

  • 5 purple fingerling potatoes, per plate full (or any fingerling potato)
  • olive oil (enough to lightly coat potatoes)
  • sea salt (or salt free seasoning)
  • dried garlic powder (optional)
  • dried onion powder (optional)

Tasty Tuber Topping Dip Ingredients:

  • 2 cups unsweetened vegan coconut yogurt (or any variety of plain yogurt)
  • 6 teaspoons extra virgin olive oil (or another healthy oil)
  • 1 heaping tablespoon veganaise (or mayo)
  • 2 teaspoons lemon juice (or lime)
  • ½ cup shredded cheese (I used Follow Your Heart brand soy-free vegan.)
  • 5 tablespoons fresh chopped chives (or 5 teaspoons dried)
  • ½ teaspoon dried garlic powder
  • ½ teaspoon dried onion powder
  • ½ teaspoon ground black peppercorns
  • 2 teaspoons sea salt (or 2 tablespoons salt free seasoning)

Purple Baked Potato Chip Instructions:

002Leigh

First, wash and scrub the potatoes well with a brush.

004Leigh

Slice them easily with a mandolin (or slice thinly by hand… the harder way).

007Leigh

Next toss the potato chips with enough olive oil to coat them lightly in a bowl with the seasoning.

011Leigh

Place the chips in an even layer over a baking sheet lined with parchment paper, and then sprinkle them with a light coat of seasoning.

060Leigh

Bake at 375ᵒ for about 25 minutes or so depending on your oven’s nature. (They will shrink a little and change color when they’re done… so keep an eye on them.)


Tasty Tuber Topping Dip Instructions:

015Leigh

Simply combine all of the ingredients.

017Leigh

Then blend everything with an immersion blender, or a standard one.

038Leigh

Scoop into a serving bowl, and garnish with extra chopped chives.


046Leigh

This tasty topping also makes the perfect baked potato filling. It’s great to make ahead, along with baked potatoes, when you know you be in late the next day. Just reheat the spuds and serve with bagged salad.

056Leigh

Who needs fried potato chips when these can be enjoyed guilt-free!? These are less expensive than the store-bought kind too! And… they are purple! Enough said.

“It was a one-eyed, one-horned, flyin’ purple” potato “eater, sure looks strange to me.”

Faithfully Yours,

Leigh

Tex-Mex Dinner Fiesta Forever Tablescape Décor Ideas (for San Antonio Fiesta or Cinco de Mayo Party)

220Leigh

Fiesta forever with Tex-Mex dinner party tablescape décor ideas perfectamente for celebrating San Antonio’s Fiesta or Cinco de Mayo. Raise the roof and raise a glass in cheers for the celebratíon. Let the mariachi music play on in your heart as you feast. Throw your work aside and troubles away as you lose yourself in the rhythm of the beat. Come on and join our fiesta!

217Leigh

“Well, my friends, the time has come, To raise the roof and have some fun, Throw away the work to be done, Let the music play on…”

Mexican purple bubble glass goblets are playfully adorned with initialed wooden chalkboard signs serving as both place-card and drink minder as the party plays on. Casual yet elegant flatware are just some of the stainless steel elements bouncing around the tablescape.

225Leigh

“Everybody sing, everybody dance, Lose yourself in wild romance, We’re going to party, Karamu, fiesta, forever, Come on and sing along!…”

A colorful soutache decorated table-runner dances across the table. Coordinating striped cloth napkins are rolled into polychromatic jute bracelets masquerading as napkin rings. Vintage steel lanterns bedecked in purple beads light up the night as do upcycled luminarias.

223Leigh

“All night long! People dancing all in the street, See the rhythm all in their feet, Life is good wild and sweet. Let the music play on, Feel it in your heart, And feel it in your soul, Let the music take control, We’re going to party, Liming, fiesta, forever, Come on and sing my song!…”

Stacked upon a vintage purple basket-weave tablecloth are vintage purple glazed ceramic dishes sandwiching borrowed Mexican serape styled plates.

196Leigh

“All night long! Yeah, once you get started, You can’t sit down, Come join the fun, It’s a merry go round, Everyone’s dancing, Their troubles away, Come join our party, See how we play! Oh, yes, We’re going to have a party!…”

A fun Tex-Mex trifle bowl layered dinner salad centerpiece is joined by creamy vegan cilantro citrus avocado dressing, Texas peach salsa, and a medley of gluten-free chips held in vintage serving pieces. Salt and pepper shakers of purple cabbages are ready to spice up the fiesta.

251Leigh

“All night long! Everyone you meet, They’re jamming in the street, All night long! Feel good!”

¡Fiesta Forever!

Faithfully Yours,

Leigh

P.S. The party song quoted is “All Night Long (All Night)” by Lionel Richie.

P.P.S. Buy your own adjustable jute bracelets to double over as napkin rings inexpensively at Fire Mountain Gems, whose affiliate discount link is in the left side panel (or below on a tablet).

P.P.P.S. Find my healthy Tex-Mex trifle salad and dressing recipe by clicking HERE. Find a similar salad in a crunchy baked tortilla bowl HERE, and a Tex-Mex salad taco HERE. Learn how to easily upcycle your own DIY luminarias HERE!

Tex-Mex Trifle Bowl Layered Dinner Salad Recipe with Creamy Cilantro Citrus Avocado Dressing (Gluten-Free & Vegan)

082Leigh

This recipe for a gluten-free Tex-Mex trifle bowl layered dinner salad complete with creamy vegan cilantro citrus avocado dressing is perfect for your next dinner fiesta. It’s so easy to throw together without having to measure anything. It also saves time and expense because the beautifully layered trifle bowl pulls double duty as a colorful centerpiece. Plus, when everything is prepared ahead of time… the hostess can spend the evening in the dining room with her guests rather than in the kitchen. Most guests should be able to partake of this healthy gluten-free vegan meal, and dressing is served on the side so that everyone can control their own portions. Once everyone is taken care of… there is nothing left to do but ¡Fiesta Forever!


Layered Dinner Salad Ingredients:

1: torn romaine leaves (or any lettuce)

2: prepared black beans (rinsed canned or cooked dried)

3: chopped green onions (or leeks)

4: diced Roma tomatoes (or any variety)

5: diced black olives (or green)

6: fresh cilantro leaves (or a sprinkling of dried)

7: vegan cheese (Follow Your Heart brand vegan & soy free shredded cheddar or any variety)

8: sprouted pepitas (roasted pumpkin seeds)

  • Serve with gluten-free vegan Beanito brand chips (or any tortilla type chip), fresh salsa, and homemade creamy cilantro citrus avocado dressing (or sour cream, plain yogurt, store bought dressing, or guacamole) on the side.

Cilantro Citrus Avocado Dressing Ingredients:

  • 2 cups vegan coconut yogurt unsweetened (or unsweetened almond milk yogurt, or plain dairy yogurt)
  • 1 ripe avocado mashed
  • 3 tablespoons lemon or lime juice
  • 2 tablespoons cilantro leaves
  • ½ teaspoon ground black peppercorns
  • 1 teaspoon sea salt (or 1 tablespoon of salt substitute if sodium restricted)
  • ½ teaspoon dried onion powder
  • ½ teaspoon dried garlic powder
  • ½ teaspoon ground ginger
  • 1 teaspoon Latin seasoning blend (optional… wholefoods brand has sea salt, garlic, annatto, bitter orange, citric acid, citrus peels & oils)

Layered Dinner Salad Instructions:

073Leigh

Gather, wash, and chop enough ingredients to fill the trifle bowl you have.

078Leigh

Place a layer of each of the fresh ingredients in the order listed… so that you see them through the side like giant savory parfait.

077Leigh

I like to arrange the top in a bullseye pattern with the last ingredients… because a whole layer of cilantro would be demasiado (way too much)!

243Leigh

This is awesome when served with homemade creamy cilantro citrus avocado dressing on the side.


Cilantro Citrus Avocado Dressing Instructions:

066Leigh

Mix all the ingredients together and then blend. (I used an immersion blender.)

068Leigh

This is great to make a day ahead and refrigerate until serving.

196Leigh

I also served the trifle salad with gluten-free vegan Beanito brand chips and fresh peach salsa… to be eaten along with the salad or as a side. (Any variety of tortilla type chip and salsa would be great.) See more of the Cinco de Mayo dinner fiesta featuring this Tex-Mex trifle salad as a centerpiece HERE.


Oh so delicioso y’all! (One simply must speak “Spanglish” at a Tex-Mex dinner fiesta.)

Faithfully Yours,

Leigh

Tex-Mex Filling Recipe for Taco Salad Baked Tortilla Bowls or Salad Tacos (with Gluten-Free & Vegan Options) with Creamy Cilantro Citrus Avocado Dressing (Dairy-Free)

139Leigh

This double recipe for Tex-Mex taco salad in gluten-free baked tortilla bowls and salad tacos uses the same healthy fillings spiced up with creamy (yet dairy-free vegan) cilantro citrus avocado dressing. This is so that the salad eaters and the taco lovers can enjoy the same meal without creating extra work for the family chef. This is also why everything is gluten-free and dairy-free, and salad ingredients don’t require measuring. It’s also easy to please the vegans and the carnivores because the optional beef crumbles can be selectively applied… but know that meat isn’t necessary because beans with rice tortilla form a complete protein. So let the dinner fiesta begin!


Cilantro Citrus Avocado Dressing Ingredients:

  • 2 cups vegan coconut yogurt unsweetened (or unsweetened almond milk yogurt, or plain dairy yogurt)
  • 1 ripe avocado mashed
  • 3 tablespoons lemon or lime juice
  • 2 tablespoons cilantro (add more if using fresh herbs)
  • ½ teaspoon ground black peppercorns
  • 1 teaspoon sea salt (or 1 tablespoon of salt substitute if sodium restricted)
  • ½ teaspoon dried onion powder
  • ½ teaspoon dried garlic powder
  • ½ teaspoon ground ginger
  • 1 teaspoon Latin seasoning blend (optional… wholefoods brand has sea salt, garlic, annatto, bitter orange, citric acid, citrus peels & oils)

Tex-Mex Taco & Salad Ingredients:

  • torn romaine leaves (or any lettuce)
  • prepared black beans (rinsed canned or cooked dried)
  • chopped green onions (or leeks)
  • diced Roma tomatoes (or any variety)
  • diced black olives (or green)
  • fresh cilantro leaves (or a sprinkling of dried)
  • shredded cheese (I used Follow Your Heart brand soy-free vegan shredded cheddar.)
  • sprouted pepitas (roasted pumpkin seeds)
  • diced ripe avocado (optional)
  • beef crumbles (optional)
  • brown rice tortillas (or any variety of wrap)
  • homemade creamy cilantro citrus avocado dressing (or sour cream, plain yogurt, store bought dressing, salsa, or guacamole)
  • for the crunchy bowls: grapeseed oil in spray pump (or any oil or cooking spray)

Cilantro Citrus Avocado Dressing Instructions:

066Leigh

Mix all the ingredients together and then blend. (I used an immersion blender.)

068Leigh

This is great to make ahead of time and refrigerate until using.


Taco Salad & Tortilla Bowl Instructions:

073Leigh

Gather, wash, and chop enough ingredients to fill up the crowd you’ll be serving. I haven’t included amounts because everyone has their own preferences regarding salad composition… I like ¾ toppings with a little lettuce! (Brown the beef crumbles in a pan now… if you aren’t vegan.)

171Leigh

Toss everything but the tortillas in a large mixing bowl with a portion of the prepared creamy cilantro citrus avocado dressing … or your dressing of choice. (Or serve it own the side.)

160Leigh

To make the baked tortilla bowl shells, spray each tortilla on both sides with oil… from a refillable mist pump or cooking spray. Press each into either an oven safe bowl or a metal tortilla baker. (Sorry about the lack of pictures for this step… oops!) Bake at 350ᵒ for about 15 minutes or so… really just watch them with the oven light on so that they can be removed when just beginning to brown, because everyone’s oven behaves a bit differently. (Note that overcooked broken shells make great tortilla chips.)

157Leigh

Fill these lovely creations with the tossed salad mixture, and garnish with extra cilantro and pepitas.

164Leigh

I serve these in rimmed salad bowls rather than on plates so that guests can break the shells to eat with the salad without making a mess.


Salad Taco Instructions:

145Leigh

For the non-salad eaters in the group who don’t care for salads, try making a salad taco instead.

149Leigh

Make this soft taco by filling a folded brown rice tortilla with the tossed salad mixture.

142Leigh

Now that’s something you can sink your teeth into!


♥ “Yo quiero taco salad!” said the imaginary Chihuahua spokesdog.

Faithfully Yours,

Leigh