Tag Archives: Red

Reverential Memorial Day, Veterans Day, or Independence Day Tablescape Décor Ideas Honoring American Forces

075Leigh

These reverential Memorial Day, Veterans Day, or Independence Day tablescape décor ideas are a tangible manner for honoring American forces by setting aside a time to remember the sacrifices made for our collective freedom. This carries on a fine tradition dating to just after the civil war when families would gather with picnics upon hallowed cemetery grounds. Our ancestors and loved ones may be gone but are never forgotten so long as we continue to commemorate the dear price they paid for our united peace.

072Leigh

“Sleep, comrades, sleep and rest On this Field of the Grounded Arms, Where foes no more molest, Nor sentry’s shot alarms!“

A bare wooden table denotes the now barren fields of battles past.

089Leigh

“Ye have slept on the ground before, And started to your feet At the cannon’s sudden roar, Or the drum’s redoubling beat.”

Canvas cloth stars and stripes lay the groundwork for the start of a serene supper. Handcrafted ribbon napkin rings encompass cloth napkins rolled as bandages once were.

106Leigh

“But in this camp of Death No sound your slumber breaks; Here is no fevered breath, No wound that bleeds and aches.”

A seat at the table of peace procures red merely with ceramic vessels set among wooden ones, as wood handled metal flatware convey the firearms of yore.

133Leigh

“All is repose and peace, Untrampled lies the sod; The shouts of battle cease, It is the Truce of God!”

This day’s flag of peace is a handmade banner of fabric collage celebrating the triumphal peace of war’s cessation.

111Leigh

“Rest, comrades, rest and sleep! The thoughts of men shall be As sentinels to keep Your rest from danger free.”

Flag bearing bronze columns hold pillar candles aflame while standing as the evening’s sentinels.

103Leigh

“Your silent tents of green We deck with fragrant flowers; Yours has the suffering been, The memory shall be ours.”

A memorial wreath encircling a solemn flame rests at the table’s focal point as our minds focus with somber reverence.

Faithfully Yours,

Leigh

P.S. The poem quoted is “Decoration Day” written in 1882 by Henry Wadsworth Longfellow. (Memorial Day has evolved from post-civil war’s Decoration Day.)

P.P.S. ⇓ Learn how to make your own patriotic banner here:

DIY July 4th Denim No-Sew Applique Collage Star-Spangled Banner Craft Tutorial for Independence Day

⇓ Find the patriotic ring tutorial plus more crafting here:

Faux Metal Stars Paper Mache Craft Tutorial & DIY Napkin Rings for Memorial Day, Veterans Day, or Independence Day

Faux Metal Stars Paper Mache Craft Tutorial & DIY Napkin Rings for Memorial Day, Veterans Day, or Independence Day

539Leigh

Make your own faux metal stars inexpensively out of paper maché ornaments with this craft tutorial, and then easily DIY custom patriotic napkin rings for Memorial Day, Veterans Day, or Independence Day. Use these to perfectly coordinate with your existing holiday décor for a high end look on a shoestring budget. These hefty appearing textured “metal” stars are actually lightweight enough to be used in so many more applications. And they really do fool everyone… until they’re touched!

545Leigh

It’s astonishingly easy to turn inexpensive paper maché ornament stars (found in craft stores nearly year round) into expensive looking one-of-a-kind textured metallic pieces to embellish any project you can think of.

510Leigh

Grab a bag of star ornaments, some cheap white school glue, a lighter or match, and a candle. (I like to use up the last chunks of tall or broken candles to use on these kinds of projects, because candles flames do work better than lighter flames… just don’t ask me why. I stuck this pink leftover into an empty glass soda bottle to hold it in place… as is necessary to prevent wax drip burns.)

513Leigh

Cover a portion of a star completely in white glue. Hold it into the flame until the glue becomes hard with a dusty charcoal layer over it. (Don’t hold it over the bare paper because it will burn! If a flame does spark, just blow it out like a candle. Cover that area with more glue, and then burn on.)

521Leigh

Rub off the dirty charcoal layer with a clean rag or paper towel. (You’ll start seeing a smooth sheen appear.)

523Leigh

You can leave them as is or rub a light wash of metallic paint over them (cheap acrylic craft paint works well). It’s an easy way to add verdigris or to switch between silver and gold. I use a sponge square to dab on paint, and then quickly wipe some of it away (it does dry really fast).

549Leigh

You can really see the detail of the texture on the star’s undersides. (There’s no need to finish the base if you plan on gluing them onto something else.)

501Leigh

Now let’s make mix-and-match patriotic napkin rings using 1 roll of clearance chambray wired ribbon and some lengths of various American themed twill ribbon.

405Leigh

First, cut 6 inch lengths of ribbon (1 chambray and 1 twill for each ring). Then hot glue the twill across the center of the larger chambray. Next, glue one short end over the other, overlapping them slightly.

484Leigh

Check out the patriotic rings in action here: Reverential Memorial Day, Veterans Day, or Independence Day Tablescape Décor Ideas Honoring American Forces

111Leigh

Learn how to make a matching patriotic banner here: DIY July 4th Denim No-Sew Applique Collage Star-Spangled Banner Craft Tutorial for Independence Day

Happy 4th of July fire-working!

Faithfully Yours,

Leigh

Love Letter Themed Tablescape (Perfect for Valentine’s Day, Romantic Date Night, or Anniversary Dinner)

This love letter themed tablescape make’s the perfect setting for Valentine’s Day, a romantic date night, or even an anniversary dinner. I find that in the modern era of effortless texting, emails, and social networking, that it can be a lovely quixotic gesture to turn back to the sentimentality of a handwritten letter on actual paper. Then to go further back to capture the romanticism of script, drafted with pen and ink well on paper that’s been sealed with wax… so that none other than the intended may lay eyes on the heartfelt content. Call me old fashioned if you will… I’ll just take it as a compliment.

101Leigh

“Shall I compare thee to a summer’s day? Thou art more lovely and more temperate:”

Verse spells its way across a love letter inspired cloth is laid upon a greater midnight black tablecloth.

112Leigh

“Rough winds do shake the darling buds of May, And summer’s lease hath all too short a date:”

Six ravishing red roses rise from a vase overflowing with soft petals. A boundless array of them blankets the table.

114Leigh

“Sometime too hot the eye of heaven shines, And often is his gold complexion dimmed;”

Luminous brass sextuplet candlesticks cast a romantic golden glow over the tablescape. Beneath them lies a once live rose plated in brilliant 14 karat gold. Gilded studs enhance burgundy pillar candles set upon stacked vintage candlesticks that playfully generate light and shadow in the background.

83Leigh

“And every fair from fair sometime declines, By chance, or nature’s changing course, untrimmed;”

Encircling tuxedo black napkins are love letter symbolizing napkin rings trimmed with faux wax seals. Golden utensils bearing wooden handles represent the pens of yesteryear. Waiting to be filled are vintage ruby glasses trimmed with rings of gold that are flanked by golden flecked midcentury champagne vessels.

75Leigh

“But thy eternal summer shall not fade, Nor lose possession of that fair thou ow’st, Nor shall death brag thou wand’rest in his shade,”

Beneath a resplendent tree sit black ladder-backed chairs cushioned with sumptuous garnet pillows.

67Leigh

“When in eternal lines to Time thou grow’st. So long as men can breathe, or eyes can see, So long lives this, and this gives life to thee.”

Italian countryside plates from Mikasa are topped by red dishes resembling wax seals. They obscure all but rings of gold from the gleaming mat chargers below them.

Faithfully Yours,

Leigh & William Shakespeare’s 18th Sonnet

P.S. Click here for my Easy DIY Valentine’s Day Countdown Calendar / Treat Bag Banner & Love Letter Napkin Rings Craft Tutorials.

Easy DIY Valentine’s Day Countdown Calendar / Treat Bag Banner & Love Letter Napkin Rings Craft Tutorials

1661Leigh

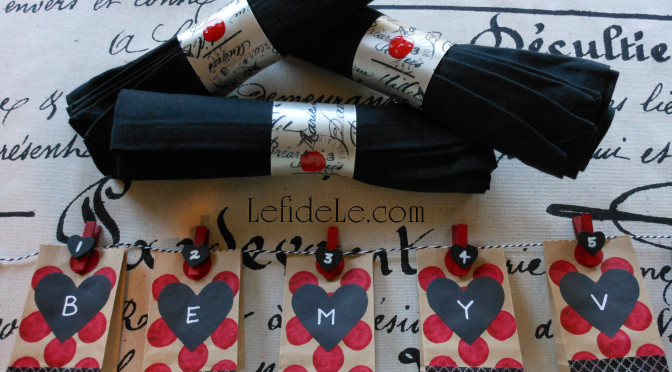
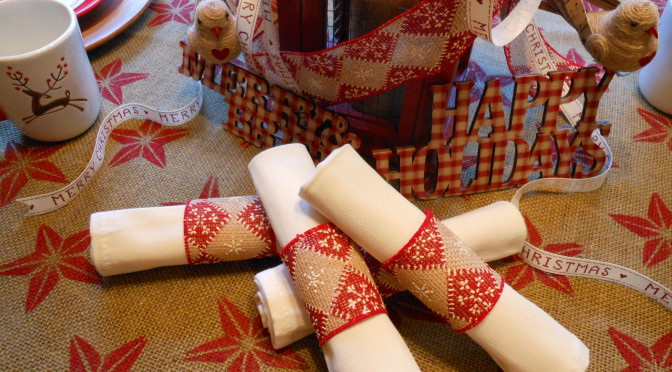
This easy DIY Valentine’s Day countdown calendar plus treat bag banner and love letter napkin rings craft tutorial comprises three of my favorite things to make… banners, napkin rings, and advent calendars. The latter project arose from the questions, “Why are countdown calendars typically made for Christmas advent and not for other holidays?” and, “Why not expand the celebration with 2 weeks of excitement leading up to Valentine’s Day?” This works well for either children or adults depending on what’s placed inside the bags. As for the love letter themed napkin rings, they perfectly fit a romantic Valentine’s theme… though this one is for adults only!

1638Leigh

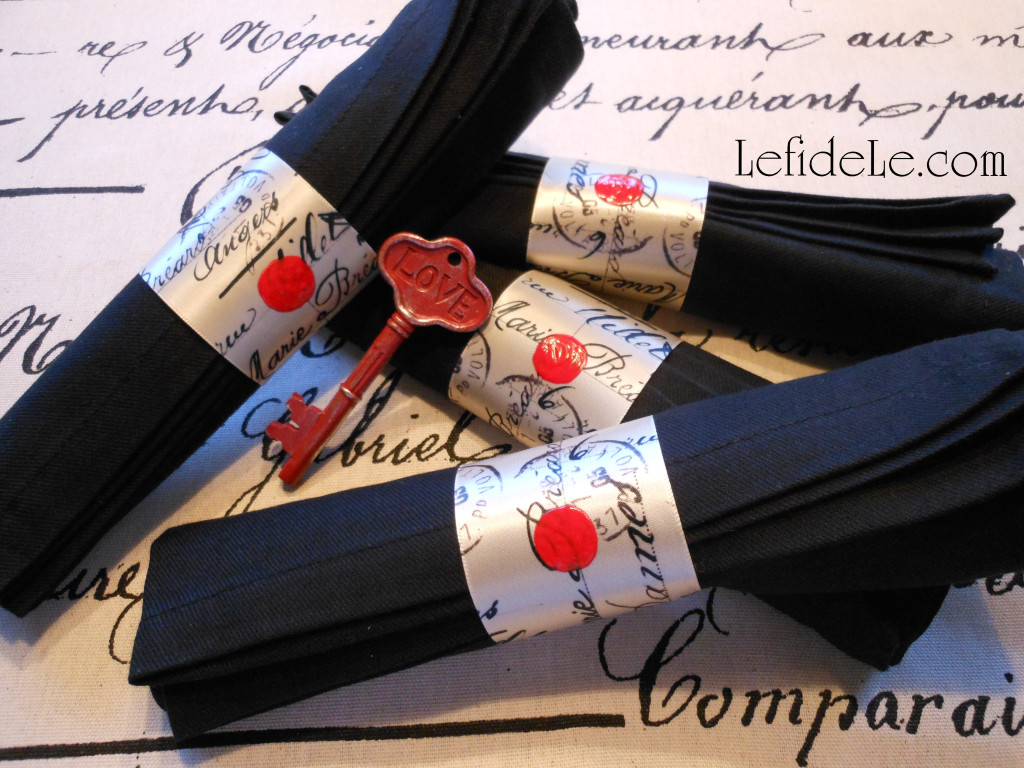
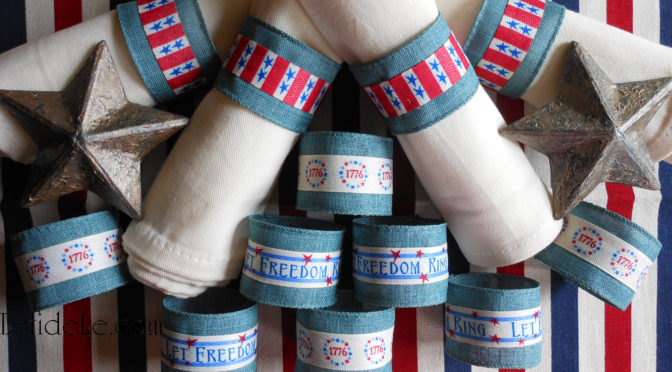
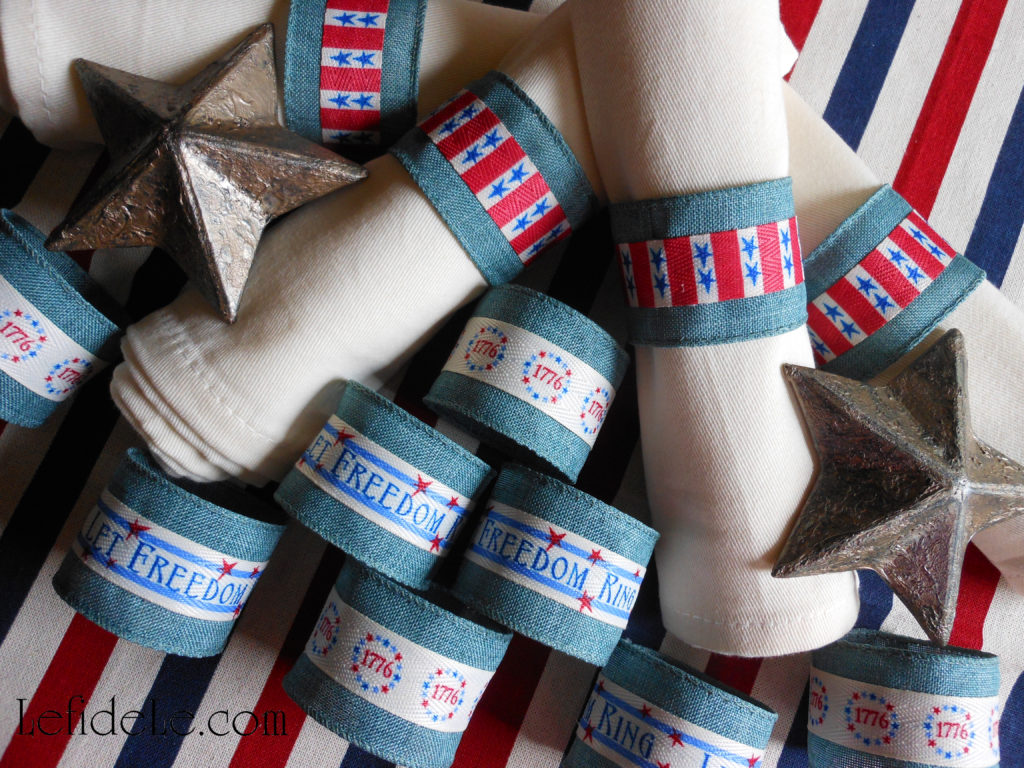
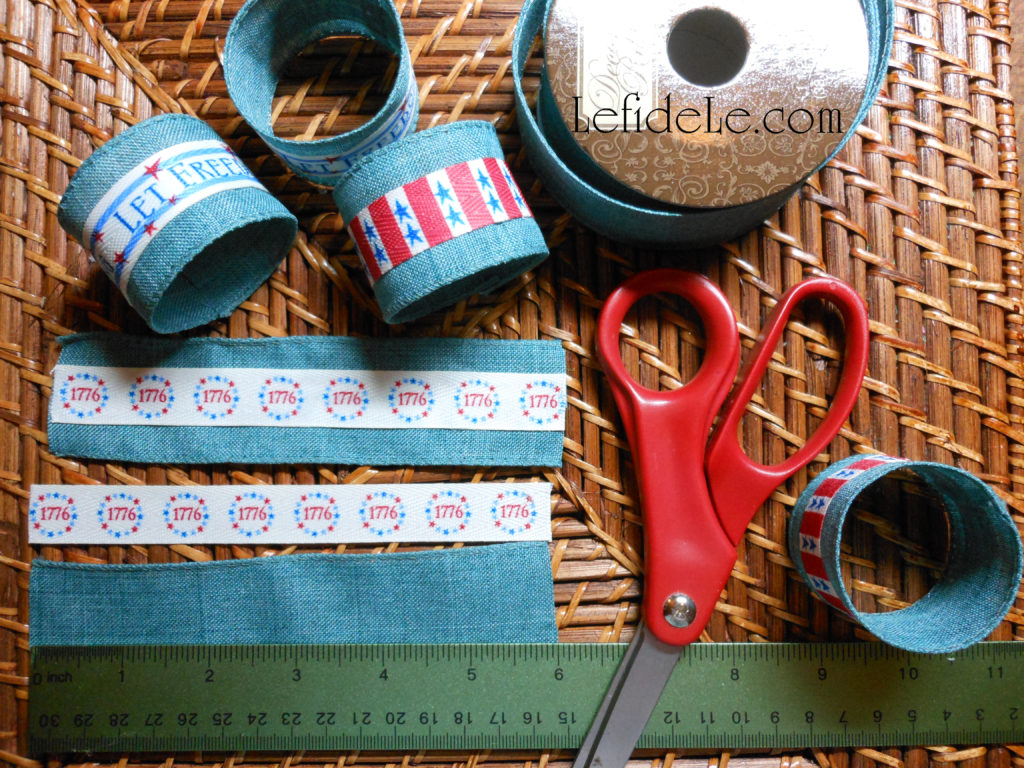
Let’s begin with the napkin rings. You’ll need a roll of Offray Brand Ribbon in a script pattern. (I purchased this ½ price with a coupon from Joann Craft & Fabric Stores. There’s a link for them in the sidebar.)

1647Leigh

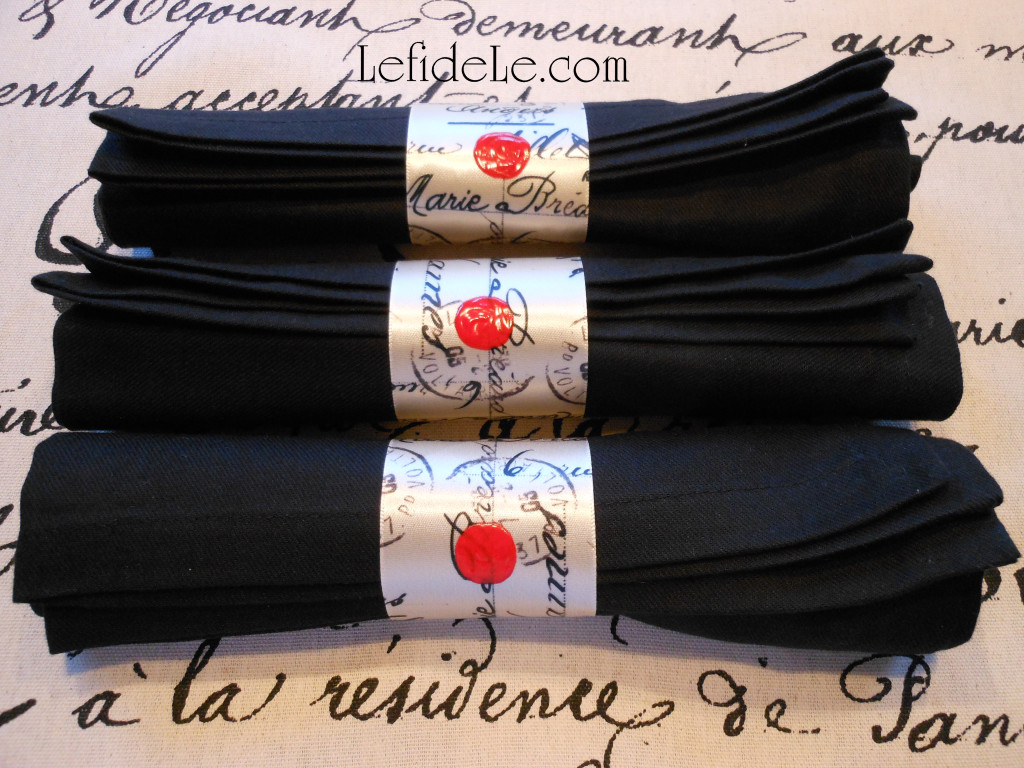
You can make 12 rings and still have enough left over for a gift package bow if you like. You’ll also need either hot glue or liquid fabric glue and fabric paint in red (because it works on so much more than just T-shirts).

1216Leigh

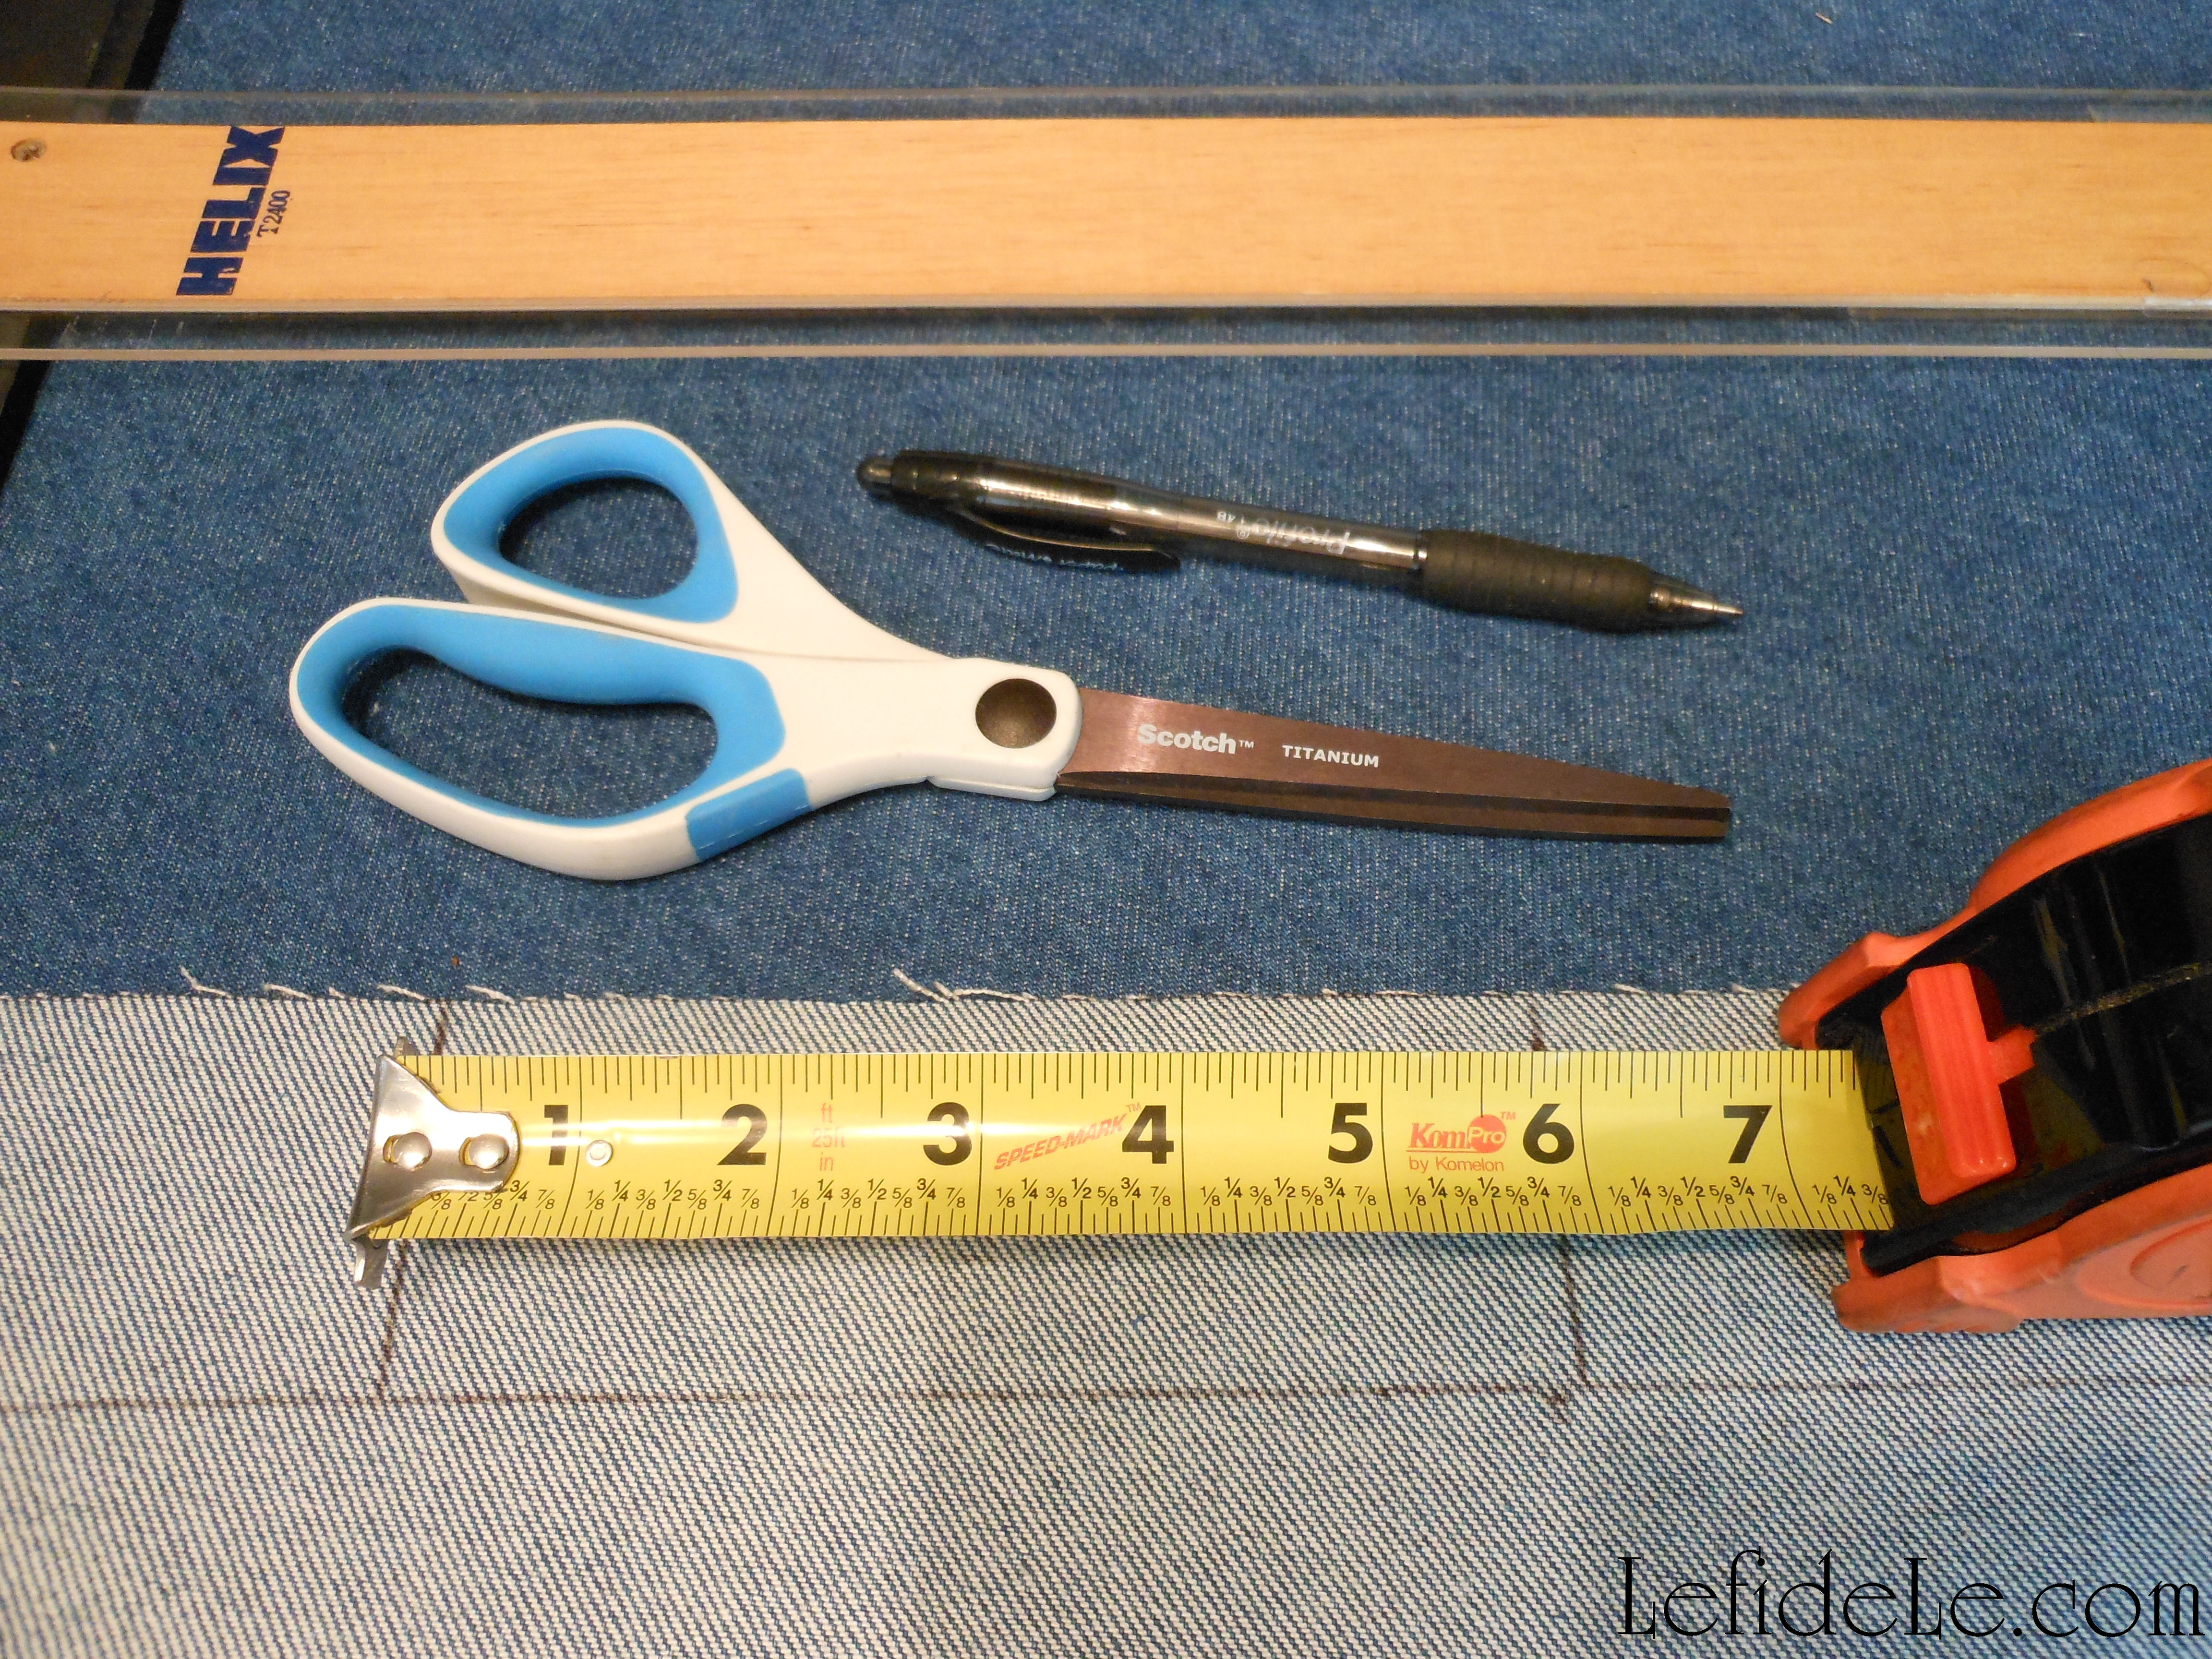
Measure and cut a 6 inch length of ribbon for each ring you wish to make (use sharp sewing scissors to prevent fraying ends). If using hot glue, bond the ends with one side overlapping the other and press them together tightly. For liquid fabric glue, use a plastic clothes pin as a clamp or secure with a straight pin… and allow them to dry completely.

1243Leigh

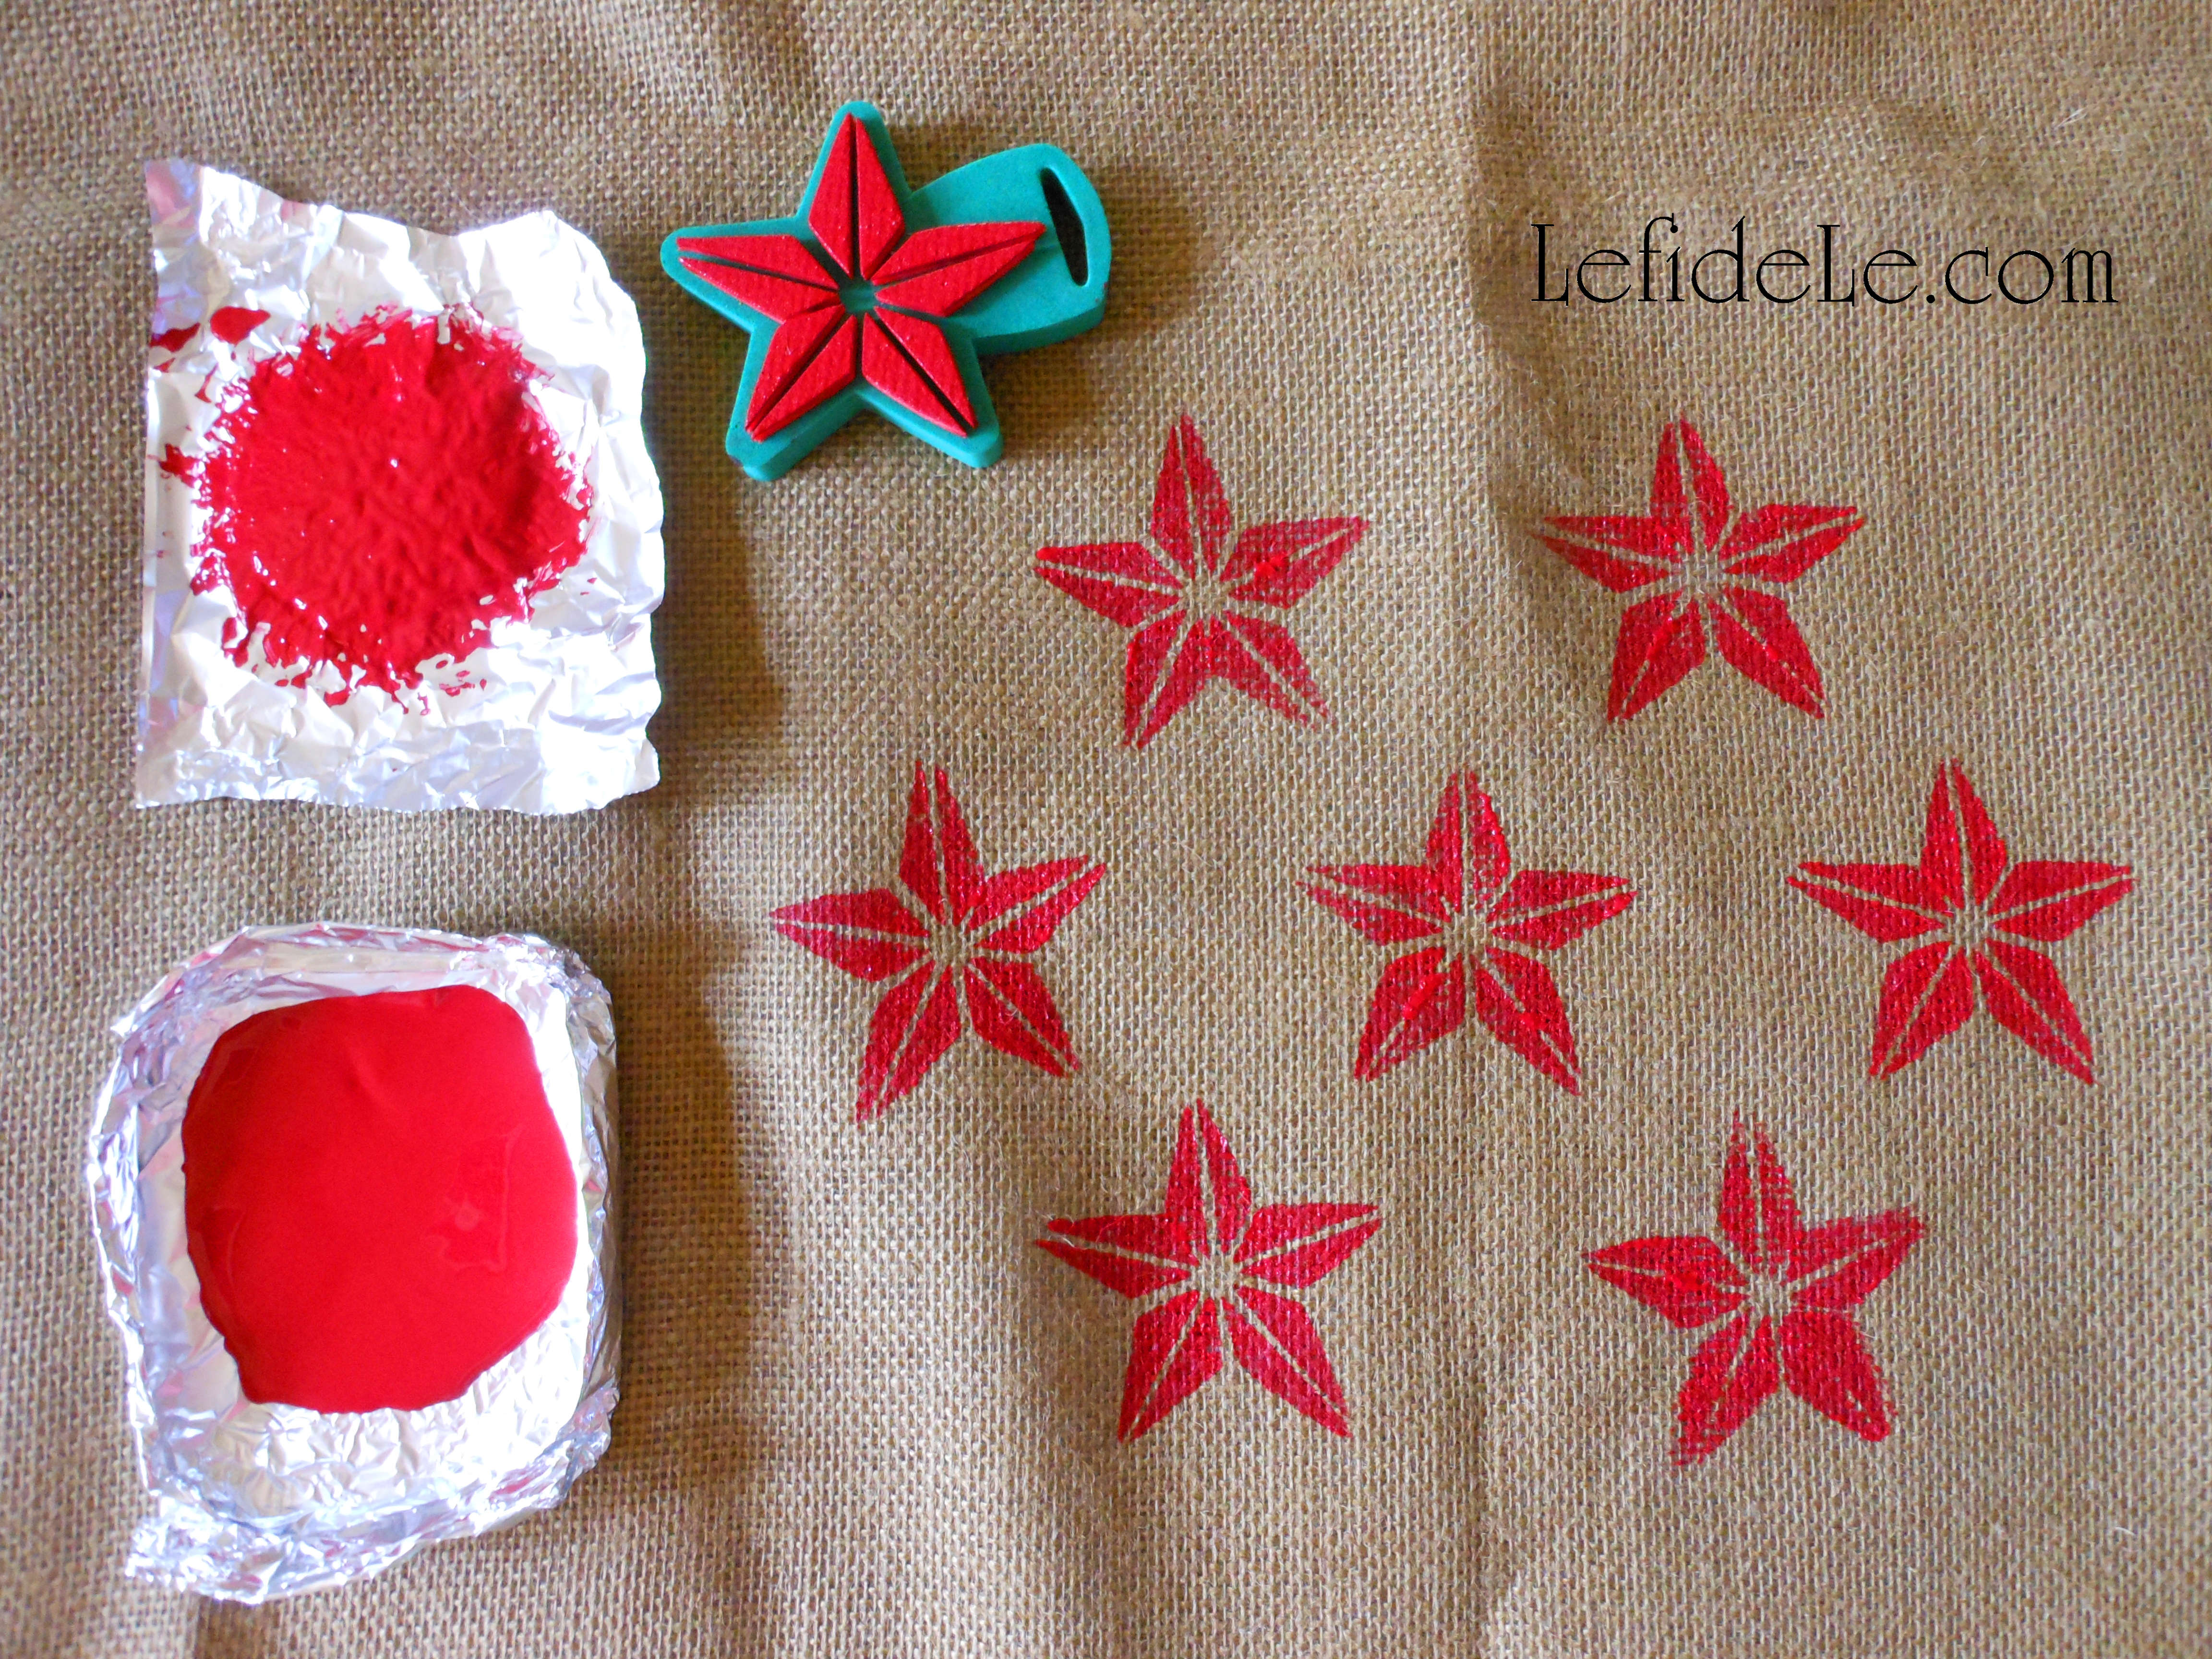
Next, make a faux sealing wax impression with the red paint. Either use the fabric paint tip to draw a circle and fill it in, or just squeeze some onto a plate and use a brush. Allow these to dry completely before handling. (Hot sauce bottles, glue bottles, and paint tubes placed inside the rings will prevent rolling and paint smears.)

83Leigh

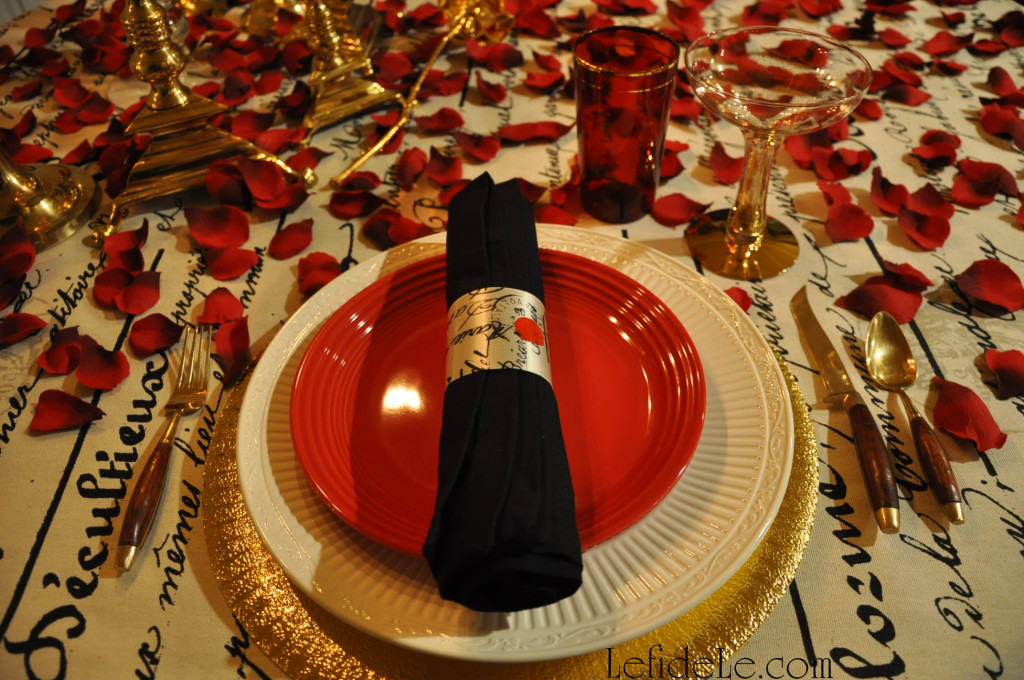
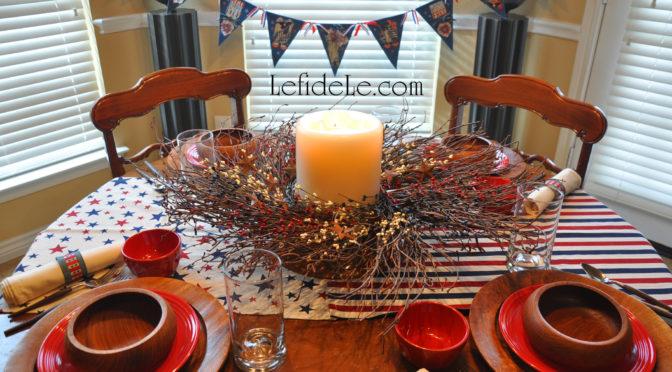
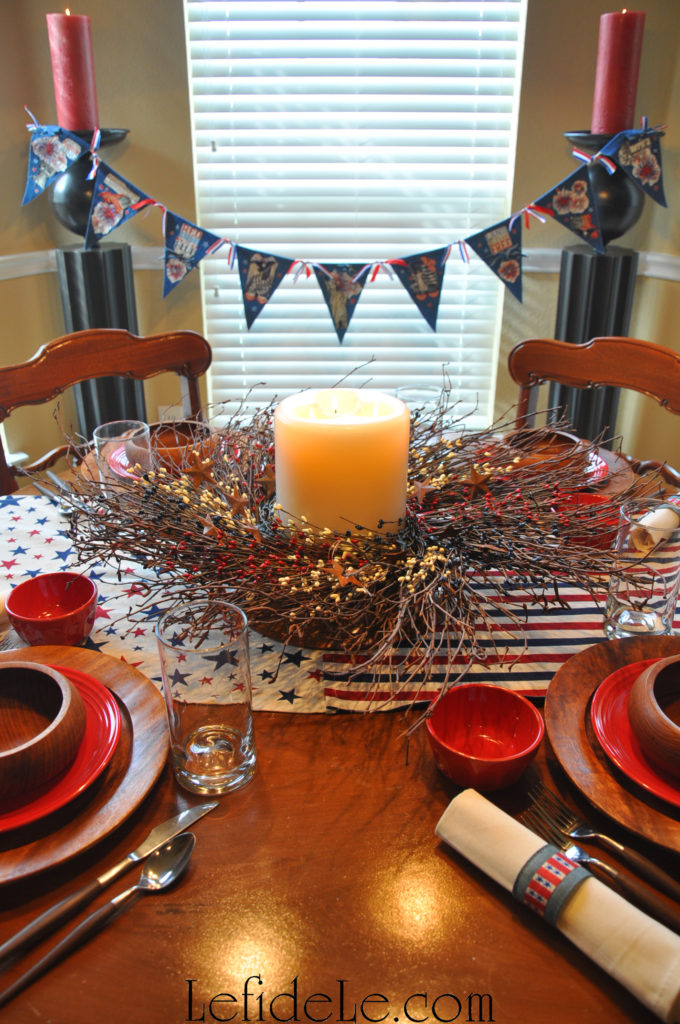
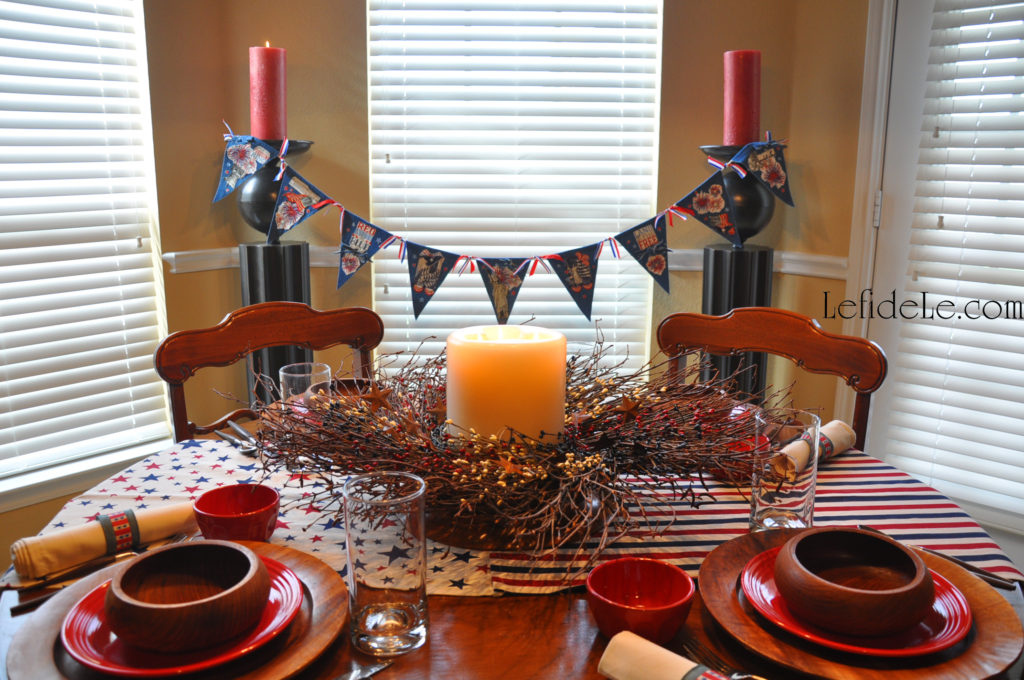
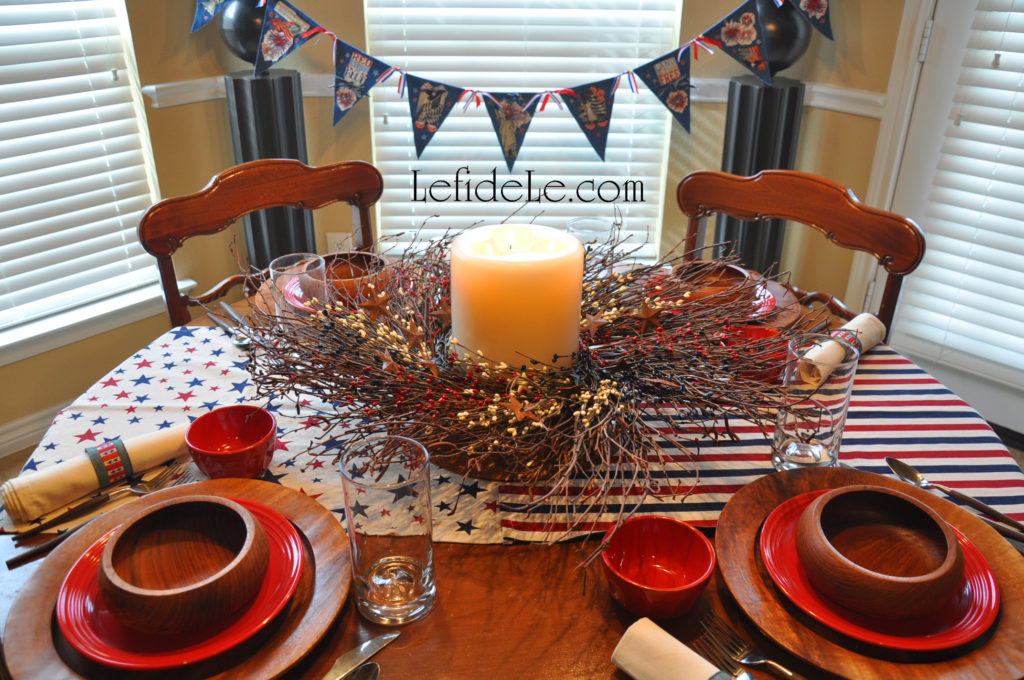
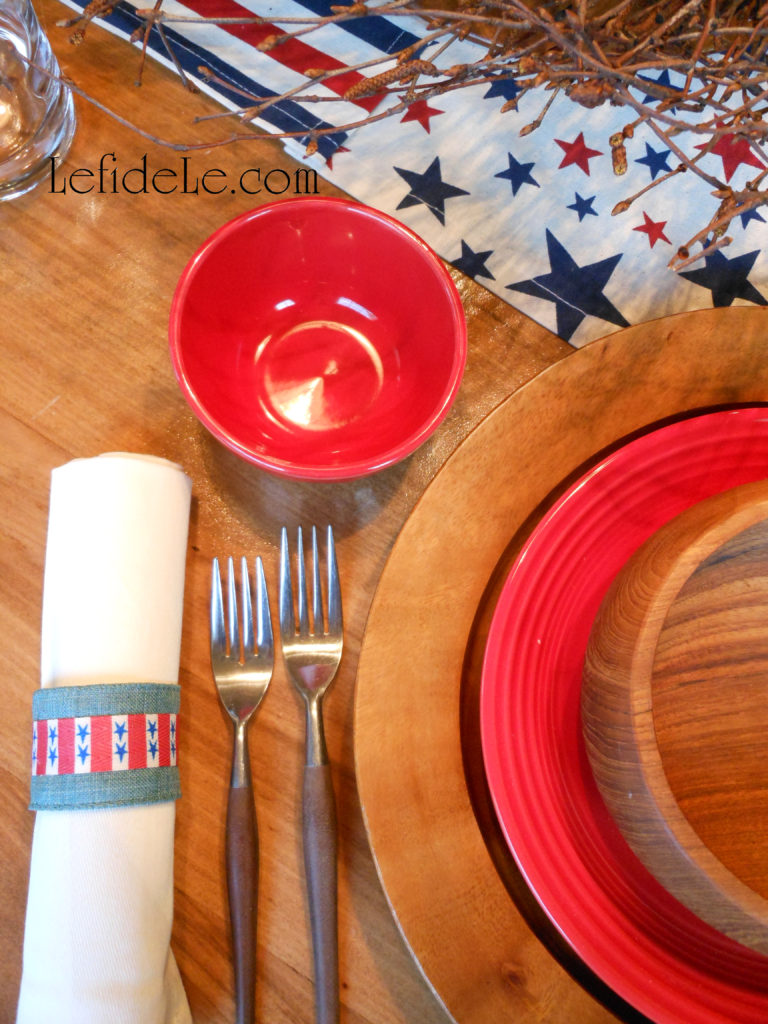
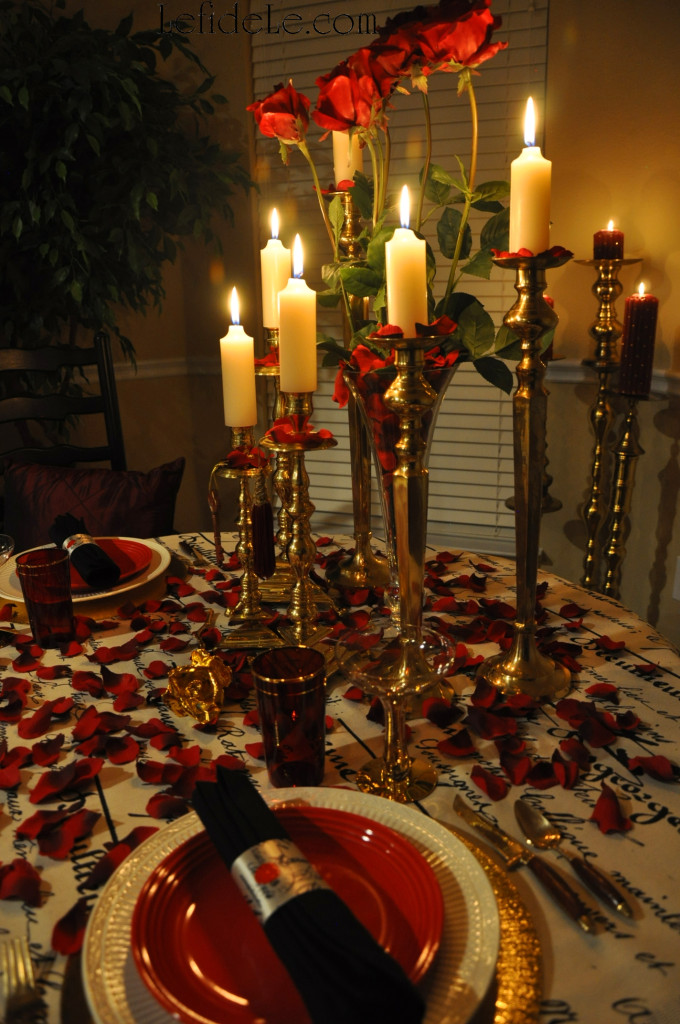
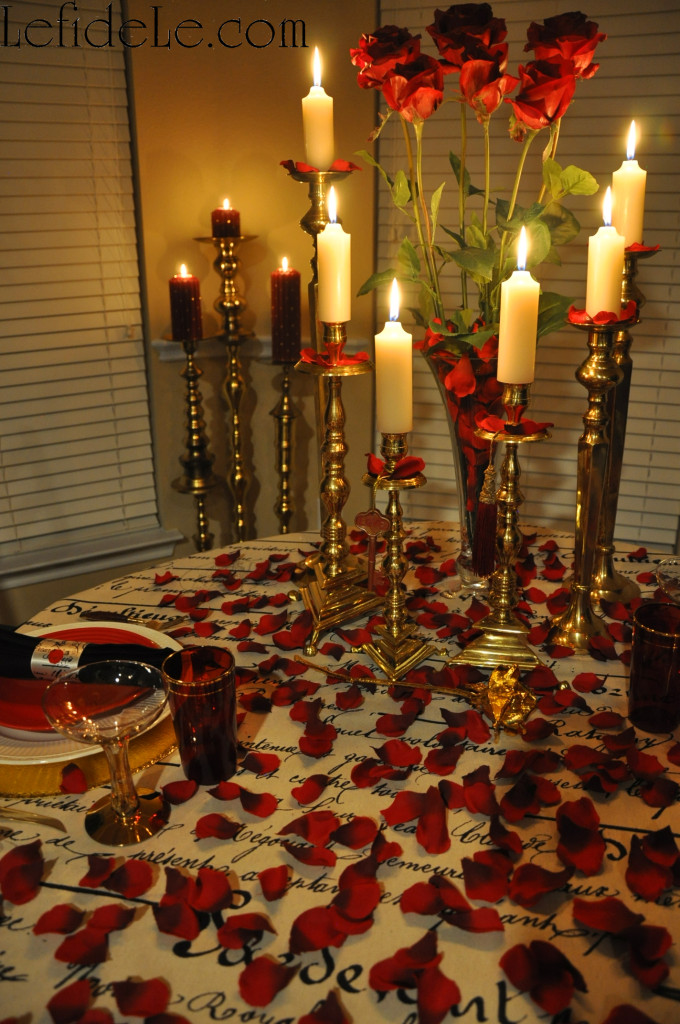
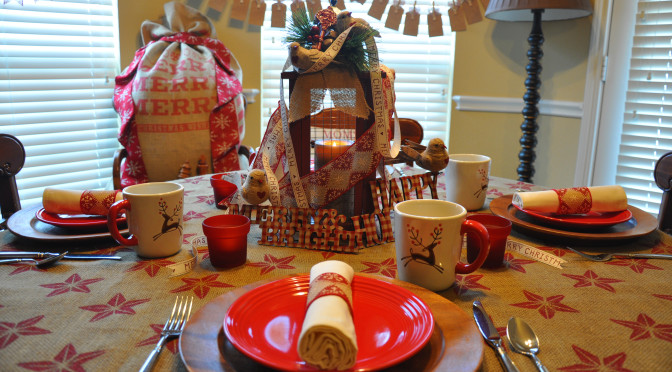
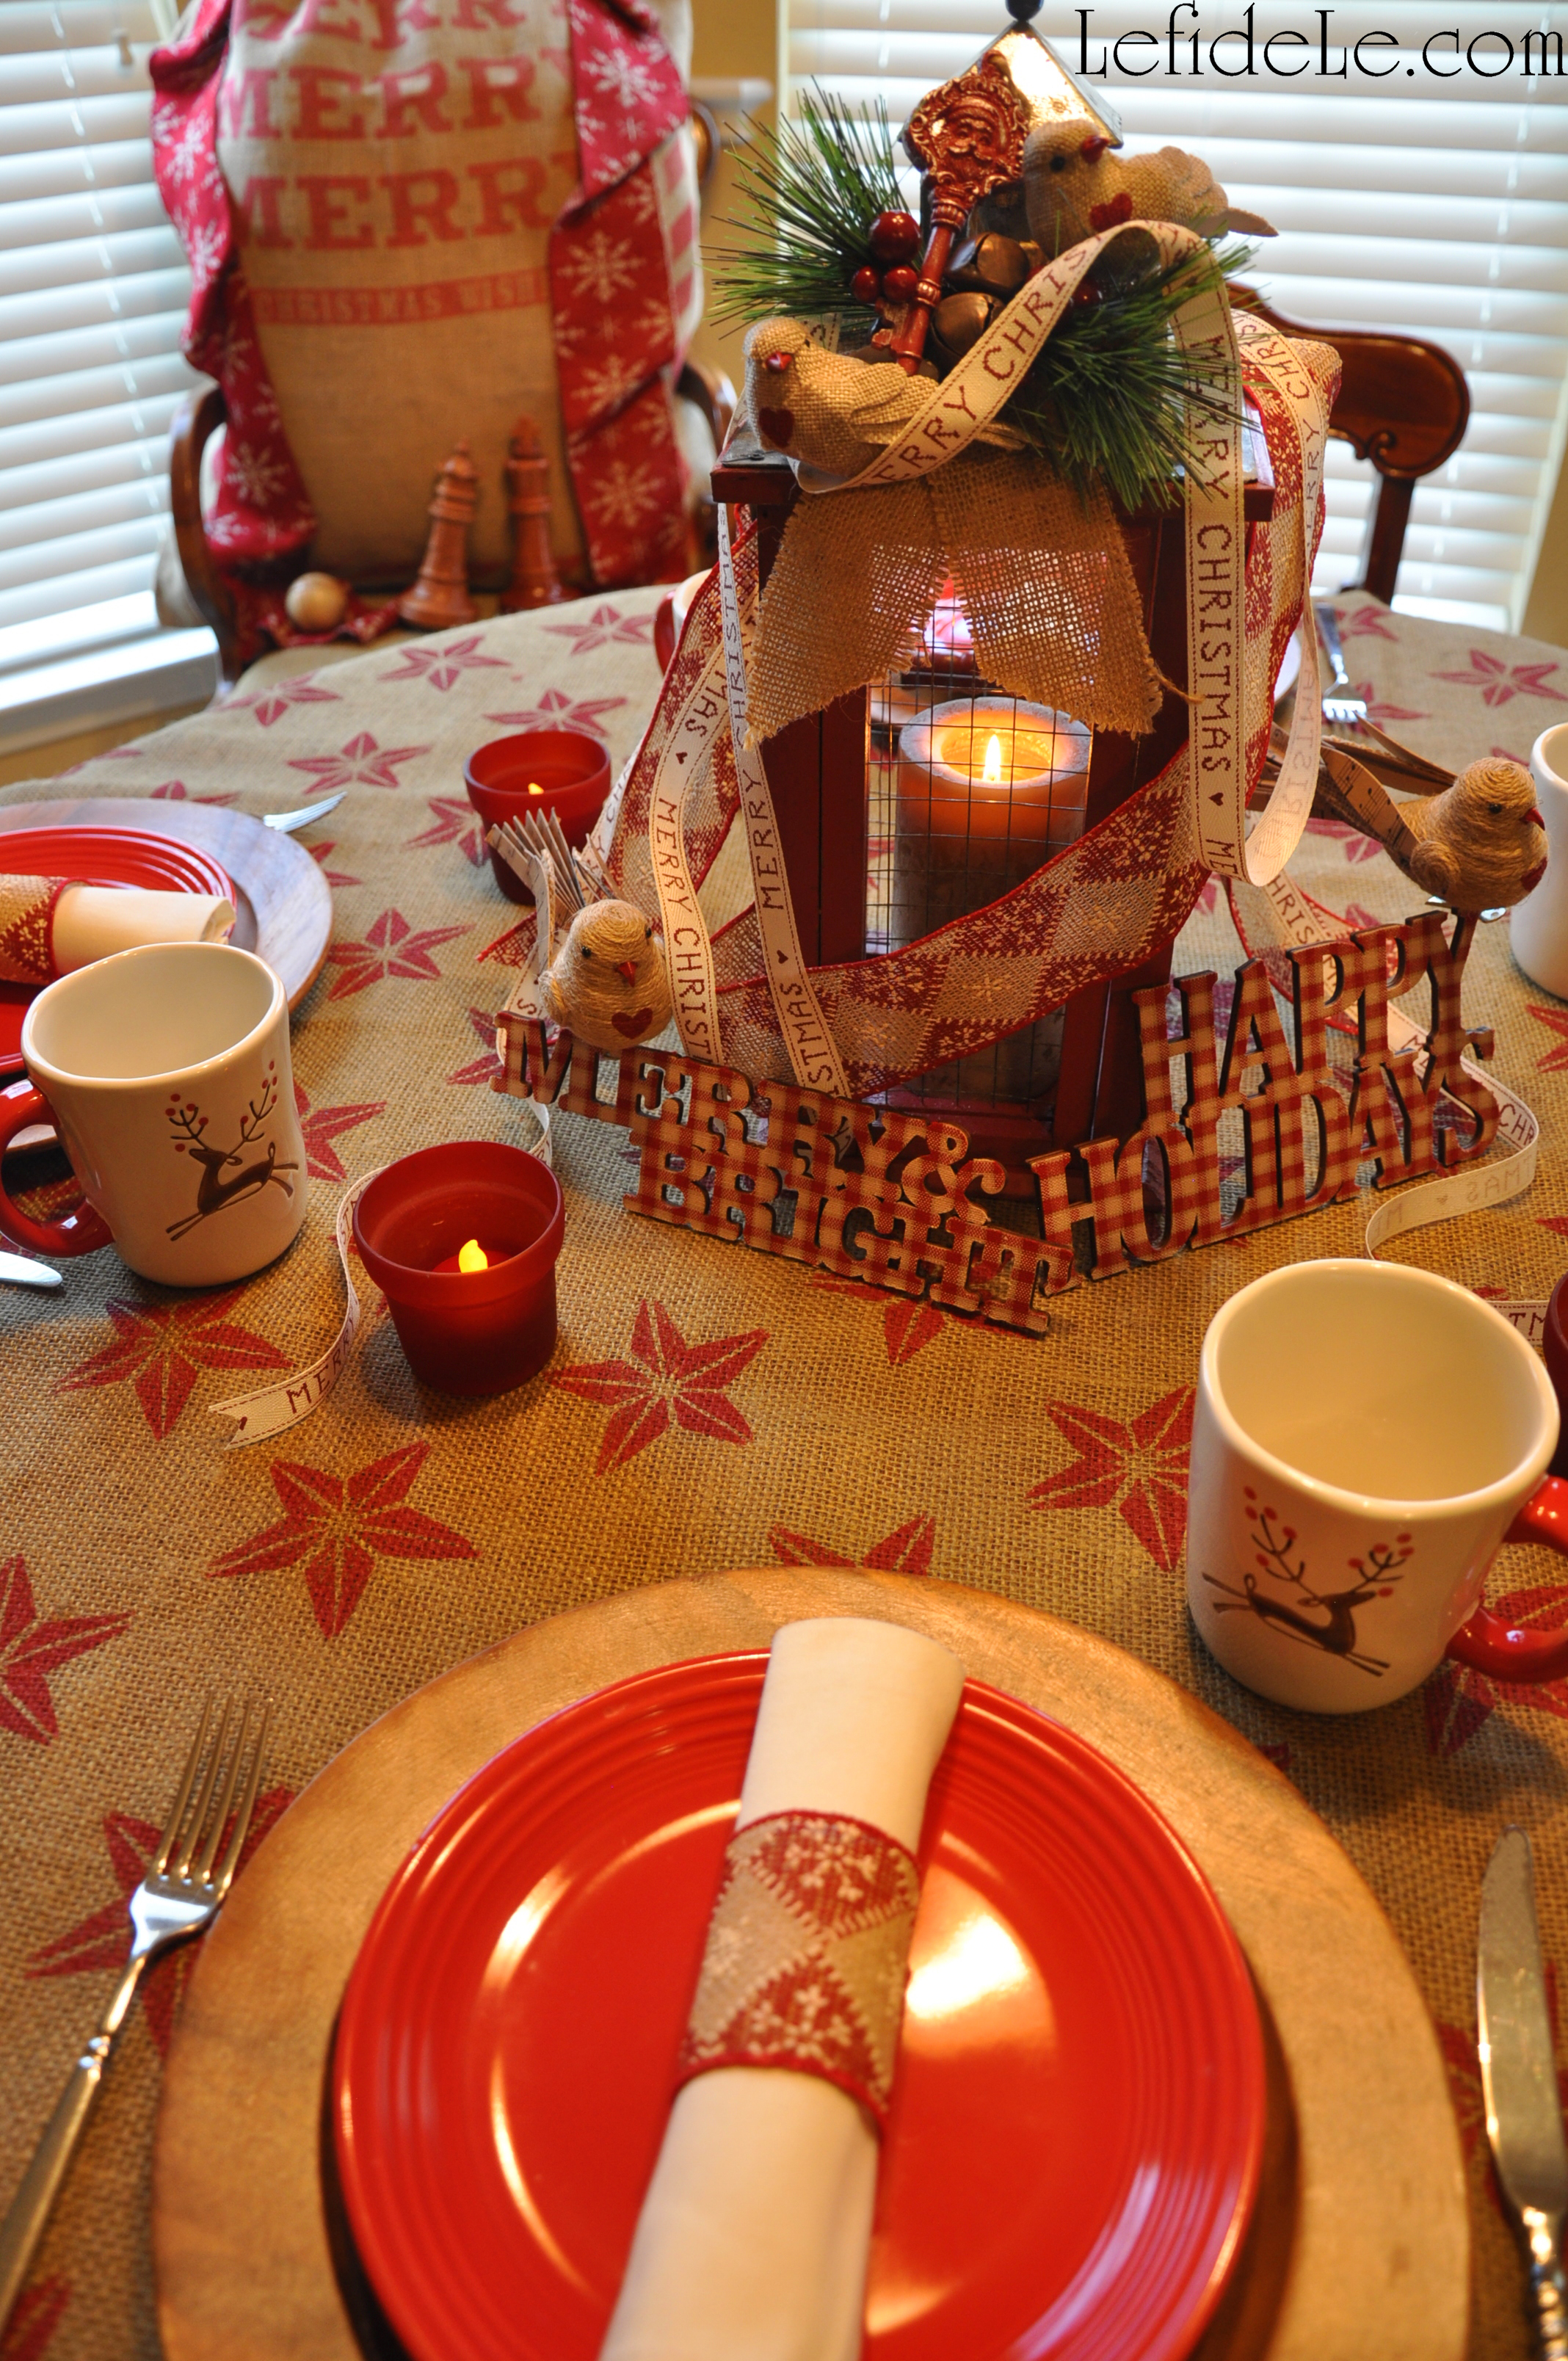
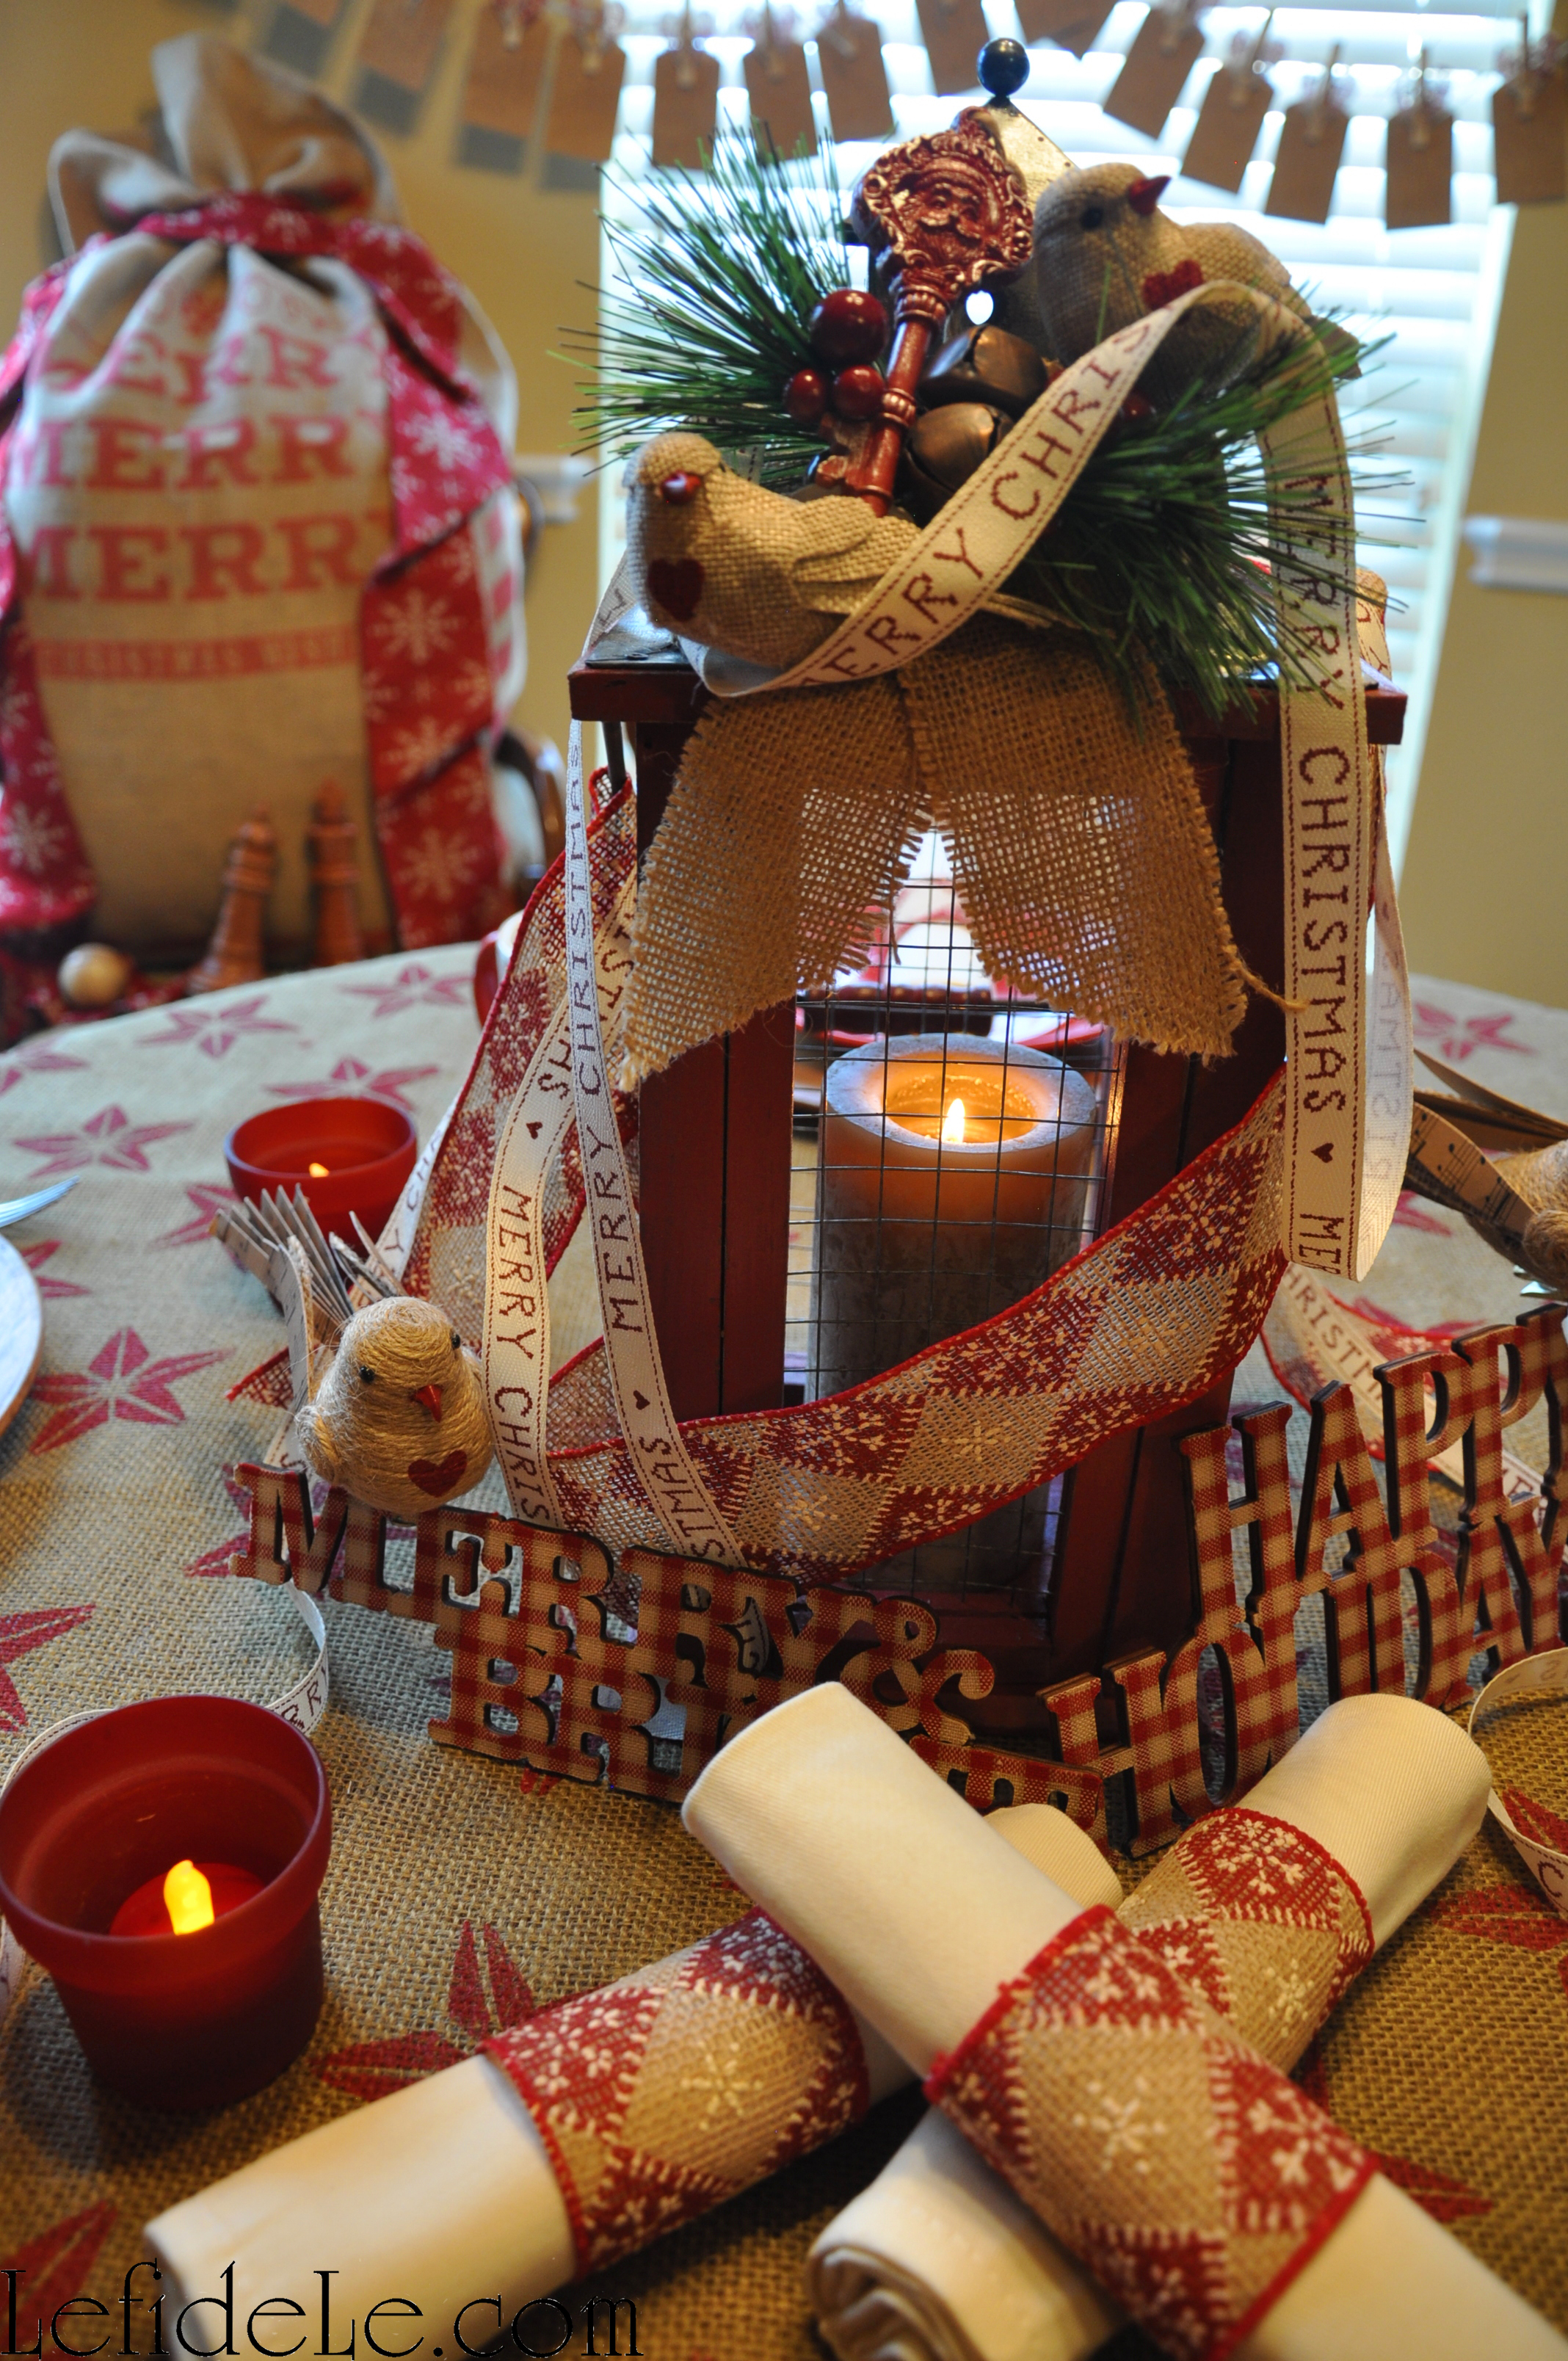
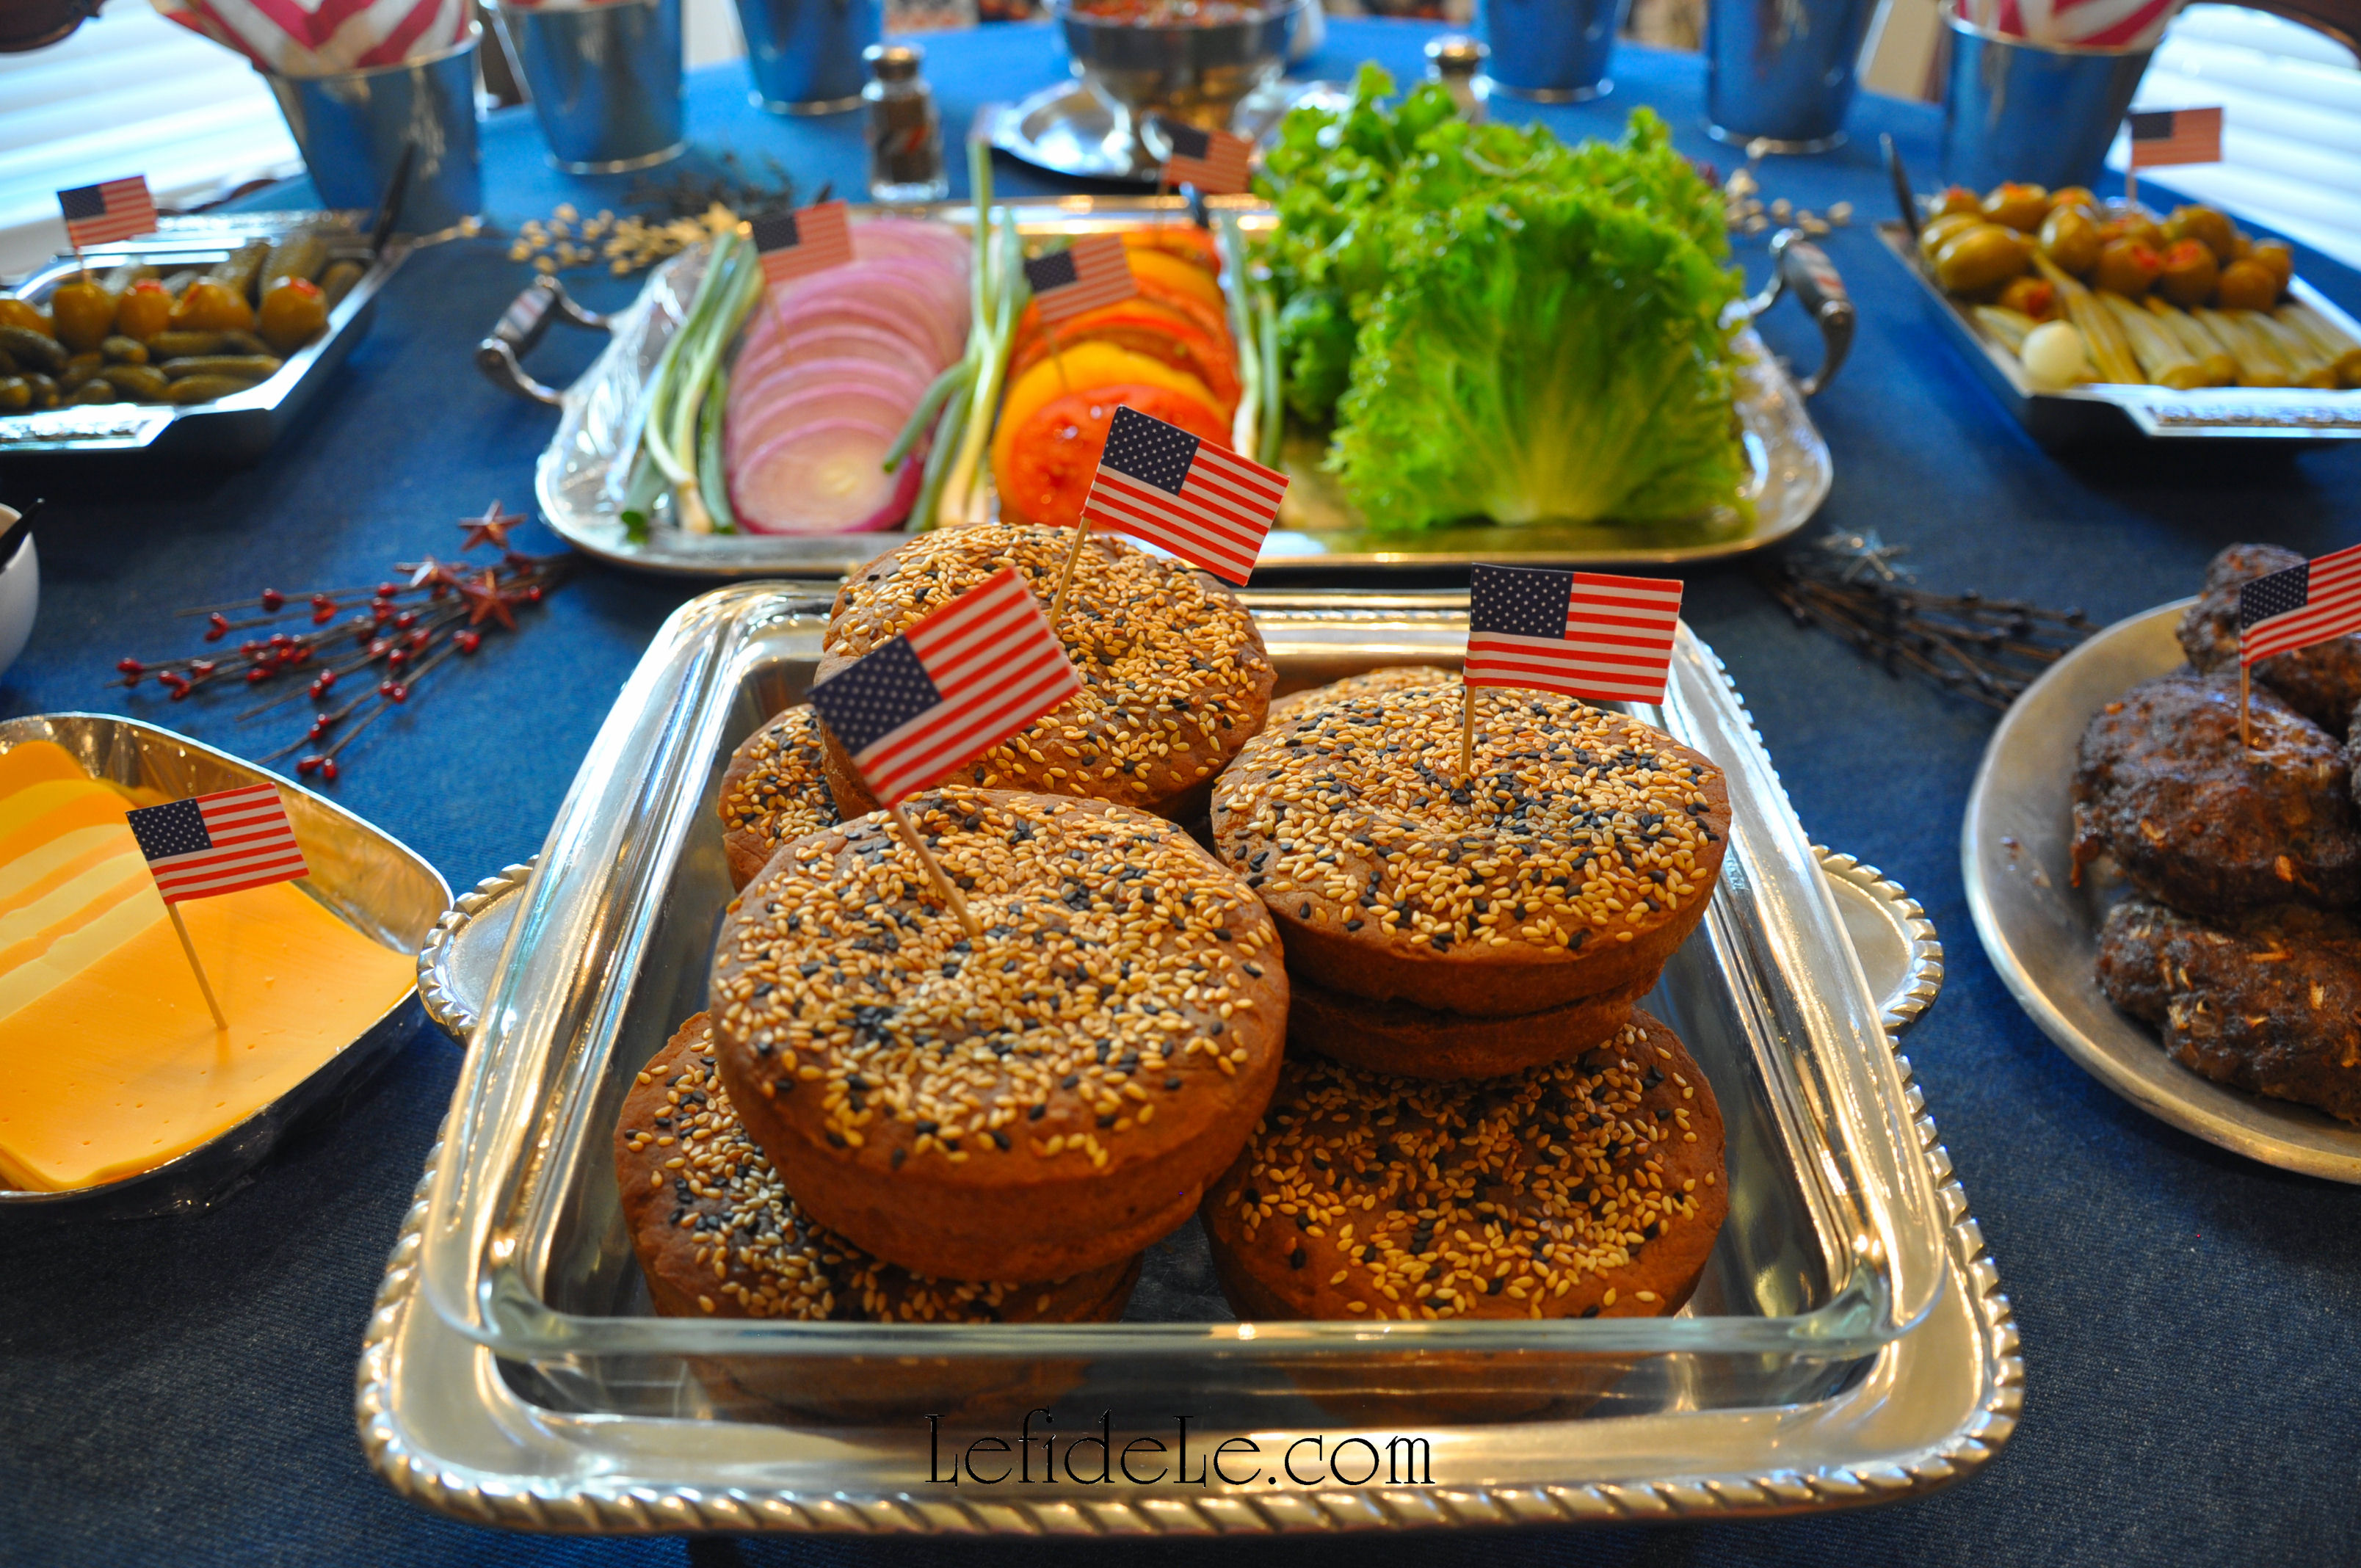
These napkin rings were so quick and easy to craft, and they were a great little touch to add to the Love Letter Themed Tablescape (Perfect for Valentine’s Day, Romantic Date Night, or Anniversary Dinner).

1617Leigh

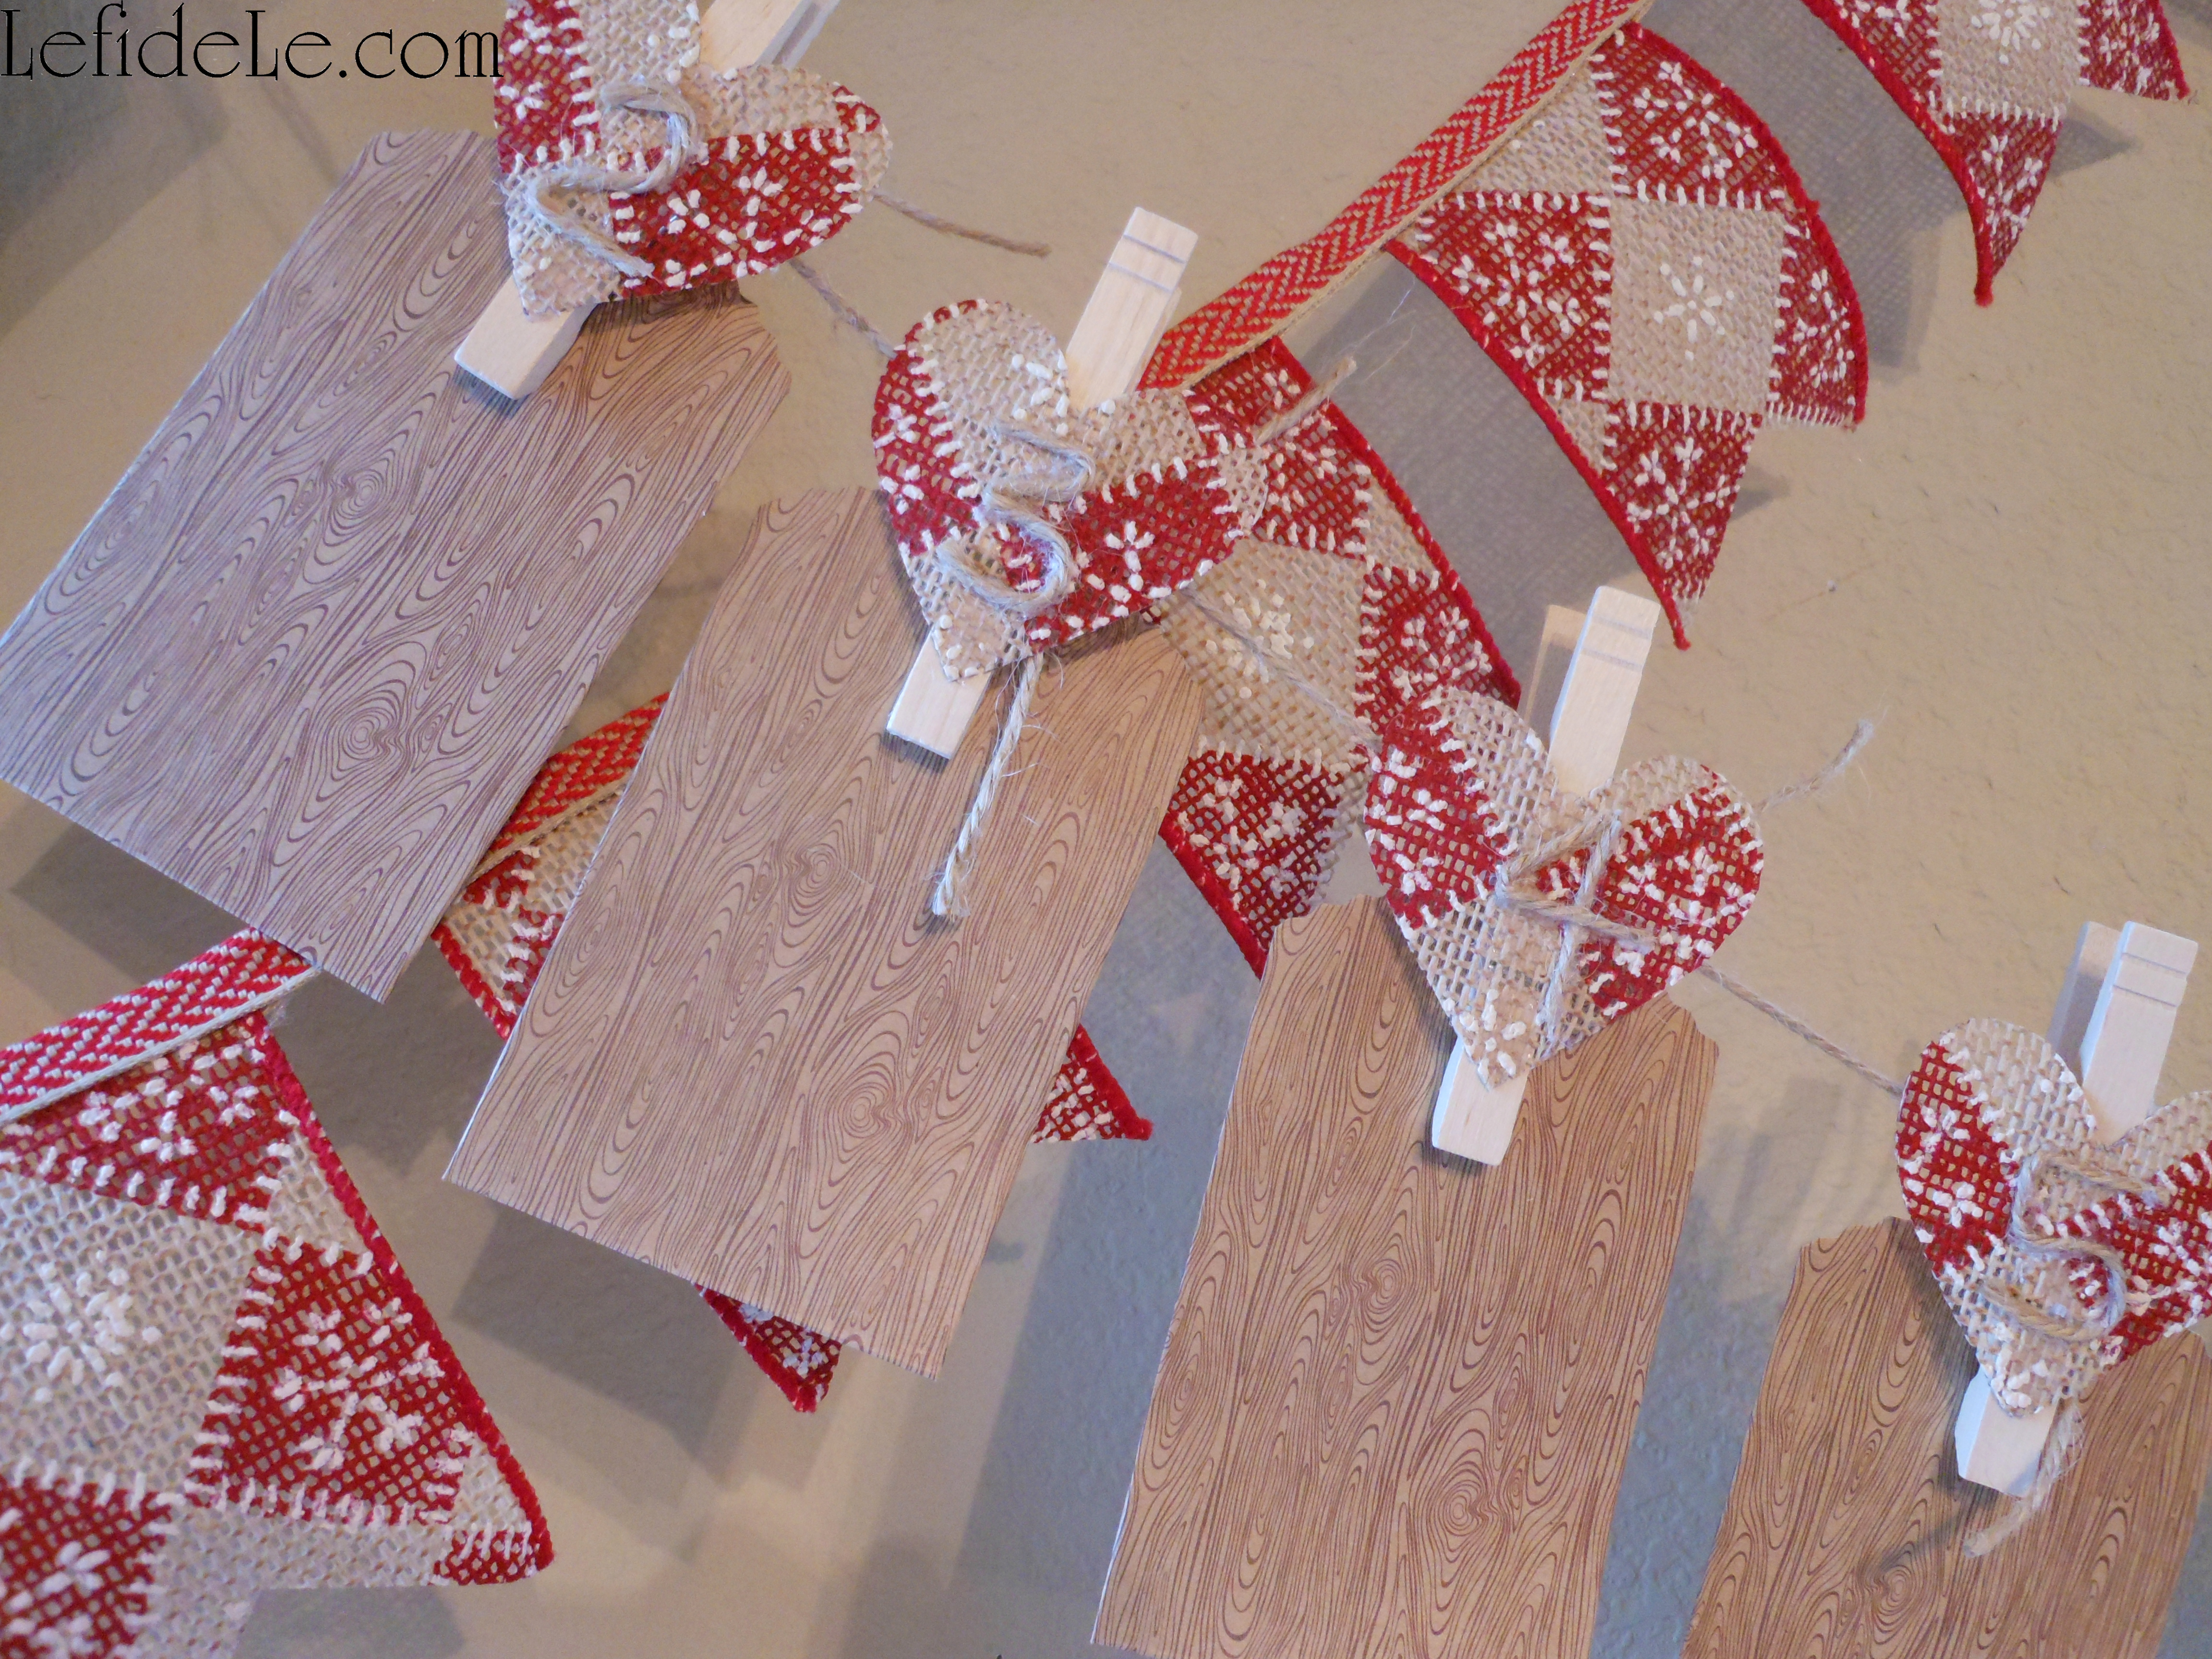
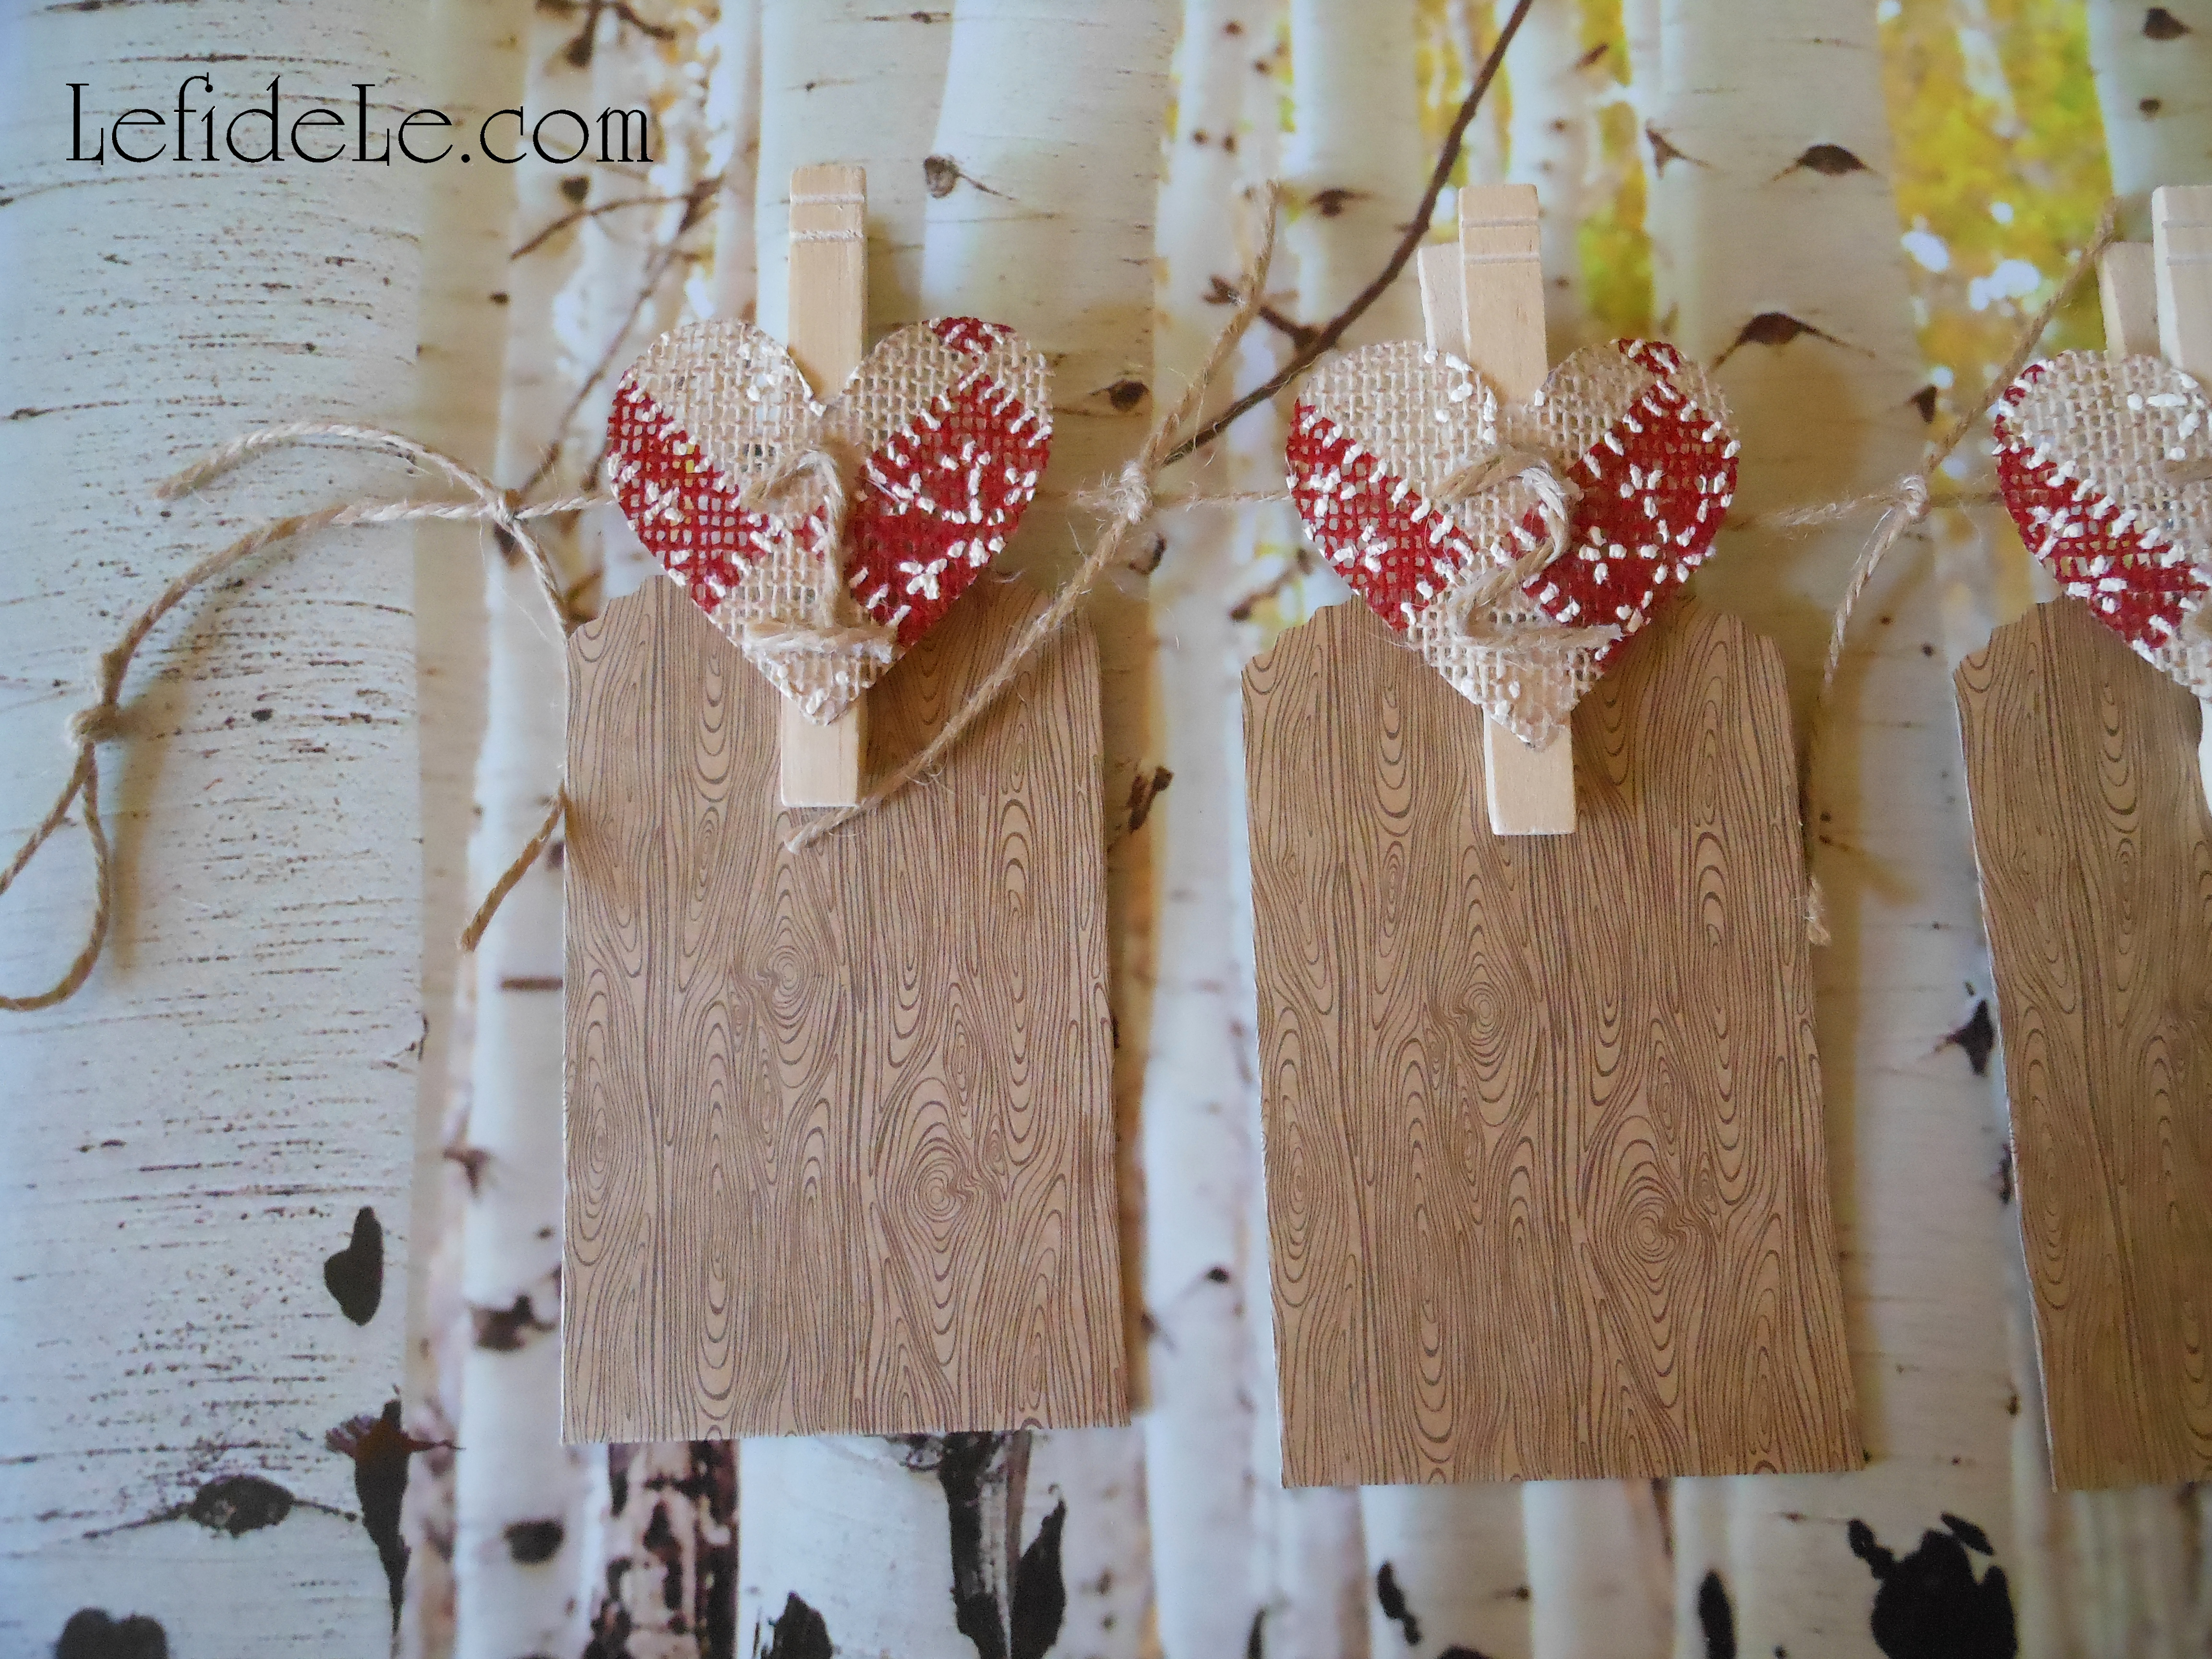
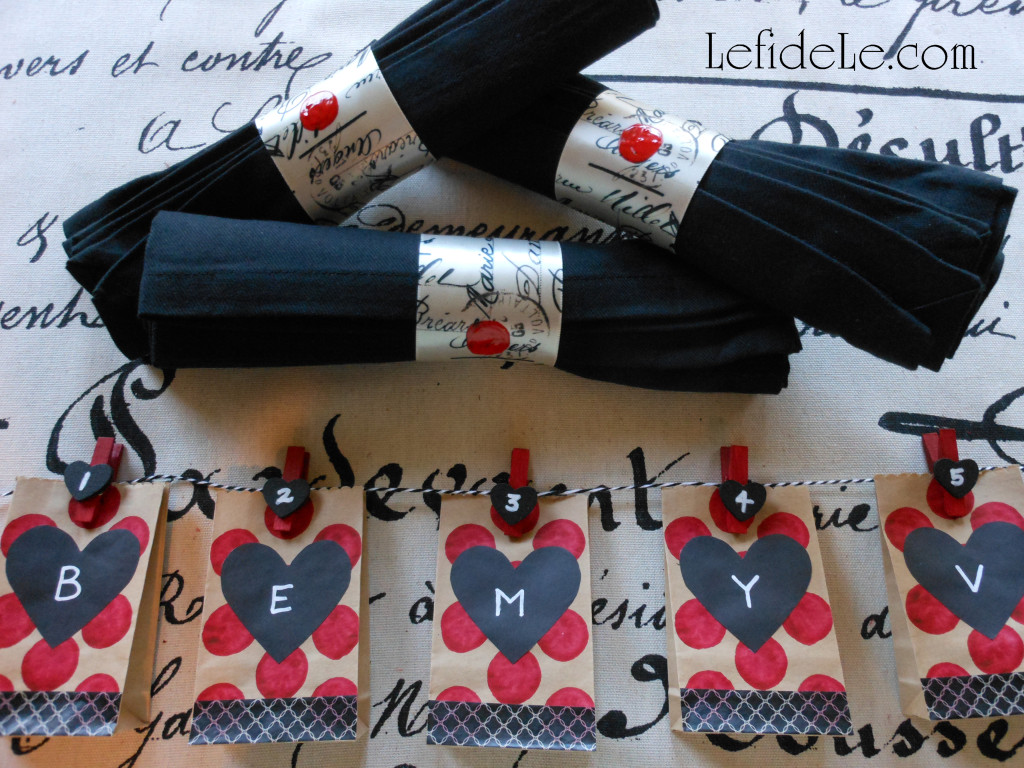
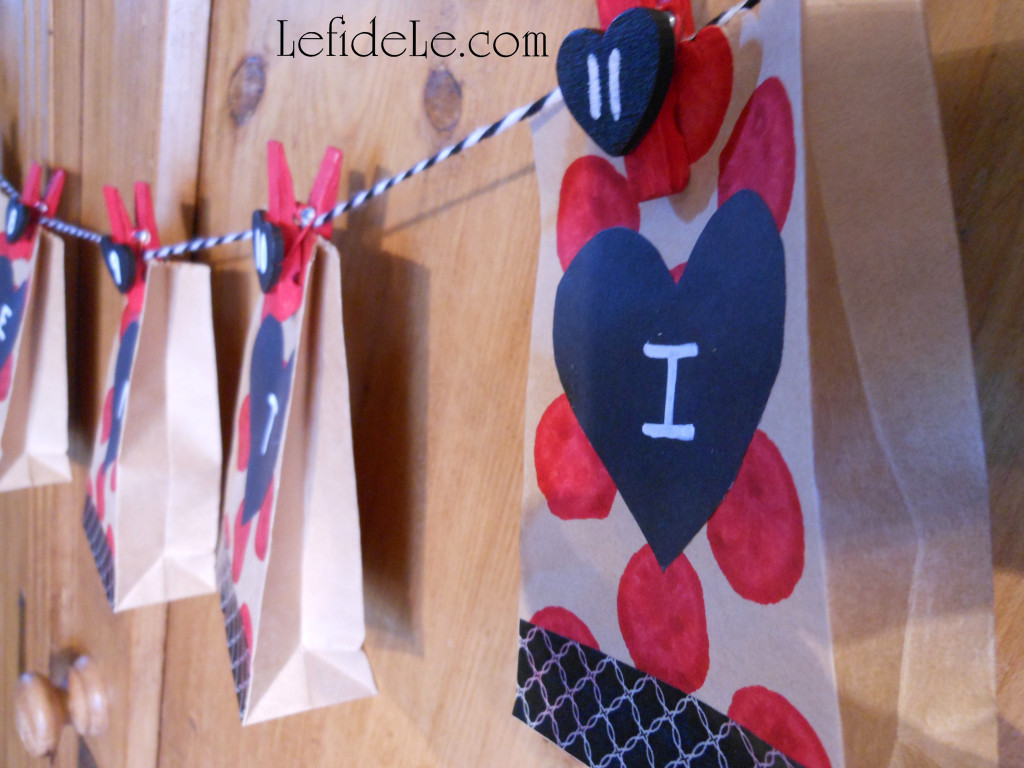
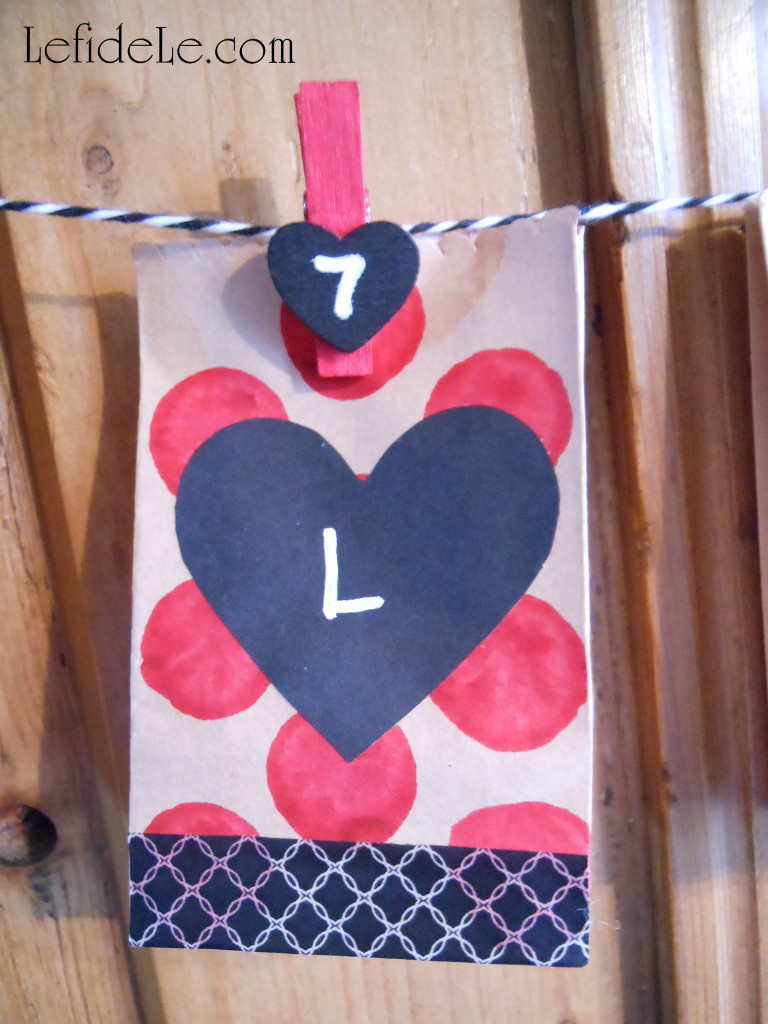
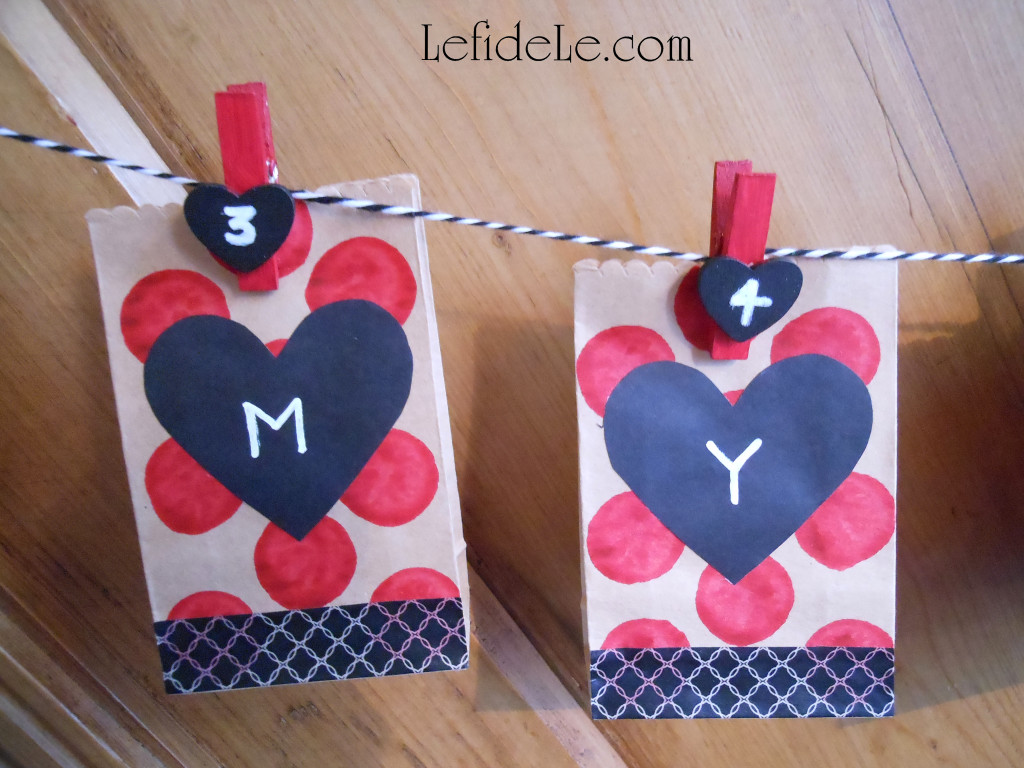
Now let’s make a Valentine’s Day countdown calendar and treat bag banner. (This is an easy enough project for the kiddos in your life to make too.) Begin by purchasing 14 mini clothespins complete with chalkboard hearts (these were 12 for $1 at the Target bargain bins). You can also buy the clothespins plainly and easily attach small flat wooden hearts with wood glue or hot glue… yes, hot glue does work on wood. Then all you need to do is paint the hearts with chalkboard paint. (All of the major craft stores carry the hearts. There are sidebar links for my favorite stores that carry coupon codes with them!)

1547Leigh

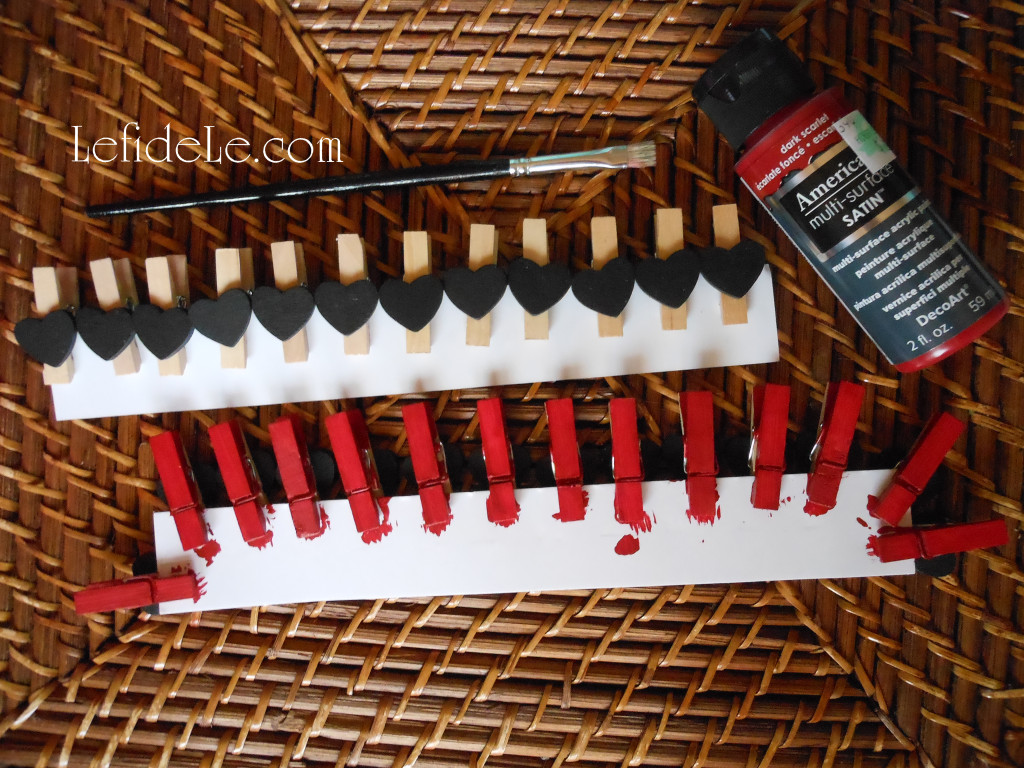
If you like, paint the remaining portion of the clothespins in your choice of red or pink… though the natural wood tone would look fine with the paper bags if you’re short on time. (I used dark scarlet multi-surface acrylic paint from DecoArt, because it matches my spice racks.) It’s easiest to clip them onto cardboard and just paint one side, leaving them to dry before flipping them over and completing the opposite side.

1552Leigh

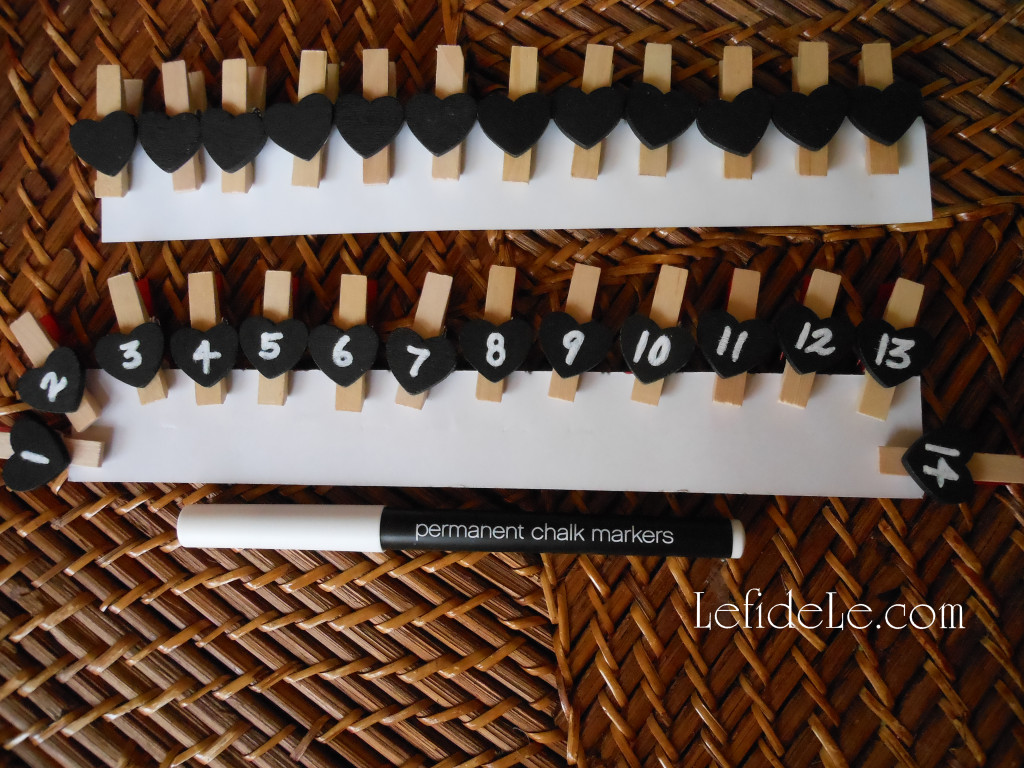
You have the option of writing the 14 day numbered countdown with actual chalk (so that they may utilized in another capacity after the holiday) or with a permanent chalk marker that can’t be rubbed off.

1555Leigh

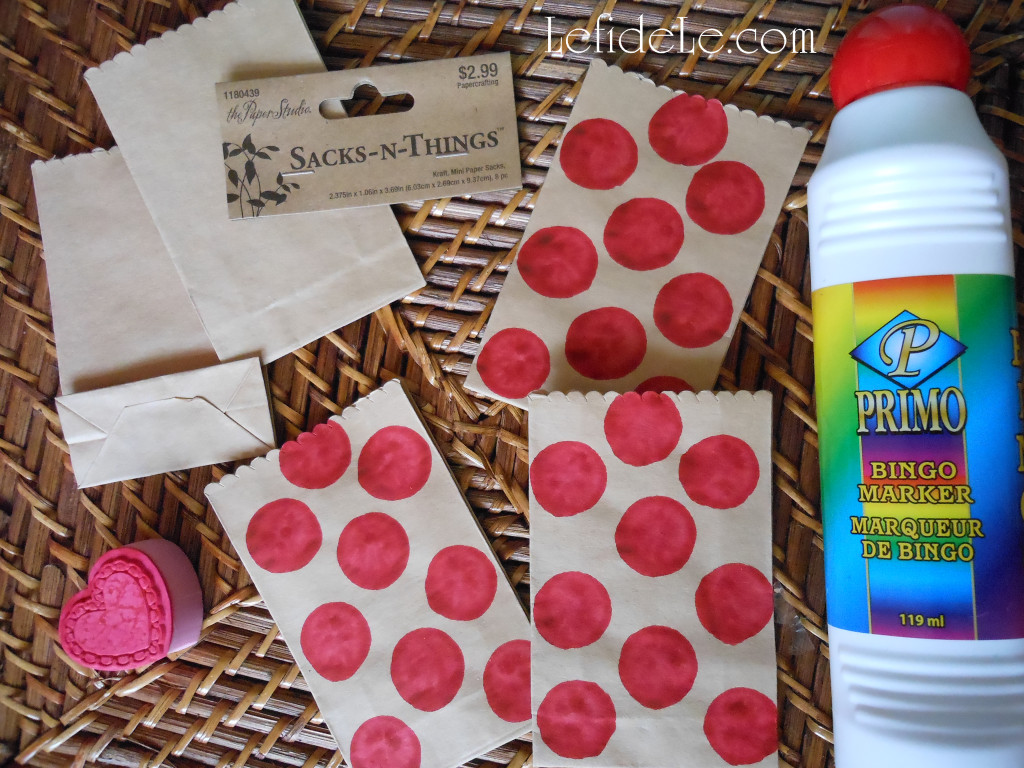
While those are drying, decorate your treat bags. (These plain little sacks were purchased cheaply for ½ off, but you can purchase printed ones if you’d like to speed up the process.) I used a red bingo marker to stamp dots in a polka dot pattern. (See more about this, along with other project ideas in my article on Fast & Easy DIY Hand-stamped Polka-dot Gift Wrap & Matching Gift Crafts.)Let these dry completely before the next step. (You also have the option of stamping a pattern onto the bags with ink or paint.)

1560Leigh

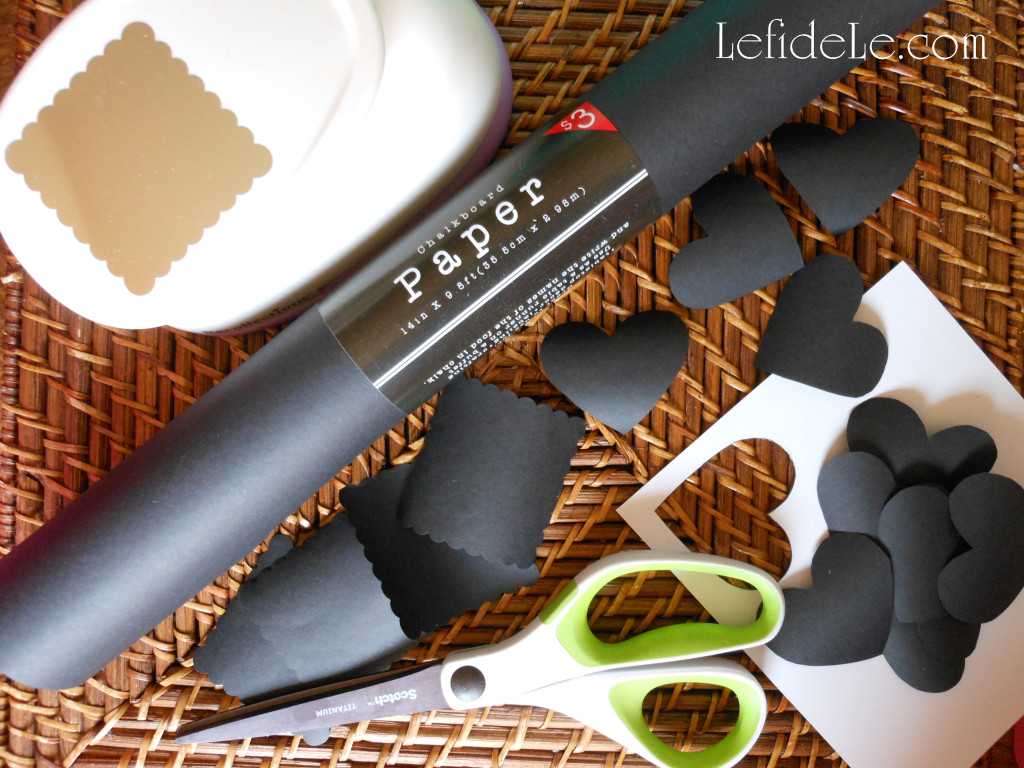
Next, cut out hearts from black chalkboard paper, or use a paper punch in any shape you like, or speedily use readymade chalkboard sticker labels.

heart template

Here is my handy little template to print free at home then cut out to trace around. It’s an easy way to make the same exact heart shape repeatedly. (Just right click the small image above and select print.)

1564Leigh


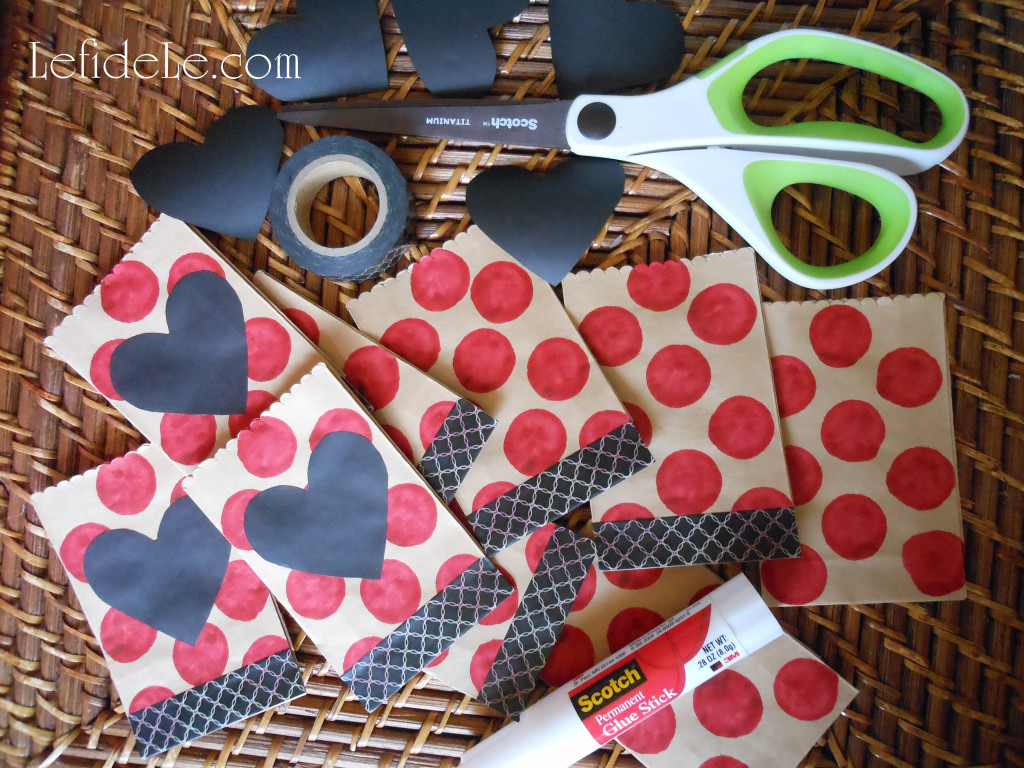
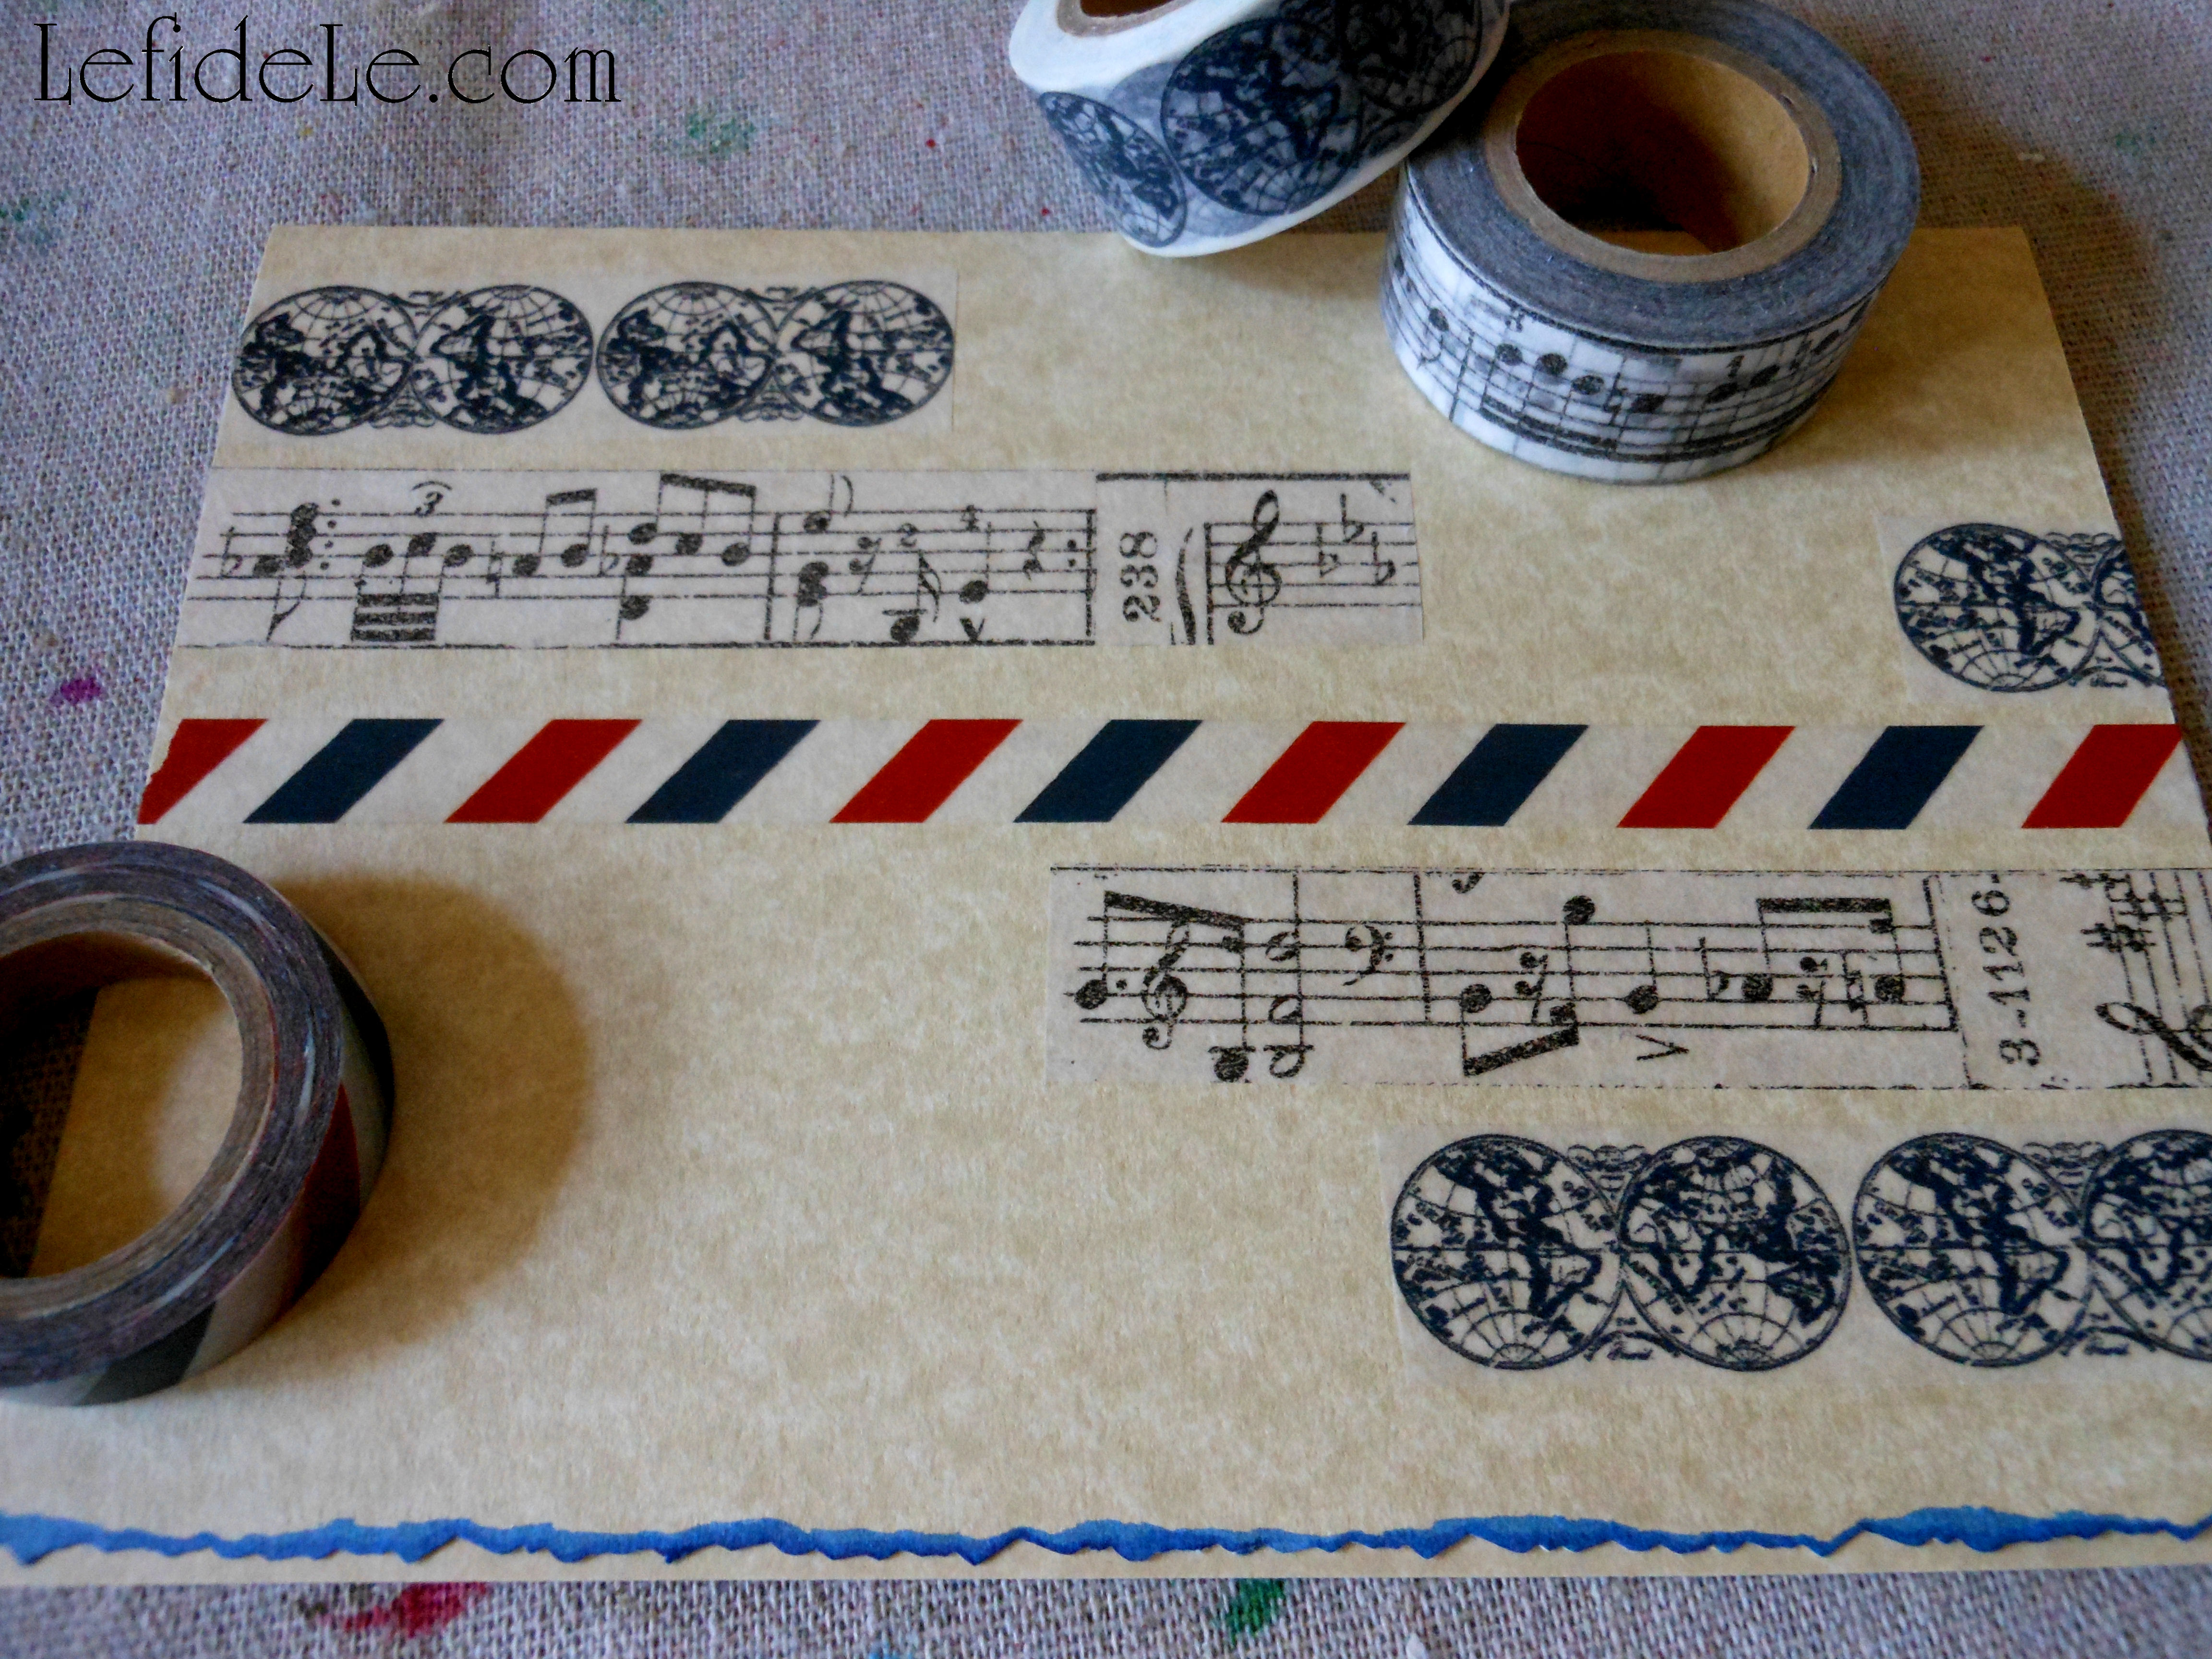
Adhere the paper hearts onto the bags with a permanent glue stick. Then run a strip of matching washi tape along the base for easily added flair.

1571Leigh

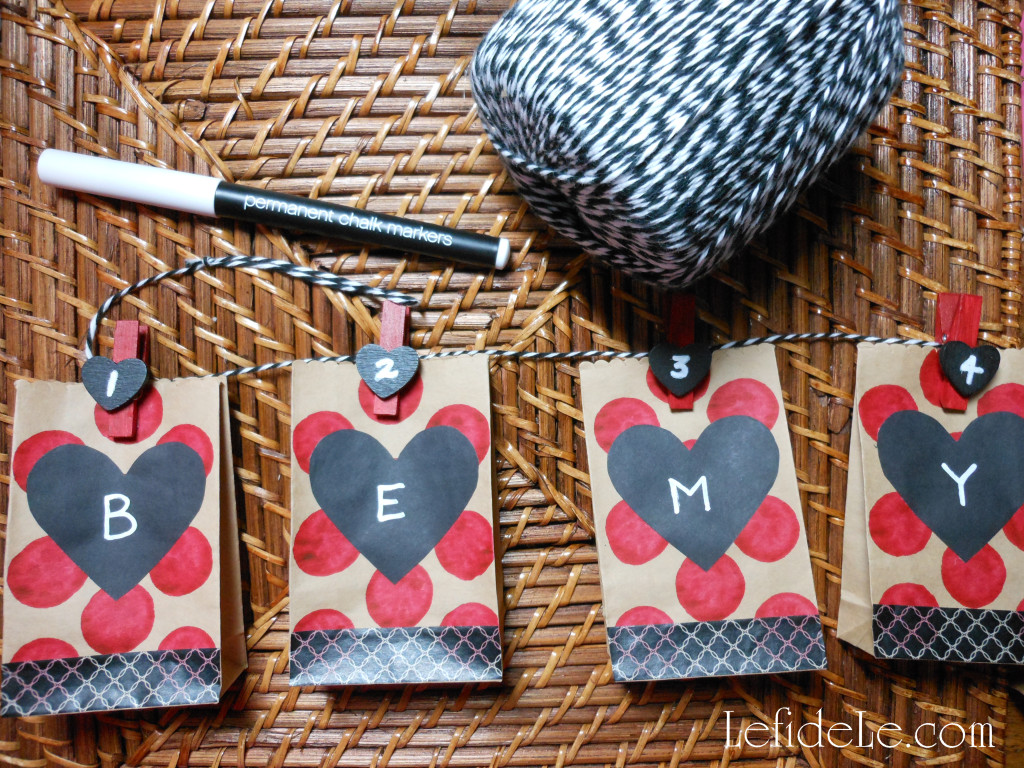
String the dry clothespins onto ribbon, string, jute, cording, twine, or yarn. (I used yarn that looks like twine because three times the amount can be purchased for ⅓of the price.) Once again, use either permanent white marker or actual chalk to write on each heart.

1623Leigh

I chose to write “Be my Valentine!” but “Valentines Day!” or “Happy Hearts Day” would also have fit on the 14 bags. You can also write the names of individual recipients like friends, classmates, or even alternate the names of family members.

1635Leigh

Fill the little bags with anything you like… you can make it as inexpensive or extravagant as you like.

1629Leigh

For kiddos: try candy, stickers, stamps, tiny toys, erasers, inexpensive jewelry… or silly printed jokes you won’t mind hearing over and over again. On the 14th day, think about directions leading to a larger gift like a stuffed animal.

1628Leigh

For adults: try printing faux fortunes, poems, romantic quotes, movie or event tickets, or even homemade coupons for “honey-do” chores or special treats. On the 14th day, think about directions leading to a larger gift like a dozen roses, box of chocolates… or something uber masculine like the latest power tool at home depot.

1661Leigh

This makes a super cute banner decoration as well, and it can be strung just about anywhere using either tape, 2 extra clothespins, or by tying knotted loops at each end of the string.

I ♥ Crafting… Don’t you?!

Faithfully Yours,

Leigh

Create a Homespun Holiday of Barn Red & Burlap with Christmas Tablescape & Mantle Décor Ideas

917Leigh

Why prepare for Christmas by waiting in long lines at overcrowded stores when you can create heartfelt moments with loved ones while crafting a homespun holiday that harkens back to simpler times. Deck the halls without breaking the bank using my easy craft tutorials for DIY décor that harmonizes perfectly with the season’s traditional crafts of gingerbread houses and strung cranberries or popcorn. Have friends over for a cookie decorating or gift wrapping party, and then move the décor over to the mantel in time for a cozy Christmas. In this way, we can all celebrate togetherness in the real spirit of the season!

943Leigh

“Deck the halls with boughs of holly“ and a one-of-a-kind burlap tablecloth painted with stamps and matching napkin rings which set a delightful tone for a homespun holiday gathering. (Learn how easy it is to make these here!)

928Leigh

“’Tis the season to be jolly” and nosh on gluten-free vegan gingerbread cake served upon red ceramic plates over wooden chargers accompanied by holiday reindeer mugs filled with steaming cups of hot chocolate and homemade marshmallows.

936Leigh

“Follow me in merry measure” to a table lit by barn red lantern bedecked with ribbons and merry-making birds. (See more about the birdies here!)

941Leigh

“While I tell of Yule-tide treasure” held in handcrafted advent calendars alongside festive banners and signs trimming the windows in the background. (Find out how to make these here!)

58Leigh

“See the blazing Yule before us” and the apropos message of J-O-Y spelling out the holiday sentiment. (Learn how easily these were made here!)

67Leigh

“Strike the harp and join the chorus” of pretty burlap birds perched perfectly upon tiny tin houses. (See this quick project here!)

918Leigh

“Sing we joyous, all together, heedless of the wind and weather.

Fa-La-La-La-La-La-La-La-La!”

Faithfully Yours,

Leigh

Easy DIY Burlap Ribbon Holiday Banner & Christmas Countdown Advent Calendar Craft Tutorials (+ Free Printable Heart Template)

75Leigh Why prepare for Christmas by waiting in long lines at overcrowded stores when you can create heartfelt moments with loved ones while crafting a homespun holiday that harkens back to simpler times. Deck the halls without breaking the bank with easy DIY advent calendars and holiday banners made from burlap, ribbon, jute or twine, and clothes pins. Nothing is more festive than a banner, and the countdown to Christmas is even more exiting when it’s accompanied with a daily treat. In this way, we can all celebrate togetherness in the real spirit of the season!

946Leigh

To make a simple yet adorable Christmas banner, use a wired ribbon (like patterned burlap) and a thinner flat woven ribbon. Cut the woven ribbon as long as you want your banner to be (like the length of your mantel).

624Leigh

To make the little flags, cut enough 4 inch lengths of the wired ribbon to fill the length of the banner. Next cut 1 inch V-notches out of one end of each (by folding in half lengthwise and making a straight cut at a diagonal angle).

628Leigh

Hot glue the straight sides of the cut flags to the center of the long woven strand (spacing them a little apart). Now add a line of glue to the top of the long ribbon and fold in half over the cut ribbons. (Press this down for better adherence.) Do this in sections of a few flags at a time (so the hot glue doesn’t have time to cool before pressing).

923Leigh

Try hanging it on a stairway or as a festive backdrop in your breakfast room. (I even have one hanging across my spice racks as I write this.)

84Leigh

To make an original yet inexpensive advent calendar use 25 clothespins, 25 tiny paper bags, jute or twine, and some leftover ribbon or burlap.

heart template

Print my heart stencil, and cut it out to use as an easy template to trace uniform shapes quickly. (Just right click on the image above, and select print.)

653Leigh

Trace the hearts (or make stars, trees, circles, etc.) onto the underside of your choice of ribbon, fabric, paper, or burlap. Cut 25 of the shapes out.

663Leigh

Then hot glue a shape to each clothespin. Next, you have the choice of gluing a ready-made number onto each heart, or simply adding a bow. (This is really cute when using them as a mantle-less stocking holder line. You can also add a strong magnet to the back, and stick it on the fridge.)

2Leigh

I chose to hot glue jute in the shape of numbers onto each heart. (It is easier than it looks, but it was a bit more time consuming.)

706Leigh

Be sure to knot small lengths of twine in between each clothespin at regular intervals (so that they don’t all end up in the center once they’re hung up).

58Leigh

A few ideas for daily treats are… gum or candy, jewelry or cufflinks, holiday fortunes without the cookies, gift cards from favorite stores, love notes or poetry, cash or coins, seasonal jokes, flash drives loaded with holiday movies or music, sewing goods like thimbles or embroidery floss, special recipes with a promise to make, barrettes or keyrings, homemade certificates for things like breakfast in bed or car-washing, lip gloss or chap-stick, scavenger hunt clues for large items, scrapbooking stickers or components, and tickets for movies, concerts, events, or travel. Or for the crafty person… try putting one piece of a crafting kit into each packet which can be completed when the holiday’s over. You can even assign odd and even days to different family members.

67Leigh

Why have one day of a filled stocking that competes with big presents, when you spread the joy of Christmas into 25 days of surprises!

Fa La La La La Lovin’ It!

Faithfully Yours,

Leigh

P.S. Check out my other coordinating homespun holiday craft tutorial HERE, and the full results all of the heartfelt crafting HERE!


Easy DIY Stamp Painted Tablecloth & Holiday Ribbon Napkin Rings + Burlap Birds Craft Tutorials

953Leigh

Why prepare for Christmas by waiting in long lines at overcrowded stores when you can create heartfelt moments with loved ones while crafting a homespun holiday that harkens back to simpler times. Deck the halls without breaking the bank with an easy DIY burlap tablecloth painted with stamps to coordinate with ribbon crafted napkin rings. Then add a personal touch to ready-made burlap and jute bird ornaments with just a little paint and sentiment. In this way, we can all celebrate togetherness in the real spirit of the season!

958Leigh

To make the tablecloth, fold the burlap fabric onto itself forming a triangle. Cut alongside the raw edge to remove the extra footage. Unfold it to reveal a perfect square without having measured a thing. The raw edges add to its rustic appeal… so nothing needs to be sewn either! (Note that burlap is available in varying widths which in turn will affect your length… so purchase the widest variety you can find.)

644Leigh

Spread the burlap over a cheap drop-cloth to protect your work surface from paint (because it will seep through). Add a holiday pattern to the cloth with a thick foam shape stamp. Dip it into cheap acrylic craft paint, and then stamp it onto a throw away piece to remove the excess paint before stamping your project.

943Leigh

I used a star shape for several reasons… I already owned the stamp, it symbolizes the star of wonder in the heavens, and the cloth can be used again on the fourth of July!

603Leigh

Make the matching napkin rings easily with wire edged burlap ribbon which is available in so many cute patterns. To do this, simply cut 6 inch lengths for each ring you’ll need.

615Leigh

Lay down a line of hot glue onto one end of a section of ribbon and fold it over to meet the other end. Press together firmly to ensure it forms a secure bond. One and done!

917Leigh

The rings coordinate perfectly with my advent calendar and banner crafts because they utilized the same roll of ribbon.

25Leigh

Saving the easiest for last… personalize any store bought ornament with a little paint for gifts or to make it match your décor perfectly.

635Leigh

For these bird picks (from the floral department of a local craft store) I simply painted the black beaks and added hearts with a bit of the leftover tablecloth paint.

31Leigh

These clip ornament birds were found at an overstock supply store locally. (Now painted, they look like lipstick laden lady birds wearing their hearts on their sleeves!)

975Leigh

I started the whole ornament personalization thing many years ago when my godmother (not a fairy) asked me to paint a pennant bearing penguin to change its school affiliation. It was a really easy way to customize a small gift to turn it into a keepsake. (If you’re not at ease with a brush and paint, try a paint pen!)

936Leigh

Fa La La La La Y’all!

Faithfully Yours,

Leigh

P.S. Check out my other coordinating homespun holiday craft tutorial HERE, and the full results all of the heartfelt crafting HERE!


Star-Spangled Independence Day Patriotic Party Décor Ideas (& All-American Burger Bar)

333Leigh

Every year on the fourth of July, families across the country gather in jubilant celebration of the birth of our proud democracy. We join together to commemorate our forefathers’ defiant stand to secure those inalienable rights we enjoy today, and to venerate that hard-won freedom. Take part in a tour of my star-spangled Independence Day event for décor ideas to plan your own patriotic party with!

358Leigh

History was heralded with a welcoming wreath spangled with bright steel stars and the broad stripes of old glory… denoting a gallantly streaming flag hailed through the perilous fight.

368Leigh

A table  in the aft zone was layered with patriotically printed fabric atop a white tablecloth… symbolizing the purchase of peace. The table’s façade was treated as a frontispiece with a star-spangled banner collage featuring iconic imagery in the appliqués cut from the same patriotic print fabric. (Find my no-sew craft tutorial on it here.)

362Leigh

The theatre’s horizon displayed a dazzling banner of classic Americana exclaiming, “God Bless America”. An explosion of color extended to thematic paper plates, blue cups, and flag printed napkins. A plain white vintage water pitcher was adorned with the sparkle of a steel star and flag ribbon.

014Leigh

Decorating rebellion manifested itself with a centerpiece, placed off-center, of beribboned candles atop vintage ceiling tile candlesticks… all to represent Lady Liberty’s torch. Hanging from them were steel stars and flag painted Christmas ball ornaments… representing bombs bursting in air and the flag that was still there. A galvanized pail held utensils set for dessert.

021Leigh

Revelers were offered the refreshment of blue patriot punch held in sustainable vessels festooned with stars and stripes. Further sustenance was provided with chips in a red painted basket (from the Beanitos brand made in the USA).

363Leigh

The memory of George Washington was honored with “truthful cherry patriotic pie” (of my own upcoming gluten-free vegan recipe) held high in esteem upon a metal pillar spelled with zinc USA letters. Sweet vegan tarts crowned with candy stars (from another American brand Hail Merry) topped a second pillar swathed in more stars.

333Leigh

The fore-field was set as an all American build a burger bar over the classic American staple of blue jean cloth set over a red tablecloth. Blasts of star spray shot out from beneath a centermost tray… connoting embattled fireworks.

373Leigh

Homemade burger buns (of my own upcoming gluten-free vegan recipe) were displayed in a pewter dish. Behind that sat a vintage tray offering hamburger accompaniments… like heirloom tomato slices, organic green onion, artisan leaf lettuce, and locally grown red onion slices.

375Leigh

An additional vintage pewter dish served onion loaded beef patties (another of my upcoming recipes). Slices of soy-free vegan cheese (from USA brand Follow Your Heart) were stamped with an American Flag seal of approval. Deep square vintage steel dishes presented pickled okra, onion, cornichons, gherkins, and sun-dried tomato stuffed green olives.

353Leigh

Galvanized metal buckets lined with flag napkins made admirable single-serving fry baskets bursting with seasoned steak fries (see my upcoming recipe). Old-school salt and pepper shakers got the patriotic washi treatment. More vintage dishes contained soy-free veganaise, paprika-free mustard, and corn-syrup-free ketchup… so that no allergy got served.

351Leigh

As the July 4th night sky blazes with the flash of celebratory fireworks, may we all seek to reflect upon the valorous sacrifices made for our collective liberty.

374Leigh

Faithfully Yours,

Leigh

P.S. Keep checking in on my Recipes Page for the latest postings on Gluten-Free & Egg-Free Pies, Fries, & Hamburger Buns! I’m launching a new on-going series of Burger Creations that is set to grow increasingly creative with time!

044Leigh

Be sure check out my article for a DIY July 4th Denim No-Sew Appliqué Collage Star-Spangled Banner Craft Tutorial for Independence Day here!

163Leigh

And this article for July 4th Altered Art Greeting Card as Mailable Mixed Media Independence Day Décor (DIY Collage Art Tutorial)here!

120Leigh

DIY July 4th Denim No-Sew Appliqué Collage Star-Spangled Banner Craft Tutorial for Independence Day

163Leigh

Inspired by our glorious national anthem, I set out to construct my own star-spangled banner (not old glory) to wave over a modern Independence Day celebration. Making a fabric appliqué collage banner is easier than it looks, and it’s easy on the budget because it only takes a little fabric, rope, ribbon, and hot fabric glue. That’s right, glue… no sewing skills are necessary! This makes it so quick to construct, that it can be made the day before a party. Even better, no one else will have anything like it, because it’s your own one-of-a-kind work of art!

125Leigh

Let’s begin with fabric selection as there are a number of ways to go about this… if you have a plethora of leftover fabric scraps, all the power to you, use them! For my banner base triangles, I used old denim. (This might be the perfect project to do something useful with that old pair of jeans that hasn’t fit in, well… awhile!) You can also purchase coordinates at the fabric shops and craft stores. (See my affiliate links in the side bars as they offer great discounts from time to time.) For my appliqués, I bought a patriotic print on sale (from Le fidèLe Designs affiliate Joann / Hancock Fabrics) that was just perfect for collaging. (See more denim and patriotic print fabric completing my Star-Spangled Independence Day Party Décor as table cloths here.)

127Leigh

Divide the end of your base fabric into 6 inch sections, and mark the underside of the fabric with a pen.

128Leigh

Next, mark 8 inches below the top line to form the length of your future triangles. (You can either cut this strip now or wait until all your marks have been made.)

133Leigh

Mark a dot on the 3 inch midpoint of each 6 inch top section. Use a ruler to mark the corresponding point directly below it, onto the 8 inch line (or cut). This will be your triangle’s point. Mark a line to connect this point to each corner of the 6 inch marks you made first. (You will be making triangles with each connection.)

132Leigh

Cut along each line to make your triangle bases. Another option is to make a tab at the top of each triangle in order to fold it over a thick piece of rope… otherwise just glue the triangle top to the rope. (I elected to make a tab for these. I’ll demonstrate the tab-less version in a future tutorial.)

140Leigh

Cut a tapered edge on any tab tops you make, so that it isn’t seen on the front after gluing.

136Leigh

Now cut out individual images from your printed fabric… just as you would in a paper collage or decoupage project. Use good fabric shears for a clean cut, or old scissors to make an intentionally rough edge… again, it’s your project, so it’s your choice. Also, think about cutting apart some of the larger images into smaller ones. (For example, cut apart the eagle from the flag in one image.)

138Leigh

Lay out your triangles to plan your design. Rearrange your cut images until you find it looks pleasing. (This is the part where banner craft becomes collage art.)

142Leigh

Adhere the appliqués to the triangle base with hot fabric glue. (Because I’ve already dealt with staunch naysayers concerning the ability of hot glue to work on fabric… there are varieties of hot glue made just for fabric, and it will say so on the label. Press the fabrics together immediately after applying the glue, using silicone hand protection of course. Once the glue has cooled completely, I defy anyone to pull the 2 materials apart!) There are also many varieties of cold fabric glue that just require more drying time. (This would be the safer option if constructing this with kiddos.)

145Leigh

Next glue each triangle flap over the rope you’ve chosen, leaving an inch or so between each. (For the tab-less version, just glue along the top of the triangle’s underside to attach it to the rope directly.) Don’t forget to tie a loop at each end for hanging.

148Leigh

Cut lengths of random yet coordinating ribbon to tie between each panel. Another option is to cut strips of fabric and tie those on. (You can see I’ve done this in the bows I glued to the panel fronts.) Now go hang it up and admire your handiwork! 🙂

162Leigh

“Oh, say, can you see, by the dawn’s early light,What so proudly we hail’d at the twilight’s last gleaming? Whose broad stripes and bright stars, thro’ the perilous fight, O’er the ramparts we watch’d, were so gallantly streaming? And the rockets’ red glare, the bombs bursting in air, Gave proof thro’ the night that our flag was still there. O say, does that star-spangled banner yet wave O’er the land of the free and the home of the brave?”

368Leigh

May you have an absolute blast crafting your own star-spangled banner this Independence Day!

Faithfully Yours,

Leigh

P.S. If you like collage, check out my July 4th Altered Art Greeting Card as Mailable Mixed Media Independence Day Décor (DIY Collage Art Tutorial).

120Leigh

July 4th Altered Art Greeting Card as Mailable Mixed Media Independence Day Décor (DIY Collage Art Tutorial)

120Leigh

Herald in the fourth of July with an altered art greeting card that doubles as a mailable gift, as it may be framed by the recipient as mixed media décor commemorating Independence Day. It’s a delightful way to send a bit of revelry to a loved one who can’t attend the year’s celebration. This art project is perfect for gathering the whole family together for a fun “crafternoon”, because the Design Memory Craft mediums are non-toxic. They are also fully compatible with each other and a large variety of substrates. This product versatility makes it so easy to combine collage material into something impressive. So follow along as I create an art card ablaze with the spirit of the season, then use the ideas to make one infused with your own artistic essence… because a blast of creativity is the best way to start the holiday off with a bang!

058Leigh

Begin with a readymade greeting card base or make your own inexpensively from sturdy cardstock.

061Leigh

I cut a piece of parchment printed paper to a 7 x 10 inch size, so that it could be folded into a 5 x 7 card… perfect for framing.

63Leigh

I used deckle edge cutting scissors to produce a torn looking finish on the card. (I later used the deckle scissors to cut around some of the stamped images too.) Pitt artist pen big brushes are perfect for highlighting such details. Just swipe the side of the brush along the edge to deposit the permanent ink in a rough fashion.

064Leigh

Paper washi tape is a quick way to imbed visual texture onto the base of a collage. Another way is apply printed pages with gel medium. (I’ll demonstrate this more fully in a future tutorial.)

068Leigh

Design Memory Craft gelatos are multipurpose mediums that look like colored chap-sticks. They apply thickly, but can be thinned to watercolor consistency when mixed with water. (You can even turn them into a liquid spray paint to splatter your work with!) They can be used to dye a variety of materials as well. To dye canvas ribbon, I simply marked it haphazardly with a gelato on both sides. I then took water and rubbed it into the ribbon, like magic… it turned blue. It dried fairly quickly too!

070Leigh They can be mixed with other mediums also. You can see here what straight gelato and plain gesso looked like before mixing. (Warning: if you explore medium capability with a small sample pack like I did… you may get totally hooked too!)

074Leigh

Here I used a palette knife to tint gesso with a cobalt blue gelato. White gesso opacified the color into more of a cornflower blue. A thick swipe of medium over a stencil will lay down a swath of shaped color onto your paper. (Stencil words like “celebrate” are great to have in a craft arsenal to use year round.)

076Leigh

I used the same technique to form raised letters onto colored paper. (This is a great way to use up all those scraps of “craftermath” from previous projects!) The thicker the layer of gesso, the longer it will take to dry.

072Leigh

Use any leftover gelatoed-gesso as an opaque stamping ink. It’s great to use on colored papers that would just appear as plain black if using a stamp pad. (I really liked the blue on red for these fireworks.) Just remember to rinse off your stamp before the gesso dries.

079Leigh

You can dye just about anything with gelatos and pitt pens. The gelato dyed ribbon will appear lighter once it has dried. If you’d like to impart deeper color, just repeat with more gelato. The little scalloped round element is a cork sticker that I tinted with cobalt blue gelato. It’s easy to make an ombre effect by applying color to only one side then rubbing it across the piece. I used the pitt pens as a wood stain by simply coloring the laser-cut birch 4 and bamboo food pick. (This is the easiest and cleanest way I’ve found to tint wood without losing the grain pattern!)

083Leigh

Pitt artist pen big brushes can also be used in place of stamp pads. (They’re especially great when you want to combine colors onto one stamp image!) I spelled out JULY, with a magnetic lettering stamp, as if it had been printed by an old-school typewriter.

087Leigh

Don’t forget to add your seal of “makership” to the back of your creation! Leftover ink on my stamp blended with the deep scarlet red pitt pen ink to tint the edges a bit darker… which I completely adore.

81Leigh

Once most of your elements are constructed, you can place them on the card in order to edit… if need be. I used the rough-draft placement to decide where my background colors should go.

086Leigh

I used red and blue gelatos as finger-paint to tint the paper and washi tape background with. Use a wet finger or a water brush to grab pigment straight from a gelato, or dip a brush or finger into pre-mixed gelato and water. (My choice took me straight back to kindergarten!)

091Leigh

Next, I tied a bow with the ribbon (representing remembrance) and glued everything down. You can use any glue you like, or even the gel medium to glue down the papers with. (I chose hot glue because it works on all the elements I used… even the wooden ones.)

122Leigh

I layered red tinted cardboard under the stenciled papers, and elevated them with tiny foam stickers for dimension. The fireworks were attached with brads, but I added hot glue dots beneath them to make them pop right off the page. (Note that the star spangled banner is actually another repurposed food pick!)

093Leigh

For a finishing touch, I applied dots with opalescent texture gems gel liner (to symbolize stars in the night sky filled with the rocket’s red glare which we memorialize with fireworks).

120Leigh

It’s that subtle yet profound symbolic meaning that completes the piece’s transformation from craft into art which makes it worthy of being framed, not just as a holiday decoration, but as artwork. This Independence Day, I will be celebrating the liberty we are given to express ourselves in a country of freedom.

Faithfully Yours,

Leigh

P.S. If you like making collages, be sure to check out my DIY July 4th Denim No-Sew Appliqué Collage Star-Spangled Banner Craft Tutorial for Independence Day. 

163Leigh