Tag Archives: Last Minute

Healthy “One-Pot” Cocorico Roasted Chicken (or Turkey) & Root Vegetables Recipe

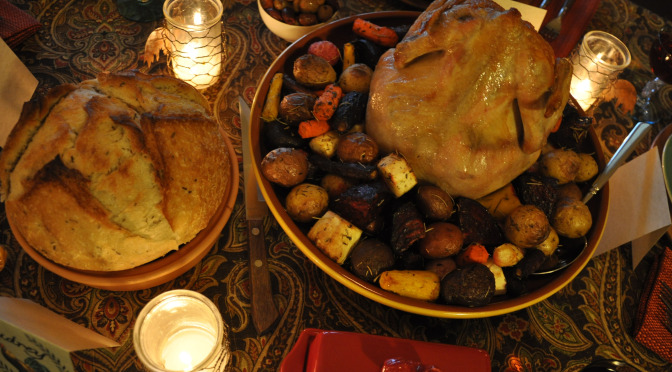
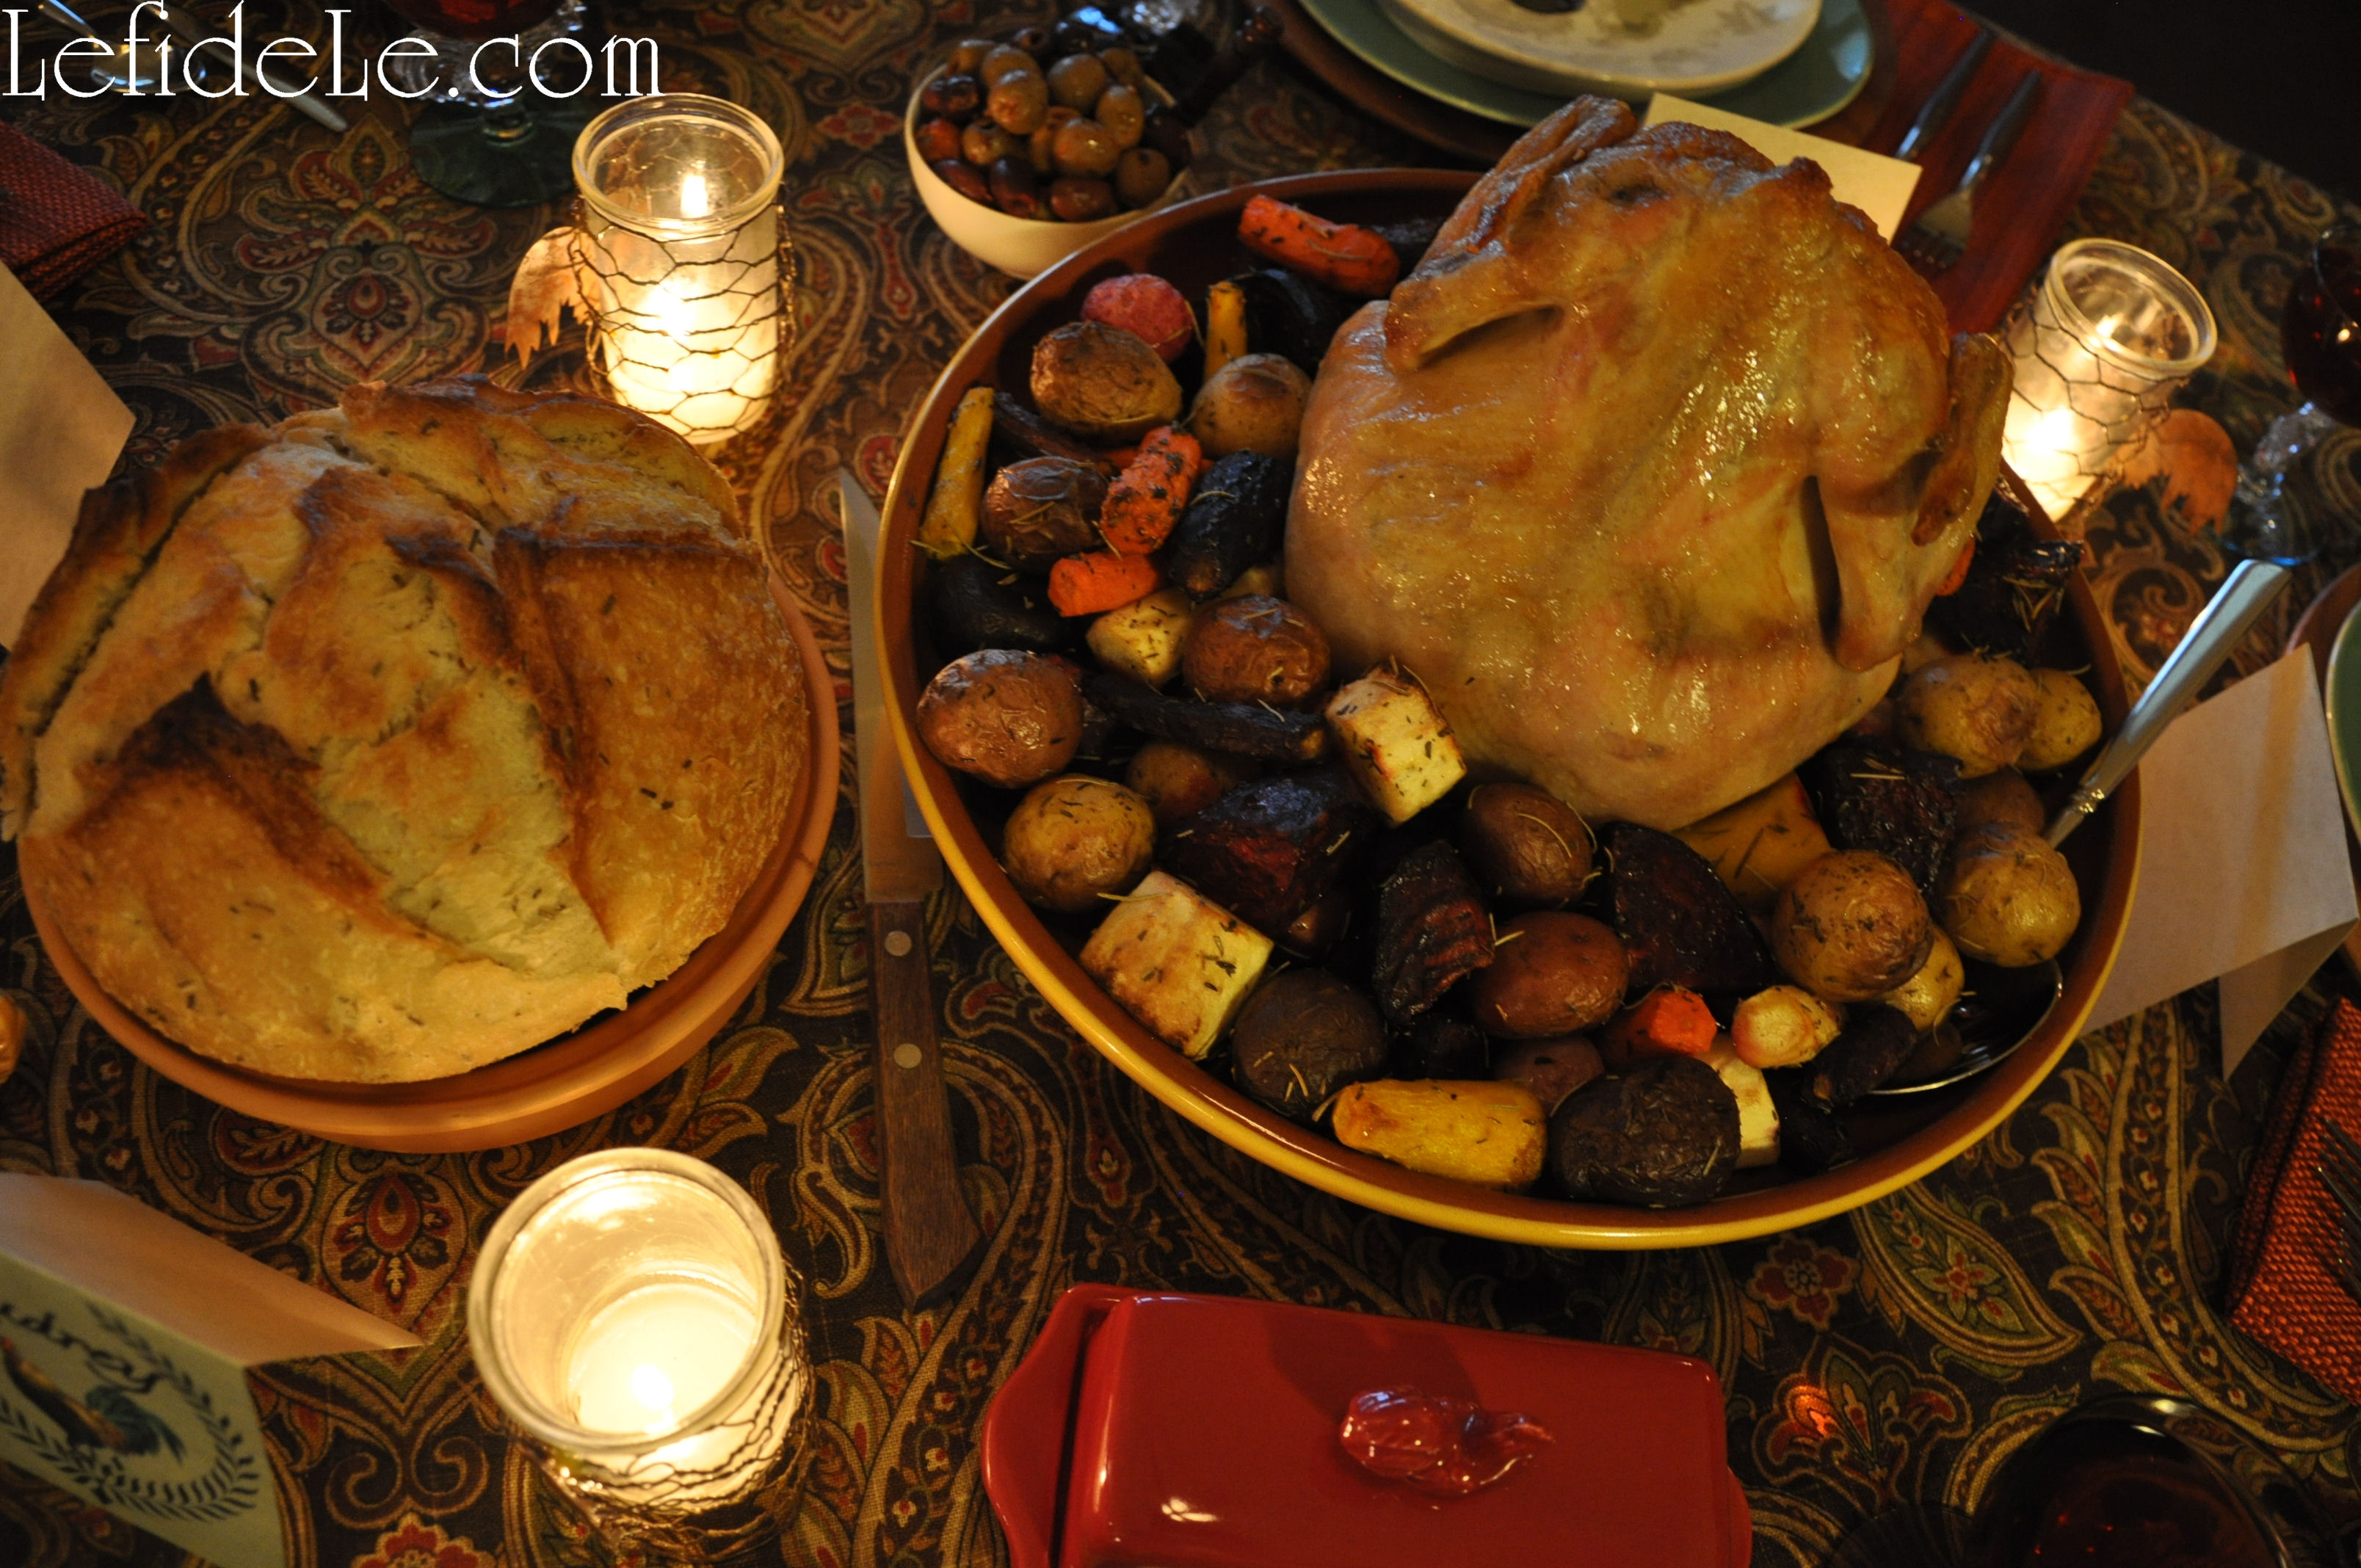
Making healthy roasted chicken and root vegetables is so easy with a Cocorico Roaster. I love to use mine as an easy “one-pot” wonder that presents beautifully from oven-to table. The night before a long day, I can peel the veggies and add herbs so it only needs to put it in the oven for a hardy home-cooked meal. Larger roasters will also accommodate a small turkey for the holidays.

125Leigh


Ingredients:
  • 1 roasting chicken (or turkey, in a size that will fit your Cocorico roaster)
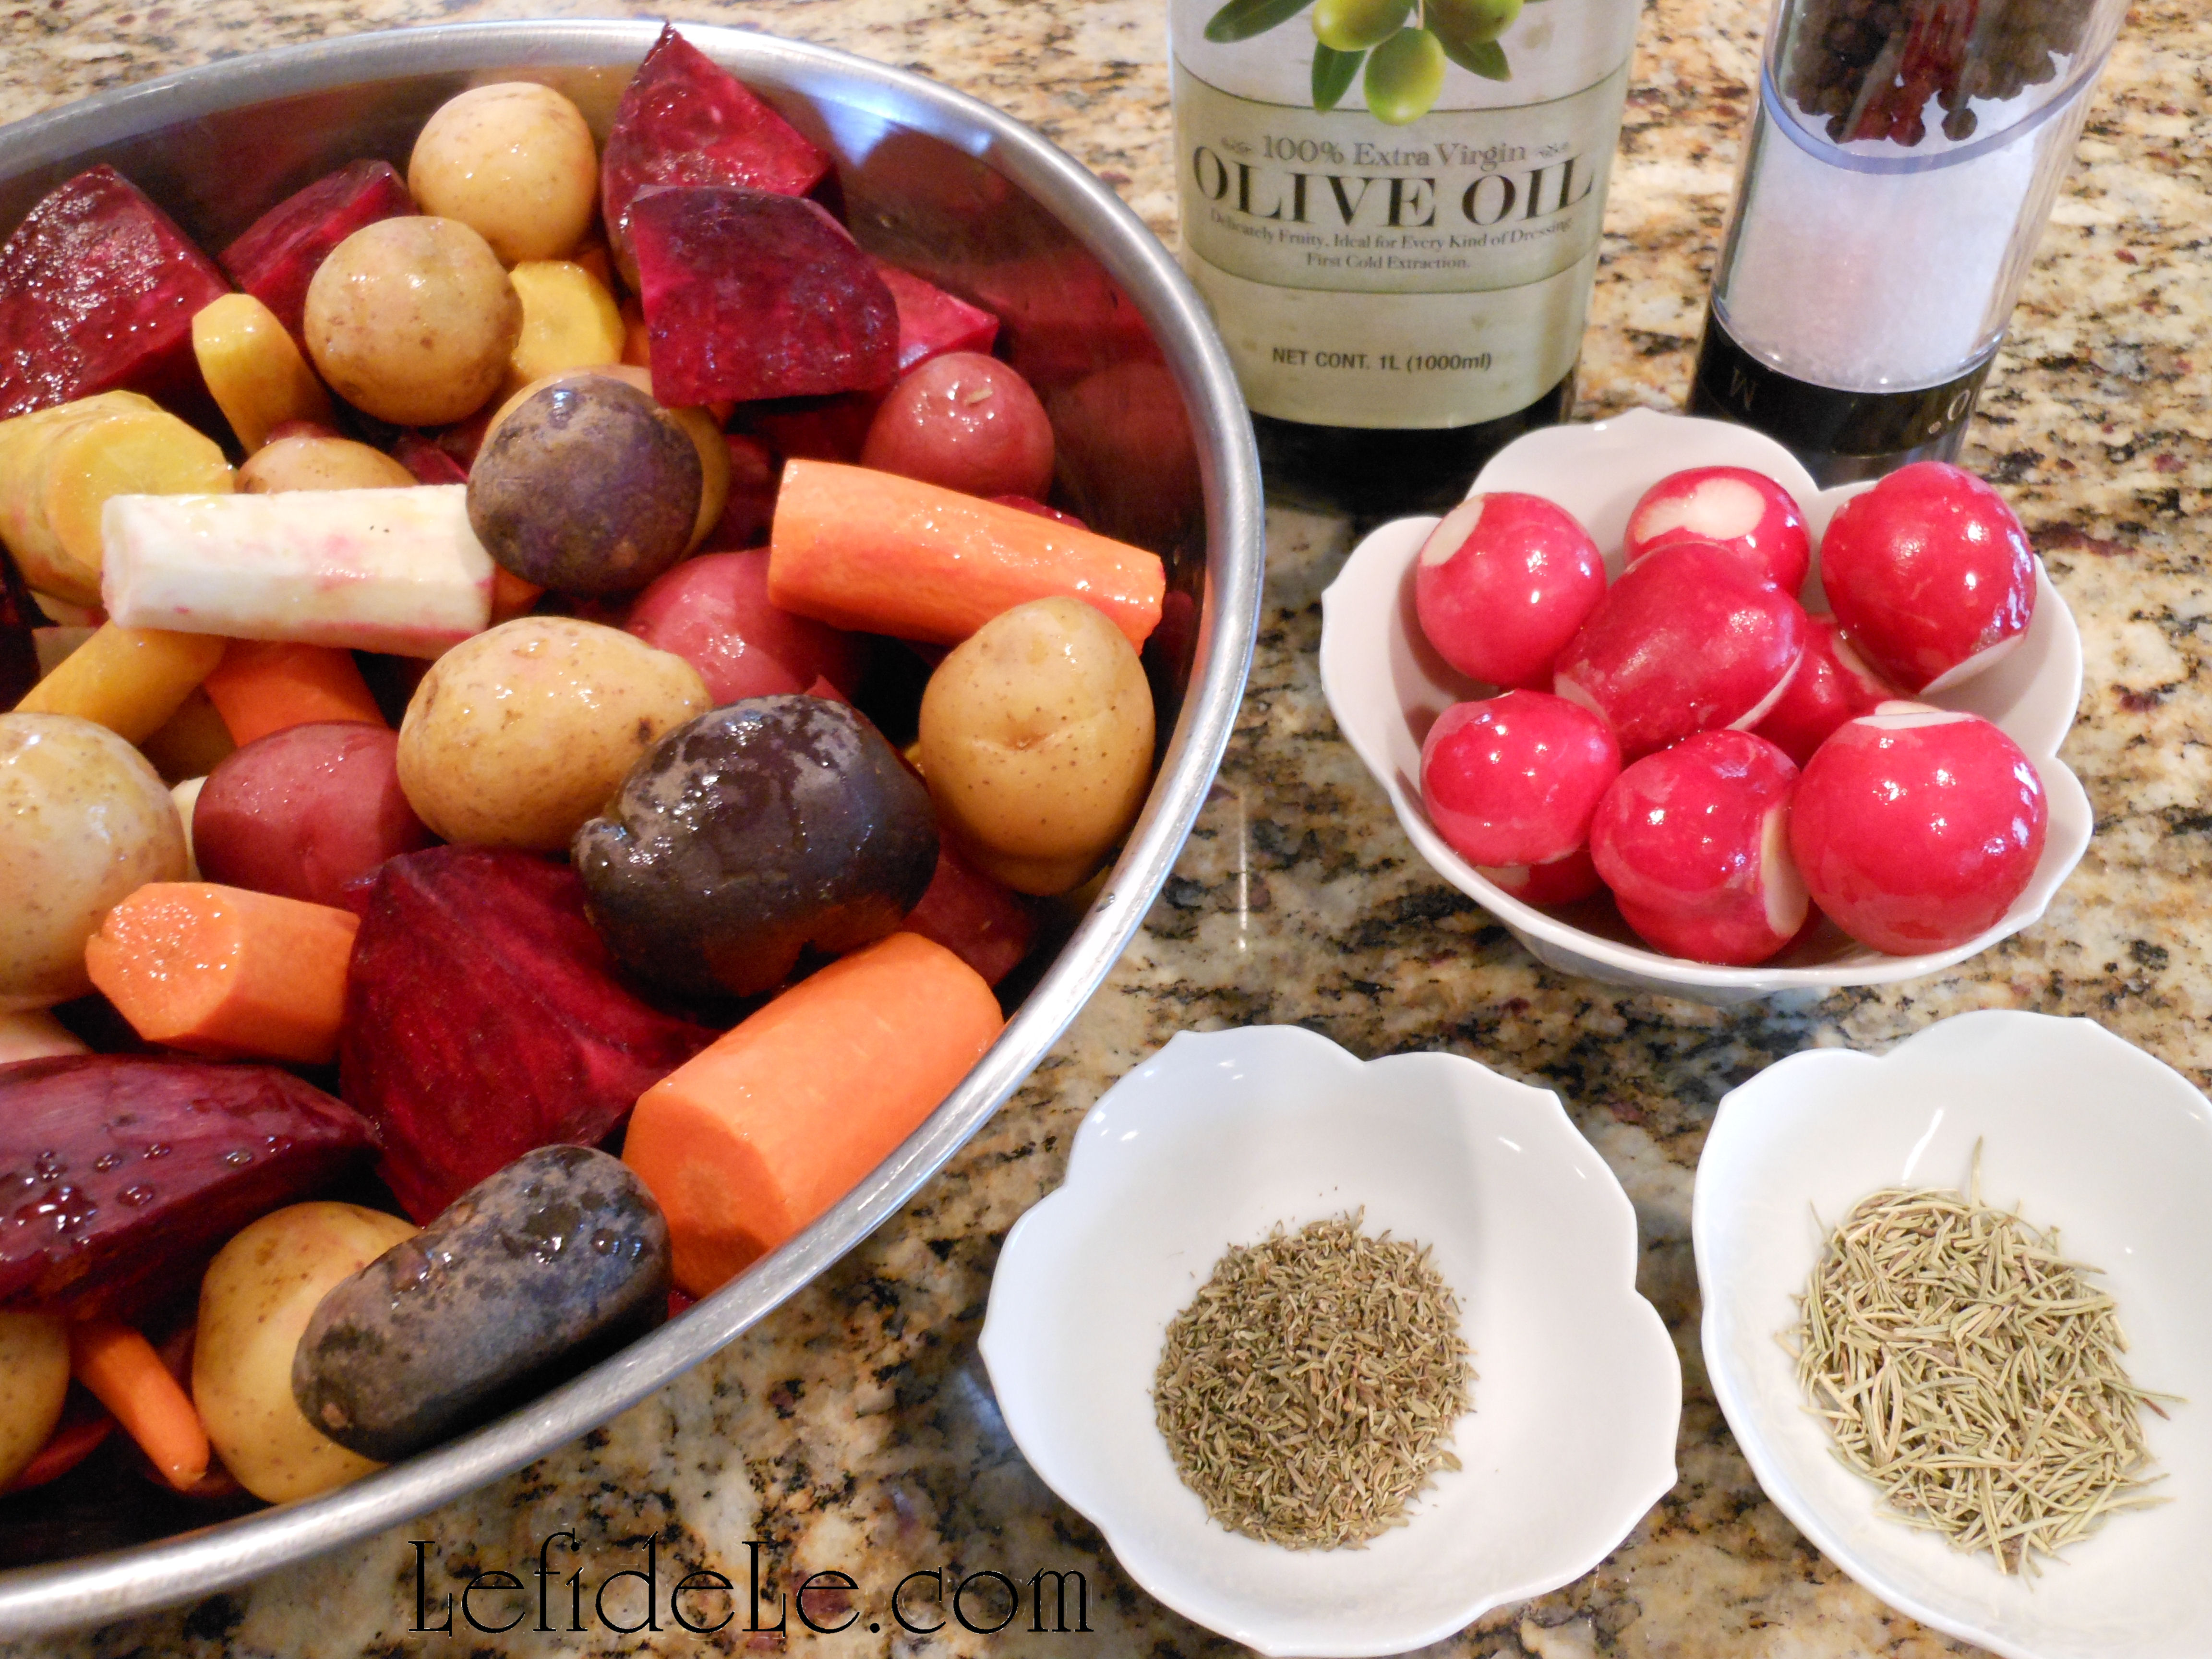
  • 2 teaspoons thyme
  • 2 teaspoons rosemary
  • 1 fresh lemon
  • 1 teaspoon sea salt (or to taste)
  • Olive oil (enough to coat chicken & drizzle a little over veggies)

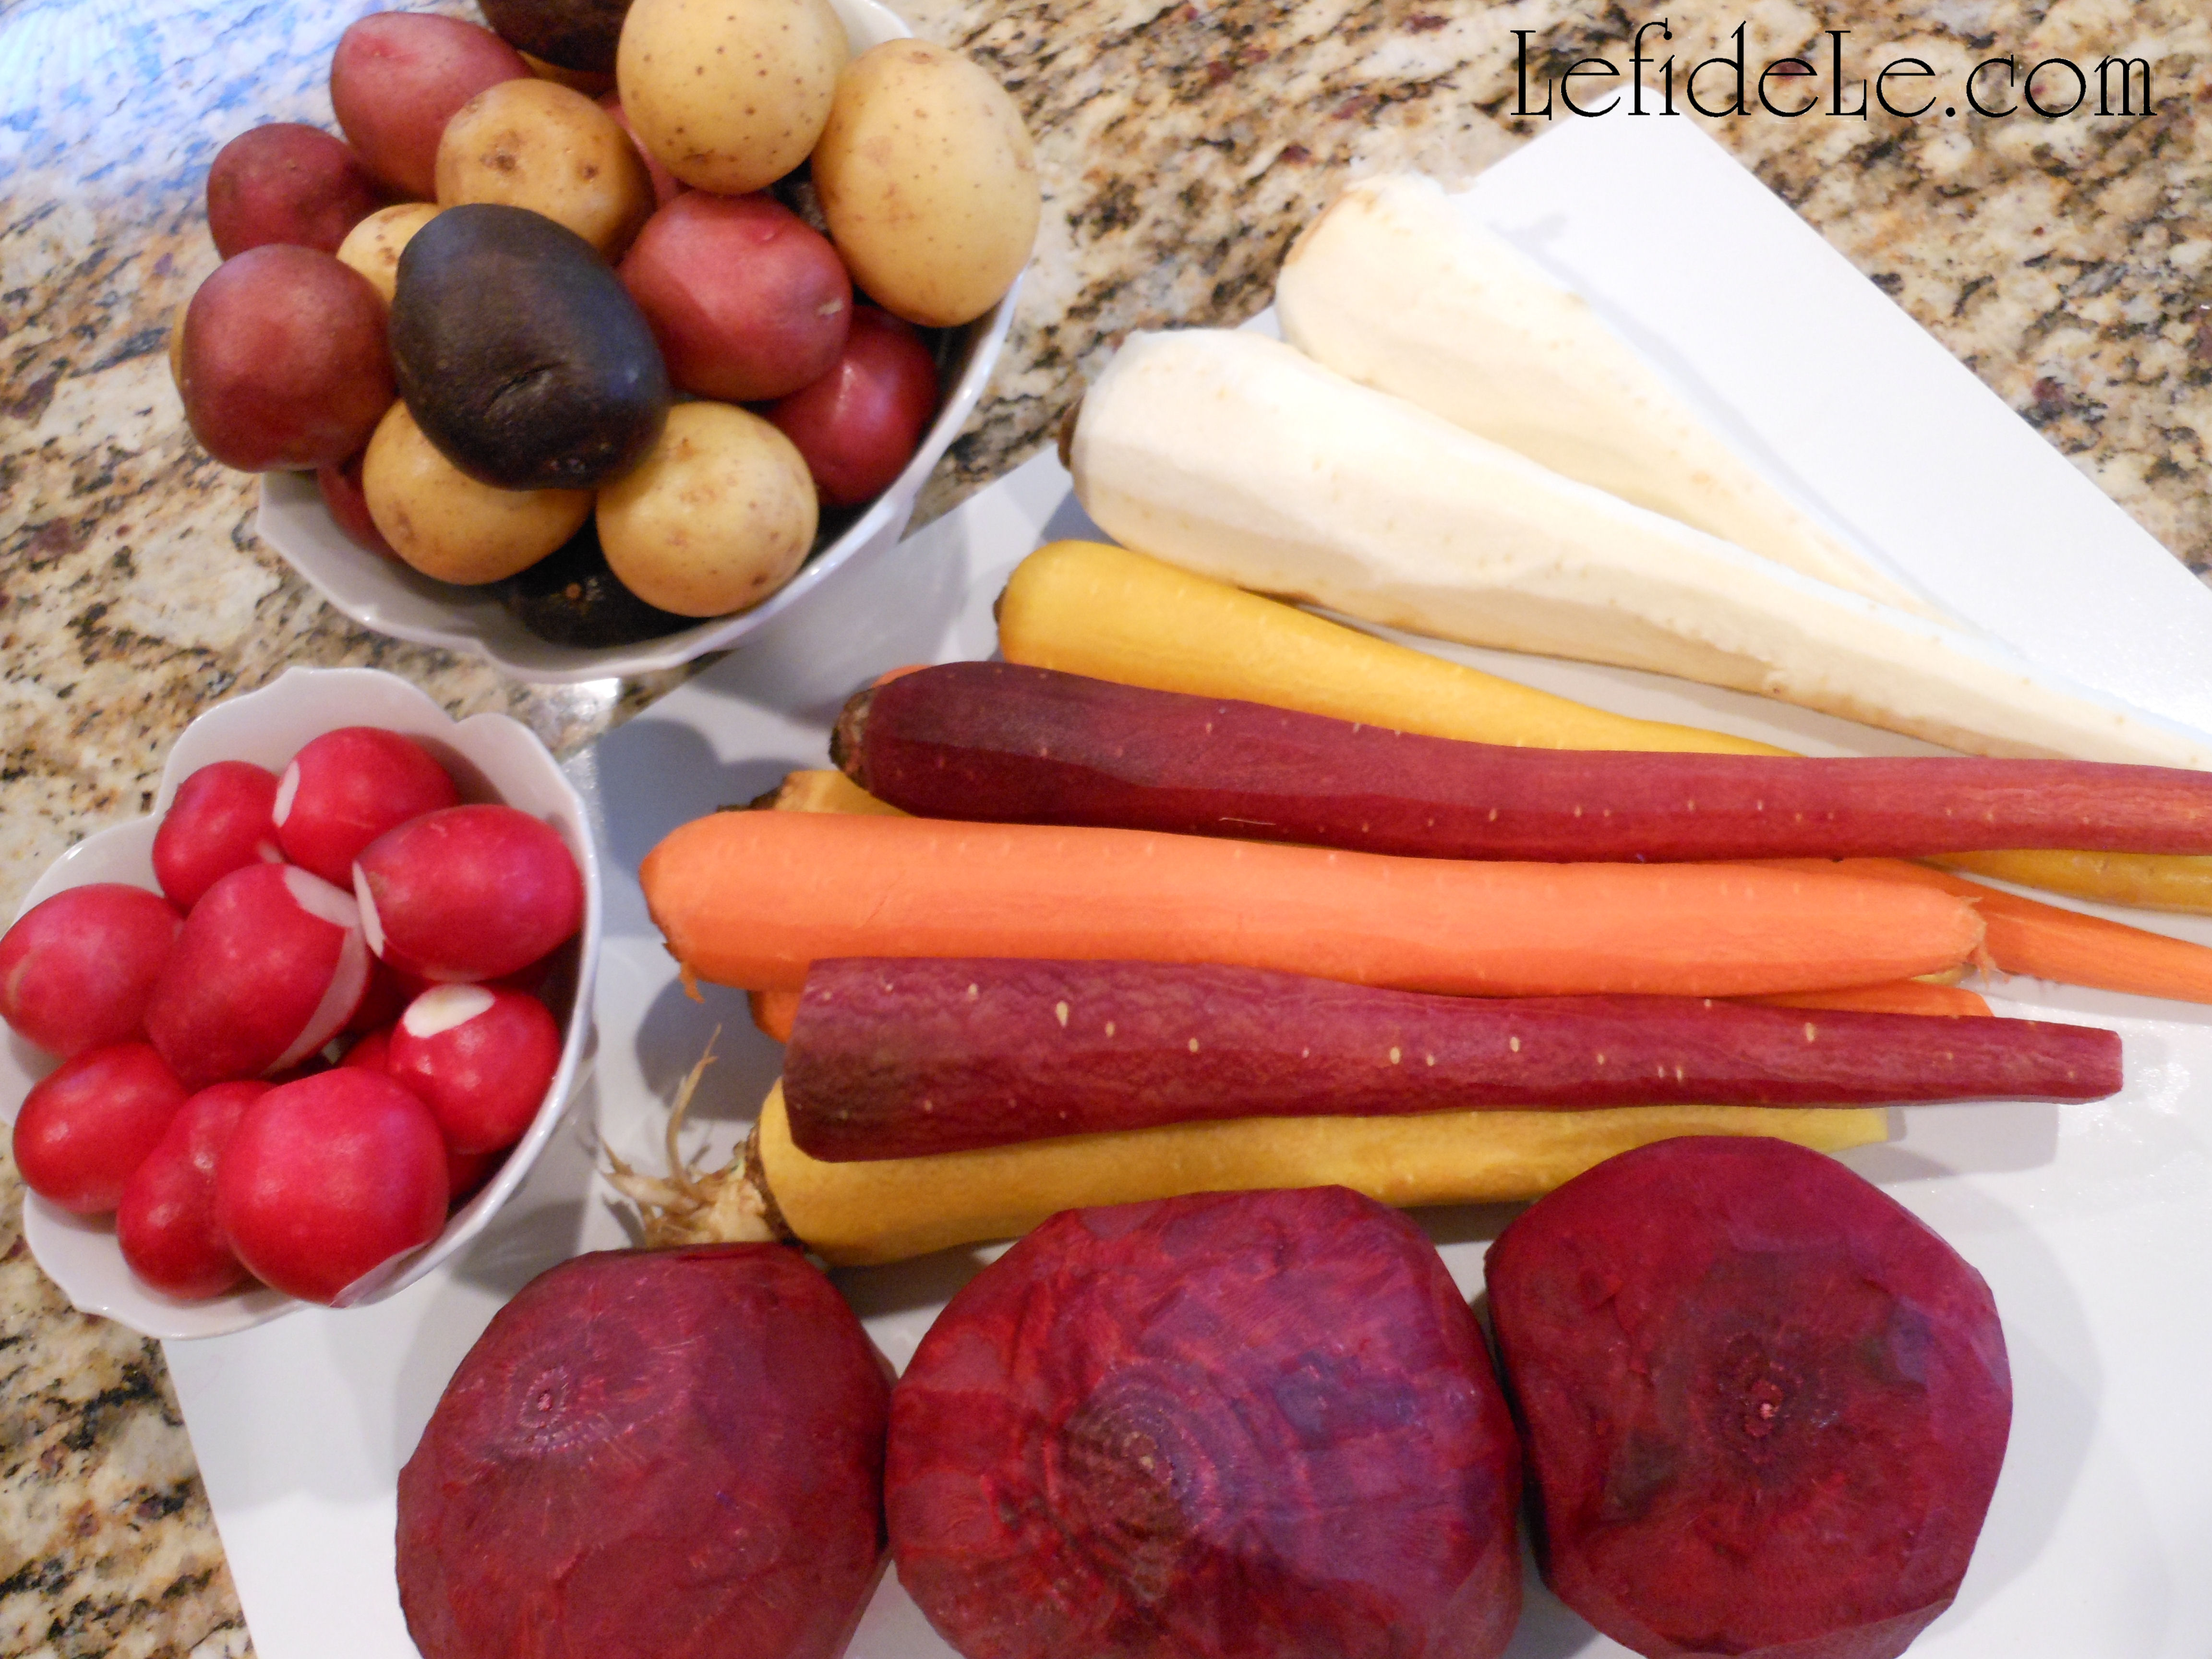
Multicolored root vegetables in season (enough to fill the cocorico base):

  • ~1 pound carrots
  • ~3 beets
  • ~2 parsnips
  • ~1 bunch radishes
  • ~1 or 2 pounds fingerling (or new) potatoes
  • (& turnips if you have better luck than I did finding good ones)

Instructions:

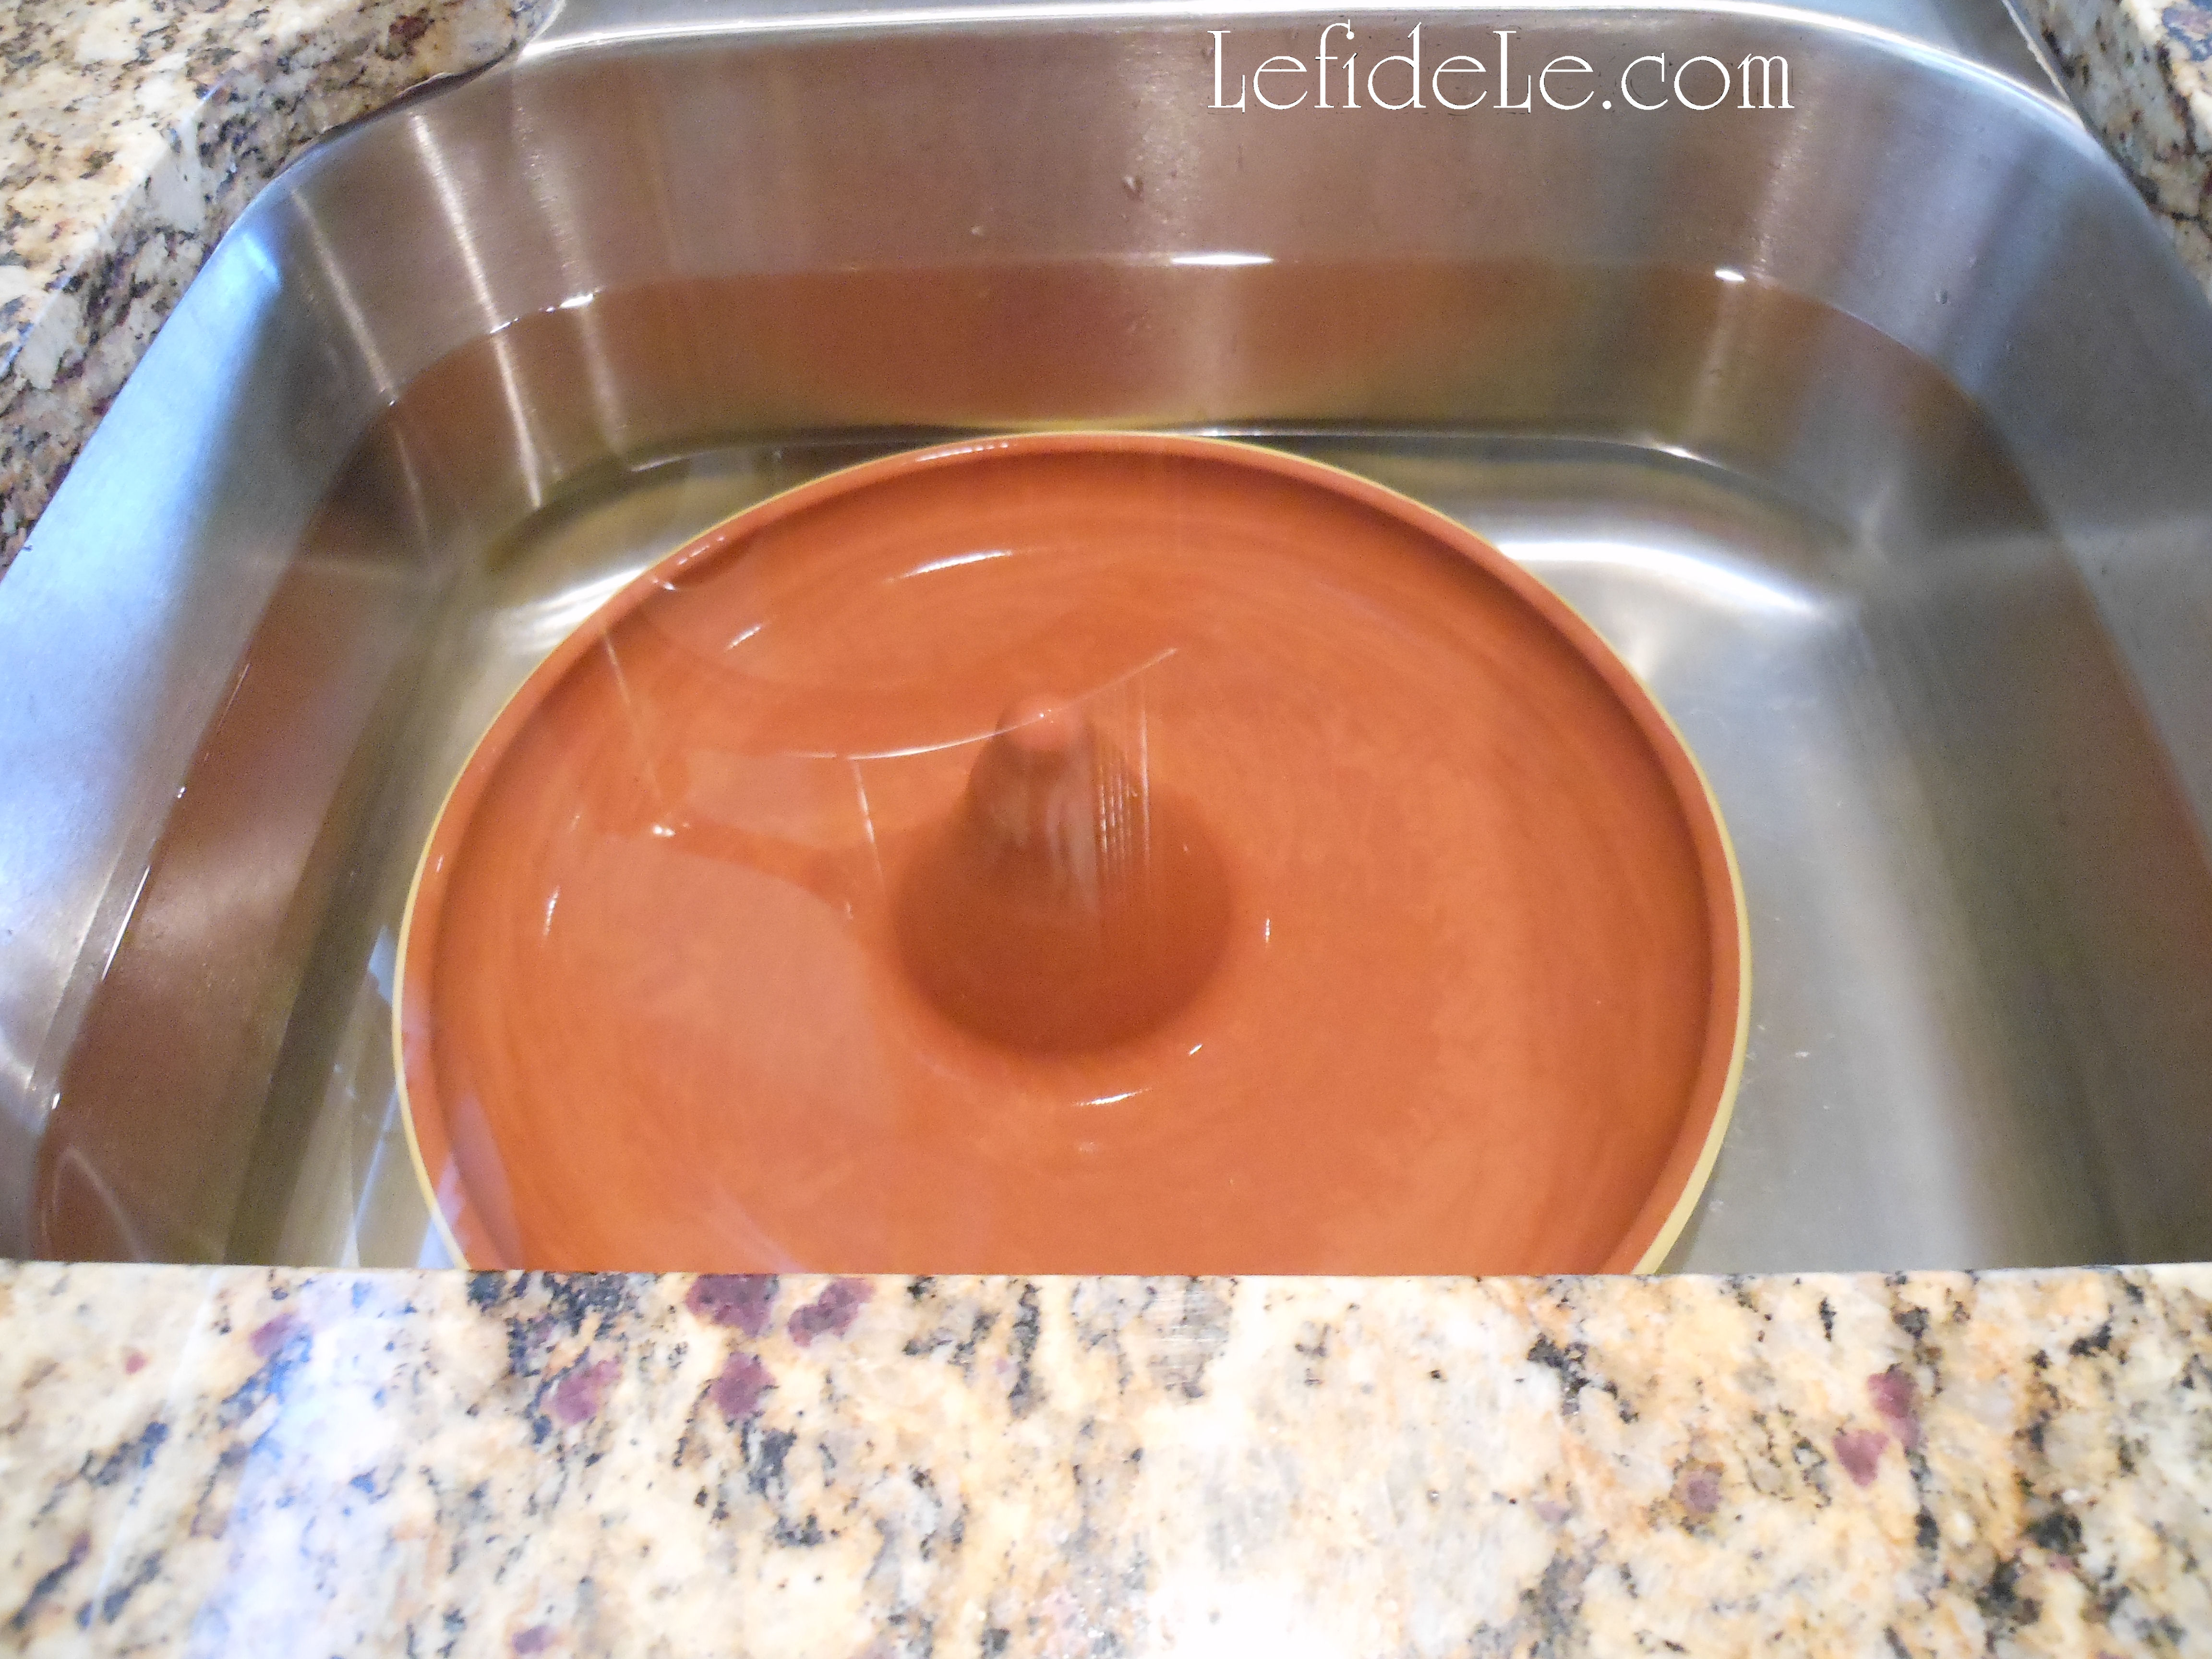
Cocorico roasters in glazed terra cotta are available locally and online. I ordered mine from Napa Style because it was the biggest I’ve seen, and also had a larger turkey cone that fit over the chicken cone. Soak the whole thing under water at least 30 minutes before cooking. This prevents any heat damage to the vessel. I saturate mine in a bleached clean sink.

2Leigh

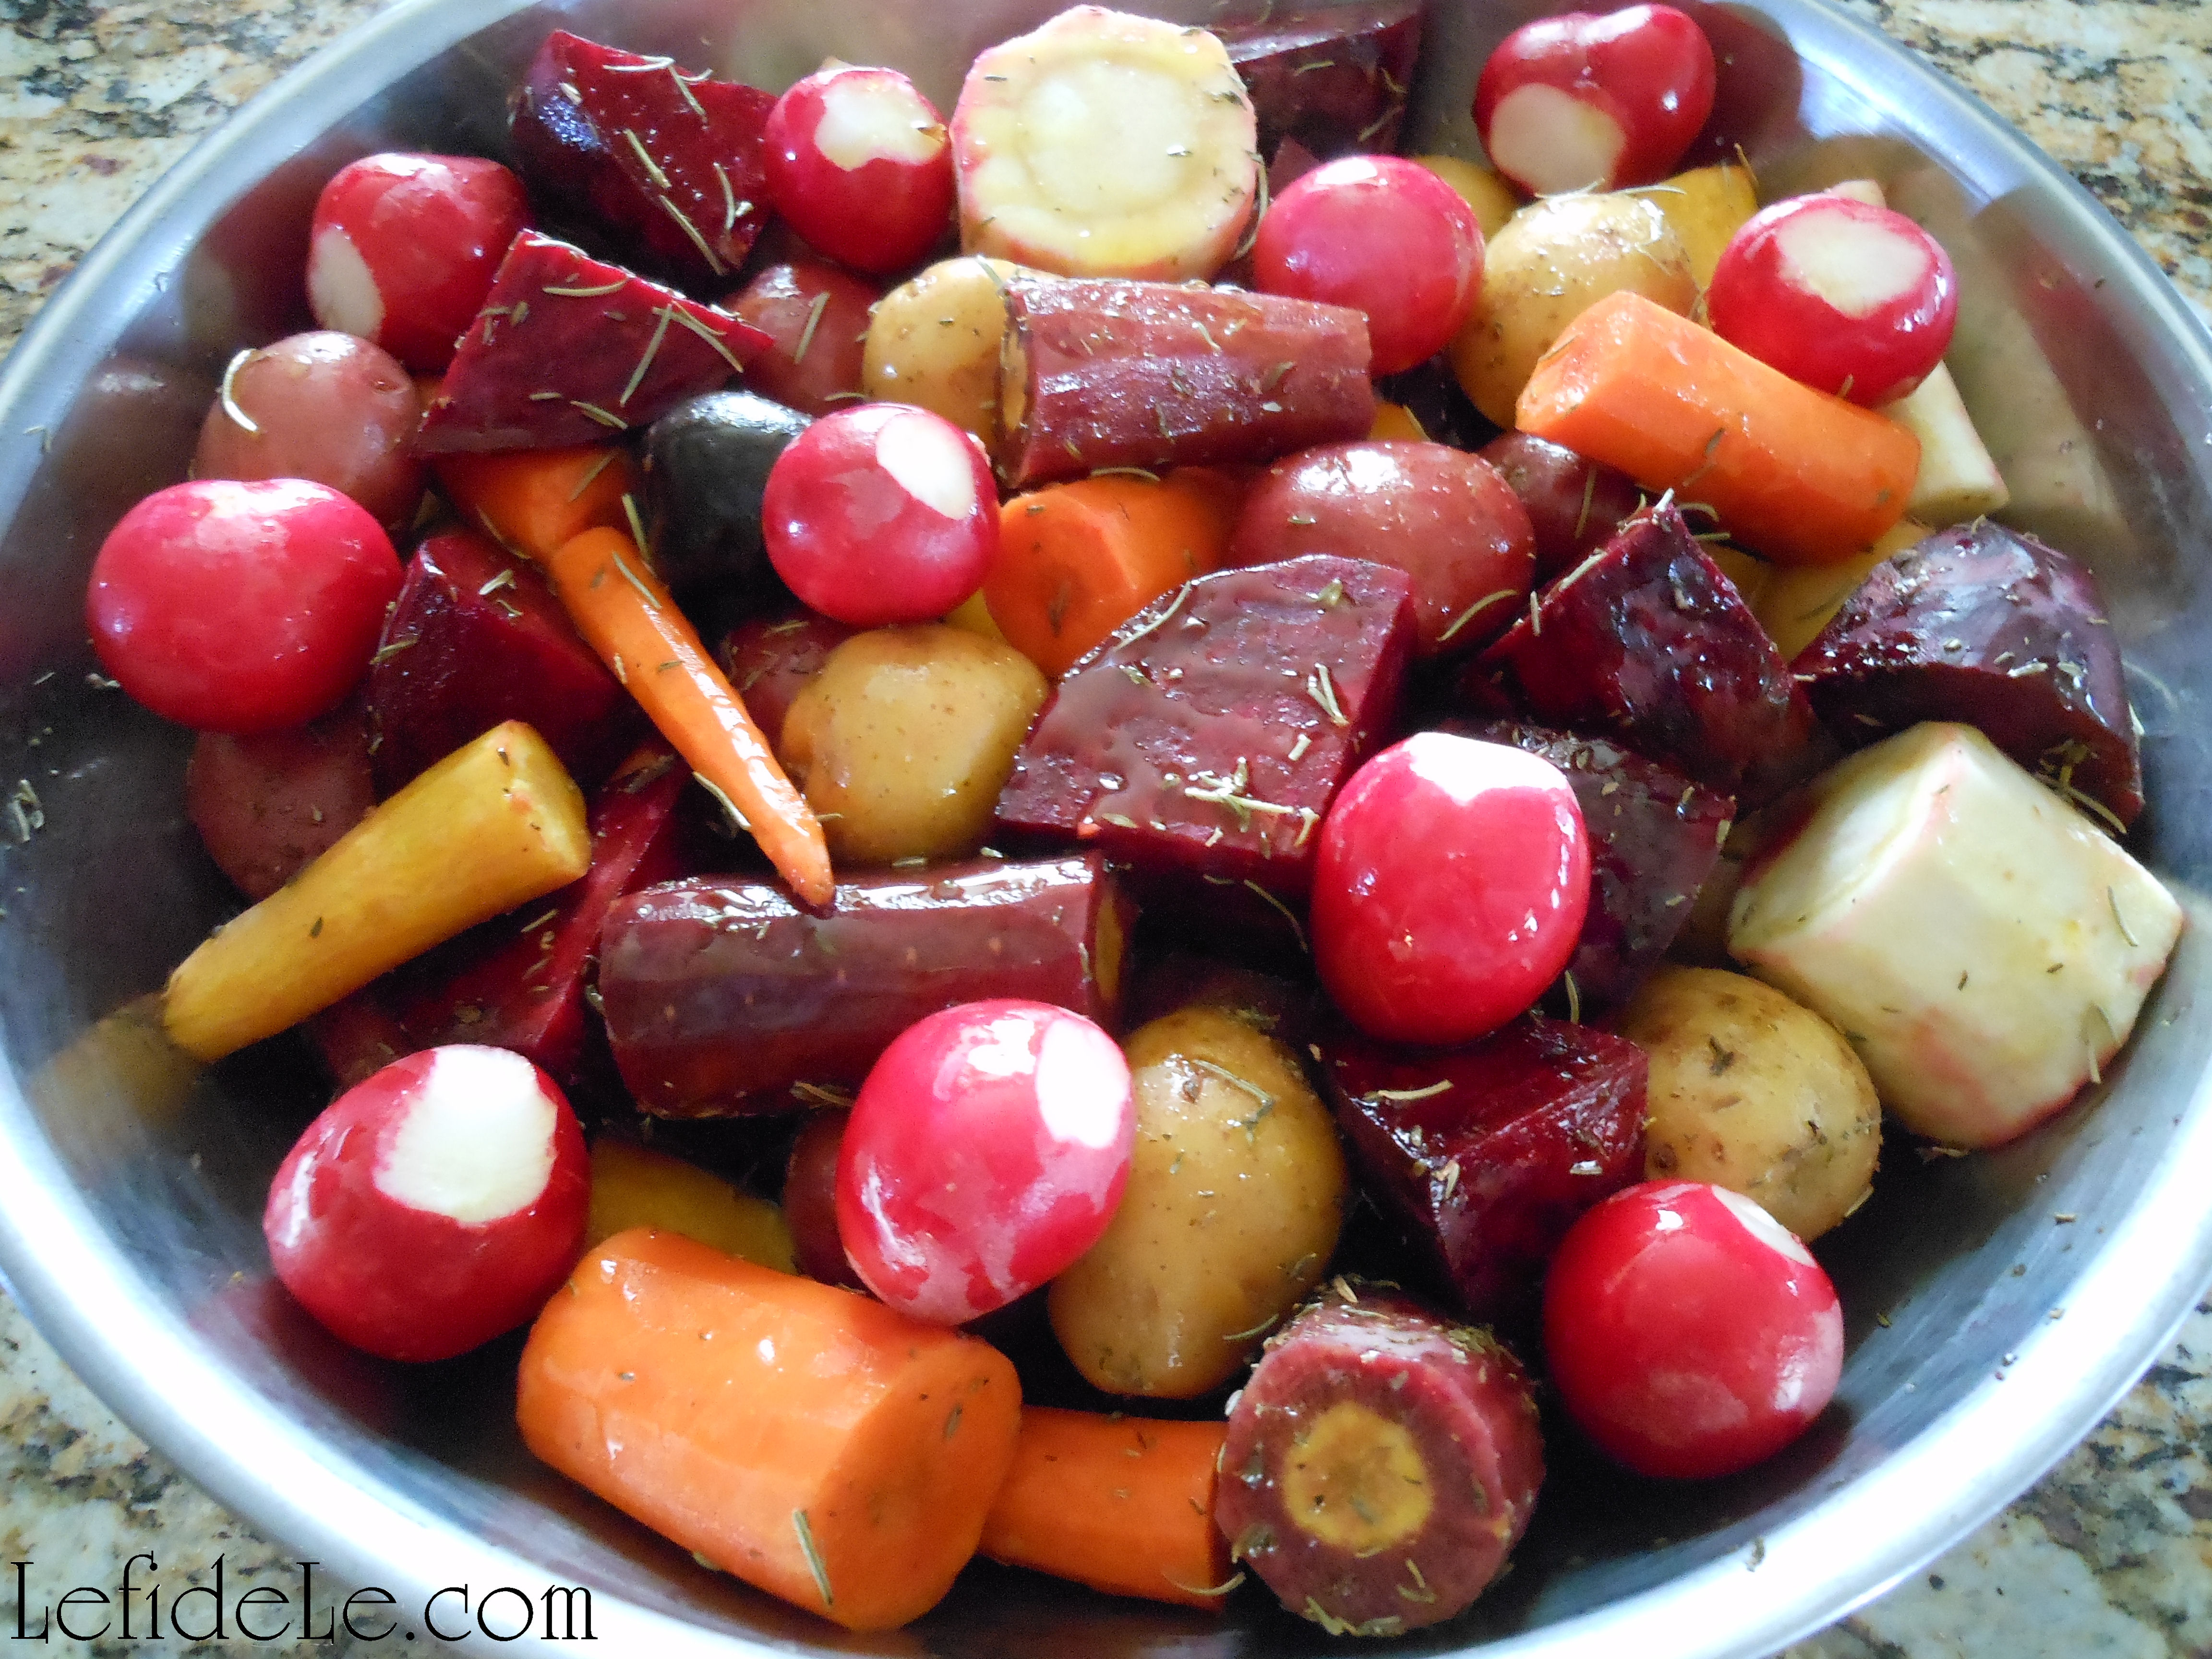
Preheat your oven to 400ᵒ, while you soak the roaster and prep your veggies. There are a beautiful variety of purple, orange, red, and white root vegetables available. Peel and cut them into about 2 inch chunks to ensure even cooking. Some recipes will advise you boil potatoes ahead of roasting, but I’ve found that to be completely unnecessary if you buy small fingerlings. They roast just like baked fries. They’re prettier, easier, and quicker… so save the big ones for baked potatoes. Radishes may seem like an odd choice for roasting, but they completely change character after cooking. They mellow out, losing their sharpness and spicy heat. I really do prefer them this way.

4Leigh

Place these in a bowl with herbs and add just the smallest drizzle of olive oil. (The chicken juices will flow over the veggies while cooking thus providing more flavor.) Squeeze a little of your lemon over the veggies, and save the rest to place inside the chicken cavity before setting over the roasting cone. Add sea salt and toss to coat everything well. This may be done ahead of time, just cover the bowl and refrigerate it until needed.

13Leigh

Many recipes will also instruct you to wash chicken inside and out before cooking, but I read a study that found it only served to spread dangerous bacteria all over your kitchen. Thorough cooking will kill bacteria while rinsing will not. Drain the fluid and remove any extra gifts left in the cavity (neck, gizzard, giblets). Then set the chicken onto the soaked Cocorico. Other recipes will also say to do this with the legs up and trussed, but this is really subjective to the size of your roasting cone versus the size of your bird. I used a smaller chicken in the pictures, which would have been physically impossible to set upside down. It cooked beautifully and tasted great. Just place the chicken whichever way you can get it onto the cone. It’s really hard to mess up dinner with a Cocorico!

21Leigh

Roast in the oven at 400ᵒ for about 15 minutes, and then reduce it to 375ᵒ for an hour longer (for ~4 lb chicken). Because every oven heats differently, the safest way to cook is with a meat thermometer. Place it in the thickest part of the thigh, but not to the bone. www.foodsafety.gov says 165ᵒ is poultry’s magic number! I’ve also read to rotate the Cocorico every 15 minutes. Thinking of how heavy it was, how that would let heat escape, what else I could spend my time accomplishing, and burn potential… I decided to forgo that. Once again, the simplest way proved itself. The chickens turned out exactly the same.

127Leigh

Use a serving spoon to gently toss the roasted veggies, so that the juices are fully distributed. It’s easiest to serve the veggies first and then carve into the meat, using the newly empty well to hold the pieces. Or it can all be transferred to other serving dishes… but I prefer to avoid washing extra tableware, and the filled Cocorico looks so lovely. If trying this, be sure to use adequate hot pads beneath it.

35RoosterVotive-Leigh

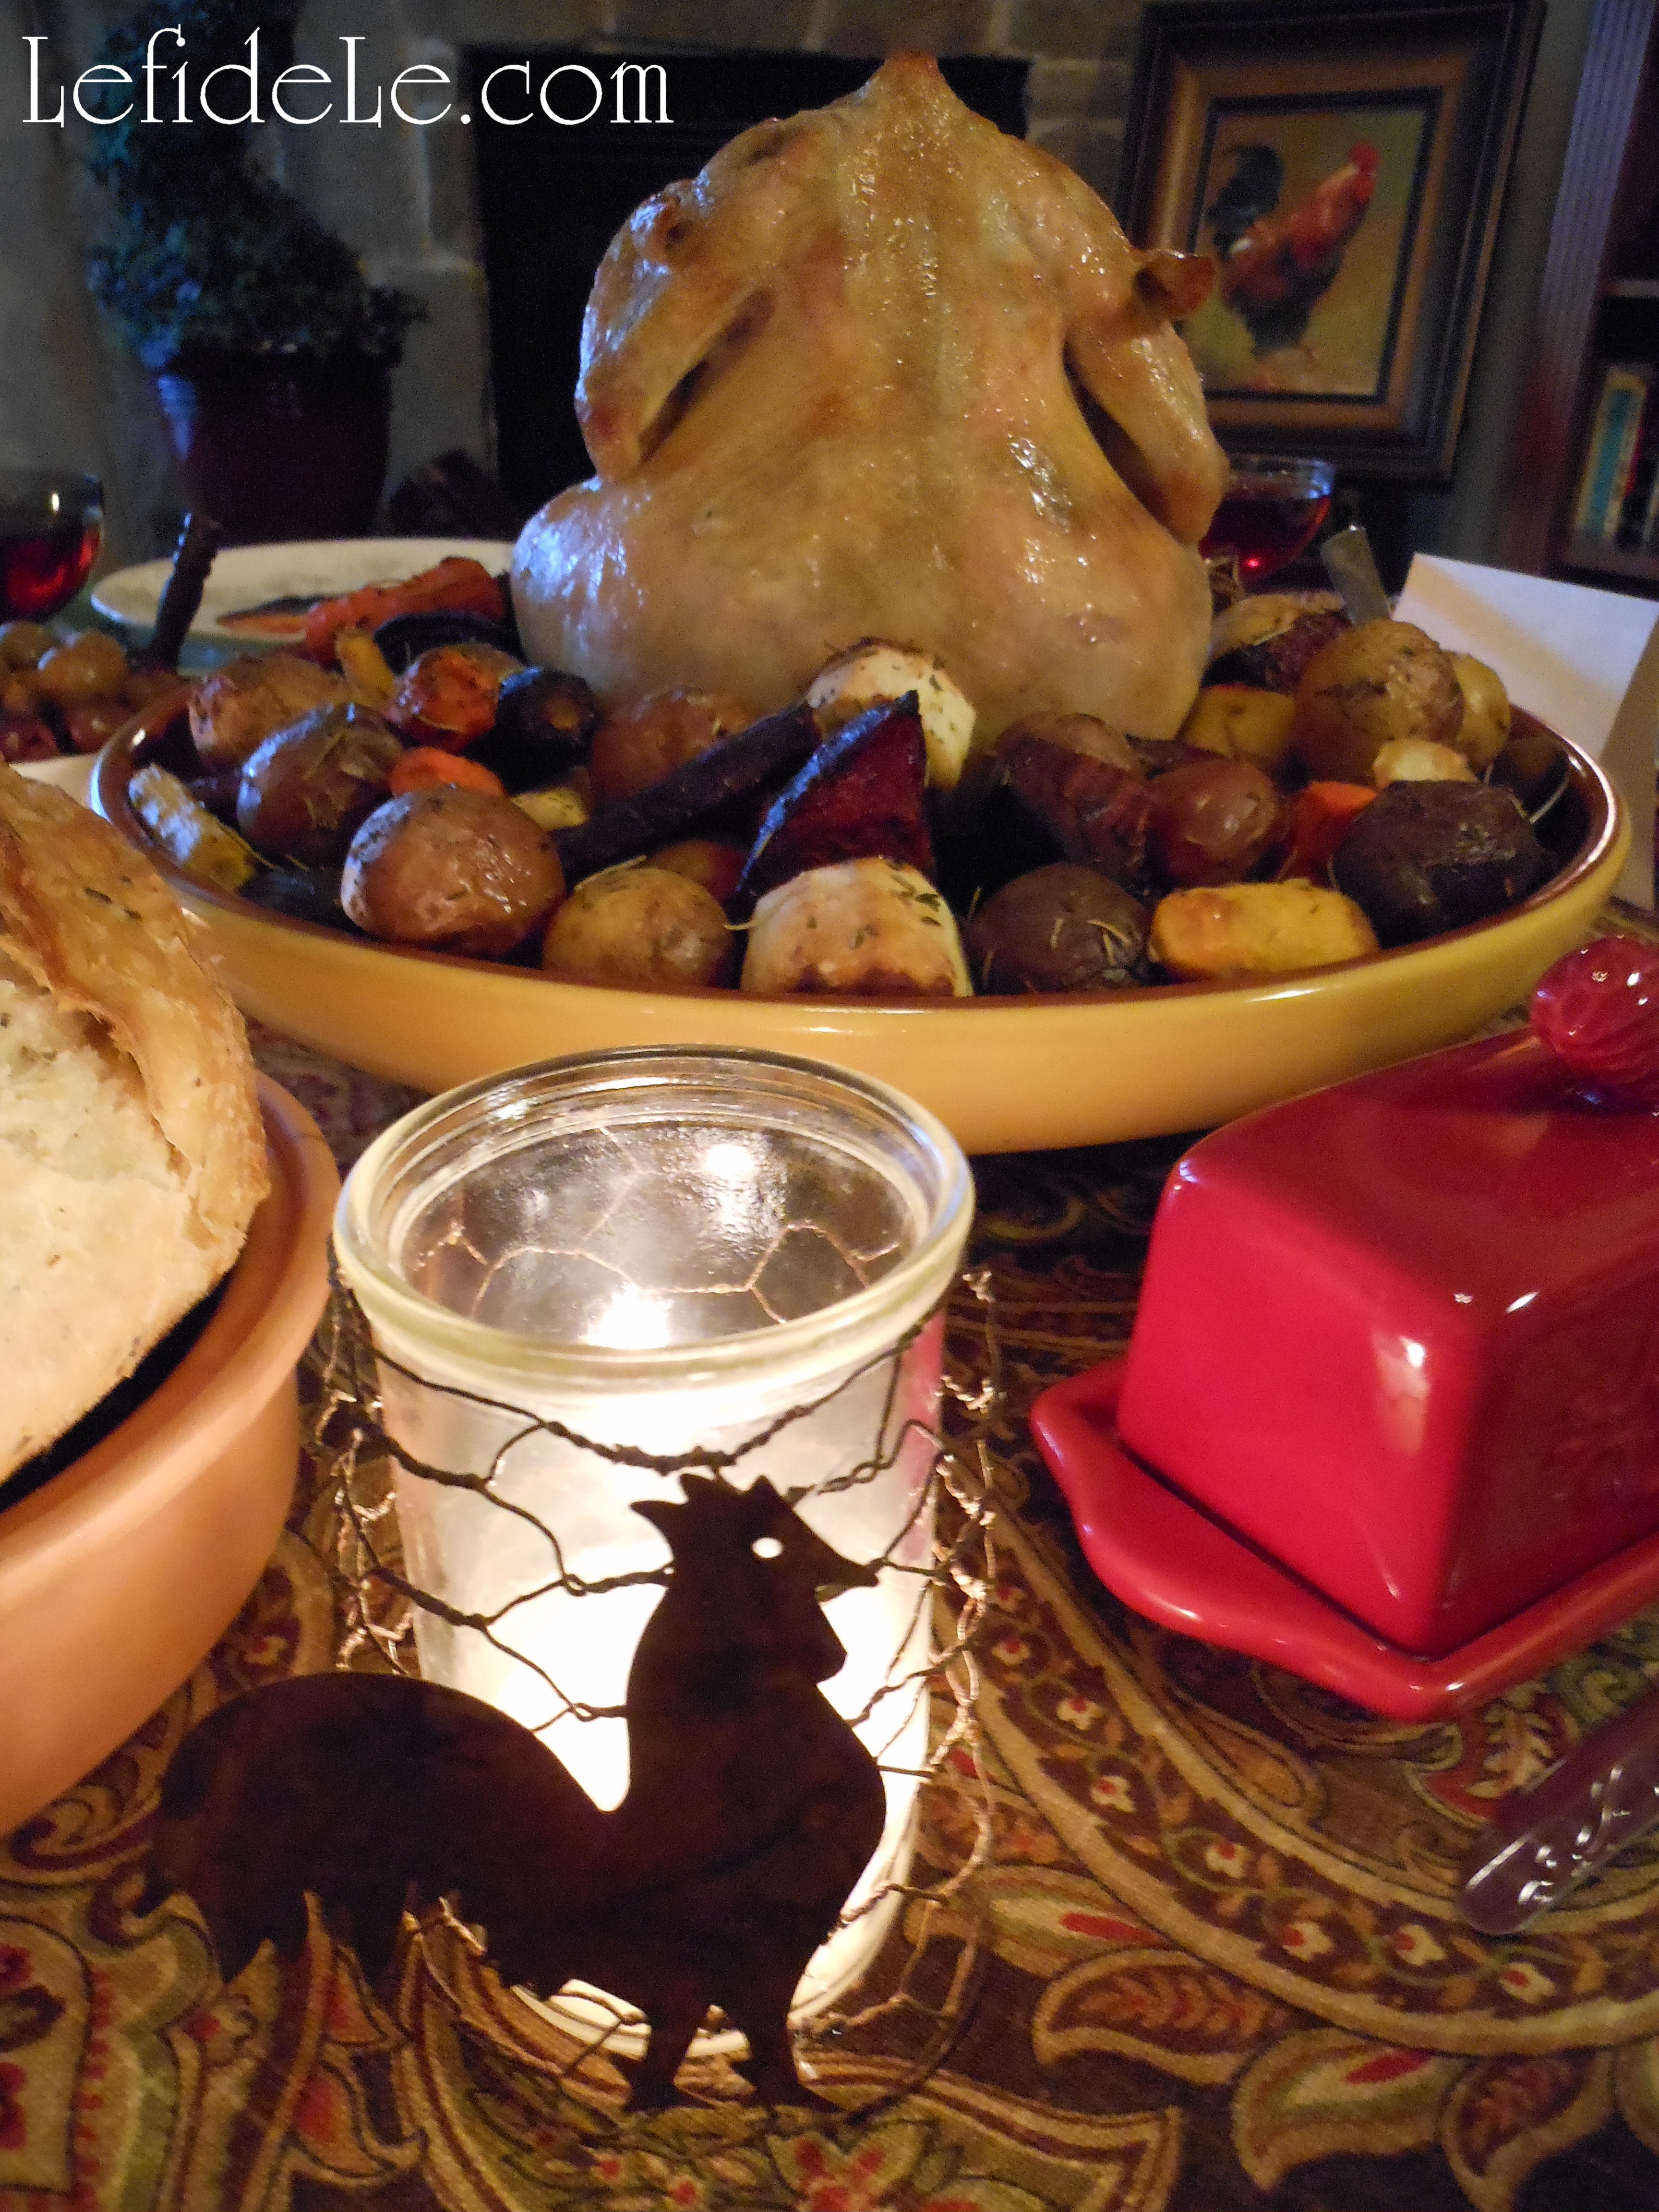
In the past, I’ve saved time by omitting the oil and placing the roots directly into the Cocorico. When it finished cooking, I would sprinkle fresh herbs and orange juice over the top, stirring it right in the roaster. Whichever way you chose to prepare it, with whatever vegetables, with either chicken or turkey, and legs cooked up or down… Cocorico roasters make it all turn out so beautifully! (See this for yourself at the link: Last Minute Cocorico Rooster Theme Dinner Party Décor Ideas.) So think about getting one for yourself, and leave the “beer-can chicken” to the tailgaters! 🙂

157Leigh

Faithfully Yours,

Leigh

Quick & Easy Informal Gathering Fondue Dessert Party Idea

One may easily spend the fall and winter bouncing from one holiday into the next, and often those celebrations are hosted at someone else’s abode. Why not extend thanks by inviting those friends and family to a small gathering that doesn’t involve candy, pumpkins, or trees. This easy fondue theme can be quickly pulled together the evening before. See my accompanying Quick & Easy Chocolate Coconut Fondue Recipe here. It takes about 5 minutes to prepare just before everyone arrives. It is vegan, gluten-free, and dairy-free so no one has to be left out. (Just be sure to buy or prepare gluten and dairy-free items to dip also.) An informal dessert party can accommodate a larger number of people without adding more work, which is great not only during the busy holidays but at any time of year.

230Leigh

I chose the warm and inviting colors of purple and green in order to distance my theme from those traditionally used for the holidays. They were a lovely contrast to the ivory dishware and dark brown of the chocolate and leather. Color accents were seen in the throw pillows, trays, glassware, dishes, and even the foliage. It extended to the cloth napkins that were set on the coffee table and lazy-Susan. Adding the rotating tier not only eased food accessibility, but also created separation between the serving and eating areas which was visually more appealing.

200Leigh

Seated on an end table was a painted tray that contained a basket of coordinating napkins in wood beaded rings, a glass holding fondue skewers, and Portmeirion Pomona plates.

251Leigh

I only used the plates with the pear and fig motif because they matched so perfectly, but even pretty paper plates would be fine for such an informal gathering.

208Leigh

Another table held a larger tray with purple bubble glasses and a matching pitcher seated on a wooden riser. An ice bucket was placed on a taller stand behind that. A cloth napkin was draped to preemptively contain any spills. Preserved lavender sat in a painted pot to soften the visual edges.

231Fondue-Leigh

All of the furniture was rotated, for the evening, in order to accommodate an easy flow. An ottoman and a ceramic stool added seating to the arrangement, without blocking pathways. Pillows in coordinating colors were pulled from other rooms, to temper the masses of brown leather. For a smaller group, one could even pull furniture from the room, and just use stacked floor cushions around a coffee table.

192Leigh

Even the rock fireplace was included as a focal point with the addition of candles on green glass. These were placed at varying levels by means of a trunk and upturned basket. Statuary, a birdcage, and small trees added height and interest. Why not switch accessories for a night?

205Leigh

The serving pieces are actually comprised of two different sets of dishware. The center group is a small fondue set placed on a wooden stand for height. The ring of dishes surrounding that was actually meant to coordinate with a plain bowl for hors d’oeuvres, but worked beautifully to present a larger volume of food. Round bowls would also have been lovely surrounding the chocolate center.

204Leigh

Whether you choose to serve on paper plates or fine china, change up your décor or leave it all the same, bake your sweet treats or buy them at the store… your guests will be treated to a relaxing evening filled with delightful confections and camaraderie.

86Fondue-Leigh

Faithfully Yours,

Leigh

Quick & Easy Chocolate Coconut Fondue Recipe (Vegan, Gluten-Free, Dairy-Free)

This super easy yet delectable fondue recipe takes about 5 minutes to prepare from ingredients you probably already have in your pantry. It can be made last minute just before your guests arrive. It is vegan, gluten-free, and dairy-free so no one has to be left out. (Just be sure to buy or prepare gluten and dairy-free items to dip also.) It’s so quick and tasty that it’s great for a family movie night, and you can make it as healthy or sinful as you like with your choice of foods to dip into it. You might even want to make some just for yourself. The coconut is great for your skin, so it’s less guilt rousing than breaking into that stash of Rocky Road!


Ingredients:

~ 12 oz bag vegan semi-sweet chocolate chips (vegan = no milk fat added, but you can use whatever kind of chocolate chips you have on hand)

~ 2/3 cup coconut cream (from 1 can coconut milk, preferably organic)


Instructions:

There are a variety of chocolate chips to choose from, but the healthiest are the vegan varieties because they omit milk and butter fat (artery clogging and potential allergens). They are just as yummy… seriously. Many well-known companies add cheap sweeteners like corn syrup and milk fat solids to trick your taste buds into believing you’re getting more chocolate than you actually are. But chocolate ingredient labels may be used like “decoder rings” to tell you in advance just how authentic the product really is. Personally, I want to pay for real sugar and real chocolate, and not worry about anyone’s allergies.

72Leigh

Use your favorite brand of canned coconut milk to obtain the cream needed. Some recipes will advise you to refrigerate a can overnight, in order to separate the cream solids, but I’ve found that unnecessary unless you’ve stored it in a hot garage or had it in the trunk of your car. I just open it straight from the pantry and spoon out the thick part, leaving the liquid behind. For this recipe, don’t worry about strict amounts. Adding some liquid or using a few less chips won’t harm the taste (which is good because who can’t help “sampling” the chips before cooking).

75Leigh

Using coconut milk means not needing to bother with a double-boiler. Just use a ceramic or nonstick green pot because it helps dramatically with clean-up. Simply spoon in the coconut cream and stir constantly over low heat. It will liquefy when warmed.

77Leigh

Now add the chocolate, a little at a time, until it has melted down. Keep stirring to the bottom of the pot. It will thicken as all the chips are completely melted and mixed in.

78Leigh

Pour into the bowl of your fondue set. It will stay a thick warm dip so long as you keep a tea-light candle lit under it.

83Leigh

You may use any fruit or baked good you like, but please note that gluten-free is an all or nothing situation. Any glutinous crumbs left in the chocolate will contaminate it for any guests with celiac or wheat allergies. If you’d like to have both types of foods, you would need to separate a small bowl of fondue to keep it safely wheat-free. Although it’s become unfortunately popular to chide those going gluten-free, many are doing so without a choice. Serious health concerns must trump jokes made by uneducated individuals. Taking a little time in order to preserve the safety of a guest is a gracious blessing to anyone with allergies, and that concern is worth far more than any store bought gift.

84Leigh

Fruits such as sliced bananas, grapes, cherries, and strawberries are magnificent when dipped in chocolate and are a great alternative to the higher calorie baked goods. It’s an extra treat to include toasted coconut and chopped nuts to spoon onto the chocolate coated confections. (Just remember to ask your guests about tree nut allergies ahead of time.)

86Fondue-Leigh

Most grocery stores have a gluten-free section, so it’s easy to include allergy free cookies that are ready-made. You can see two yummy varieties from “Enjoy-Life” pictured here. The brownies were quickly made from a gluten-free mix using shelf-stable “Ener-G Egg-Replacer” (1 egg = 1.5 teaspoons + 2 tablespoons warm water). Aside from being allergy friendly, the best thing about having replacer on hand is not running out of eggs, wondering if they’ve gone bad, or having to clean up potential salmonella germs. There are also many brands of gluten-free cake mix that may be baked successfully with egg-replacer. Just mix it, bake it, and cut it into dippable cubes. Or easier still… ask the bakery what they have available. Bon appétit!

205Leigh

See more from my Quick & Easy Informal Gathering Fondue Dessert Party Idea here!

Faithfully Yours,

Leigh

Quick & Easy “Shortcut” Cauliflower Mashed Potatoes Recipe (Heart-Healthy & Dairy-Free)

Just about everyone likes mashed potatoes, but not everyone can enjoy eating them guilt-free. And who has time to gather and prepare all the ingredients then boil and mash the potatoes into smooth perfection? This super quick and easy recipe uses mostly shelf-stable pantry items, so it can be made last minute. It takes into account allergies and other health concerns by omitting all the saturated fats from dairy… which will satisfy the gluten-free vegans as well. Calories are also cut dramatically by adding cauliflower. This recipe for “Short-Cut Cauli-Potatoes” even fooled my Grandmother into eating her veggies. She’s enjoyed eating her way to losing about 70 pounds!


Ingredients:
  • 1 head cauliflower
  • 2 cups water
  • 1 tablespoon dehydrated chopped onion (= shortcut)
  • ¼ teaspoon garlic powder (= shortcut)
  • 1 tablespoon dried parsley (+ more for garnish = shortcut)
  • 1 teaspoon salt (adjust for taste or health needs)
  • 1 tablespoon extra-virgin olive oil (heart healthy)
  • 1 cup Potato Buds (secret ingredient shortcut = dehydrated potatoes in a box)

 Instructions:

Separate the cauliflower head into small sections and wash well. Place in a pot with 2 cups of water. (This amount is important because we do not drain it, which also helps retain the vitamins.) Add the onion as well.

1Leigh

Place covered over medium heat for about 15 minutes (or until cauliflower is soft and tender).

3Leigh

Use an immersion blender to “soupify” the veggies. Mix in the potato buds a little at a time, until thoroughly blended. Add the rest of your spices and olive oil.

8CauliPotatoes-Leigh

Place in a pretty covered dish and garnish with more parsley. No one had ever guessed they’re made from dehydrated potatoes, but I guess my secret shortcut is out now! Just don’t tell Grandma 🙂 Bon appétit!

197Leigh

Pictured is another great recipe for Fall, my Quinoa Pilaf Stuffed Patty Pan “Mini” Squash Recipe (Healthy, Gluten-Free & Dairy Free) 🙂

And see more of my Fall Leaves & Pumpkins Themed Thanksgiving Tablescape Décor Ideas here.

Faithfully Yours,

Leigh


DIY Easy Last Minute Halloween Ornament Décor Remade From Scraps Craft

Is your spooky Halloween tree décor looking a tad too bare, and your budget’s already blown on candy and costumes? Then do what I did and use ribbon scraps, felt stickers, plastic rings, $1 felt garland, cupcake picks, and felt from a card found around the house to craft cute ornaments! So easy that it can be done last minute, and it makes an interesting artistic scavenger hunt for the kiddos… “Find as many things as you can, in 10 minutes, to turn into ornaments.”

109Leigh

Take a dollar bin felt garland, and cut the ribbon joining the shapes into sections. Tie a knot to form a hanging loop. You can stop there, or add bows made from glittery ribbon (also from the dollar bin) or from leftover pieces from your other crafts. Cut the ring part off the plastic spiders (that outnumber those treat bags).

0112Leigh

Hot glue those elements, at various angles, onto your new one-of-a-kind ornaments.

0117Leigh

Remove felt decorations (in this case a house shape) from cards. Cut the spikes off of leftover plastic cupcake picks. Pull the sticks out of floral arrangement decorations (the pumpkin people in the picture). Cut lengths of ribbon or tinsel twine to serve as hanging loops. These don’t stick into tiny fingers like hooks would, and they pack better too!

206Leigh

Hot glue the ends of the ribbons to the back of the shapes to make loops. Glue any decorations to the front sides. Then take fabric or ribbon (or in this case the thick orange paper that came with a floral arrangement) and glue the ornaments onto it. (The stickers will obviously just stick to it.)This makes for a prettier back that hides the hanging loop ends.

207Leigh

Hang your newly crafted ornaments as proof positive that cute doesn’t have to mean expensive or time intensive!

75Leigh

Happy Halloween!

Faithfully Yours,

Leigh

DIY Easy Last Minute Halloween Décor Kid Friendly Foam Shape Crafts

This project began with the question, “What on earth do I do with that sack of foam shapes that didn’t get used up in that last project?” My answer was to make holiday signs, spooky garlands, not-so-scary ornaments, favor necklaces, and puppet favor / food picks! So without further ado, here are some quick and easy kid friendly craft ideas that are great for last minute fill-ins for your décor this Halloween.

112Leigh

Glue colored twine in between two foam shapes to make any length garland you chose. Adults can use hot glue and a ruler as a distance guide. Kiddos can use foam glue and make it as crazy as they like!

297Leigh

Drape it along a spooky Halloween tree, or loop the ends and hang them on the wall with tacks.

291Leigh

Using the same technique, make favor necklaces for the little ones. Wrap them around mini felt witch hats for party hat dress up that doubles as décor. A barrette turns them into a grown-up witchy fascinator.

113Leigh

Glue the shapes back to back with a new popsicle sticks in-between.

79Leigh

Stick those little puppet favors into candy stashes for an extra dose of Halloween fun.

327Leigh

Some shapes can double as letters for a thrifty but cute holiday sign.

115Leigh

A block of wood or small canvas backed with a ghost cut-out, may be topped with eyehooks for a wire handle.

117Leigh

Glue on small letters plus pumpkins for O’s, armed ghosts for T’s and K’s (when an arm is cut and added as the kick in the K). Bats can just swarm the whole project!

118Leigh

A coat of glitter paint (or glue) unifies the whole project, making the foam indistinguishable from other materials. The whole thing can actually dry on the wall (so long as wee fingers are out of reach).

121Leigh

Thread an intentionally random mix of seed beads to a thick wire handle, and twist securely into a hole or eyehook.

56Leigh

Voila, super-cute… super-cheap… super-fun!

253Leigh

Happy Halloween!

Faithfully yours,

Leigh